
Introduction
Delightful, no-bake treats are a staple for anyone looking for quick and easy desserts. Peanut Butter Rice Krispies Bliss Balls are a perfect example of a simple yet mouth-watering snack that is ideal for both kids and adults. With just a handful of ingredients, these bliss balls provide a rich combination of peanut butter and honey paired with the delightful crunch of Rice Krispies—making them not only tasty but also convenient to prepare.
These bliss balls can be enjoyed as a sweet snack, an after-school treat, or even as a dessert following a hearty meal. Additionally, they make for an excellent addition to lunchboxes or healthy eating plans, as they are easy to store and transport. Their chewy texture, combined with the smoothness of peanut butter and the sweetness of honey, makes every bite a small delight worth savoring.
Whether you choose to indulge in them right after they’ve chilled in the refrigerator or save them for later, these bliss balls are not only satisfying but also versatile. They can be whipped up in no time, making them a go-to recipe for unexpected guests or when you’re in need of a quick dessert fix.
Recipe Overview
– Total Time: 45 minutes
– Prep Time: 15 minutes
– Yield: About 20 bliss balls
– Difficulty: Not specified in the recipe
Ingredients
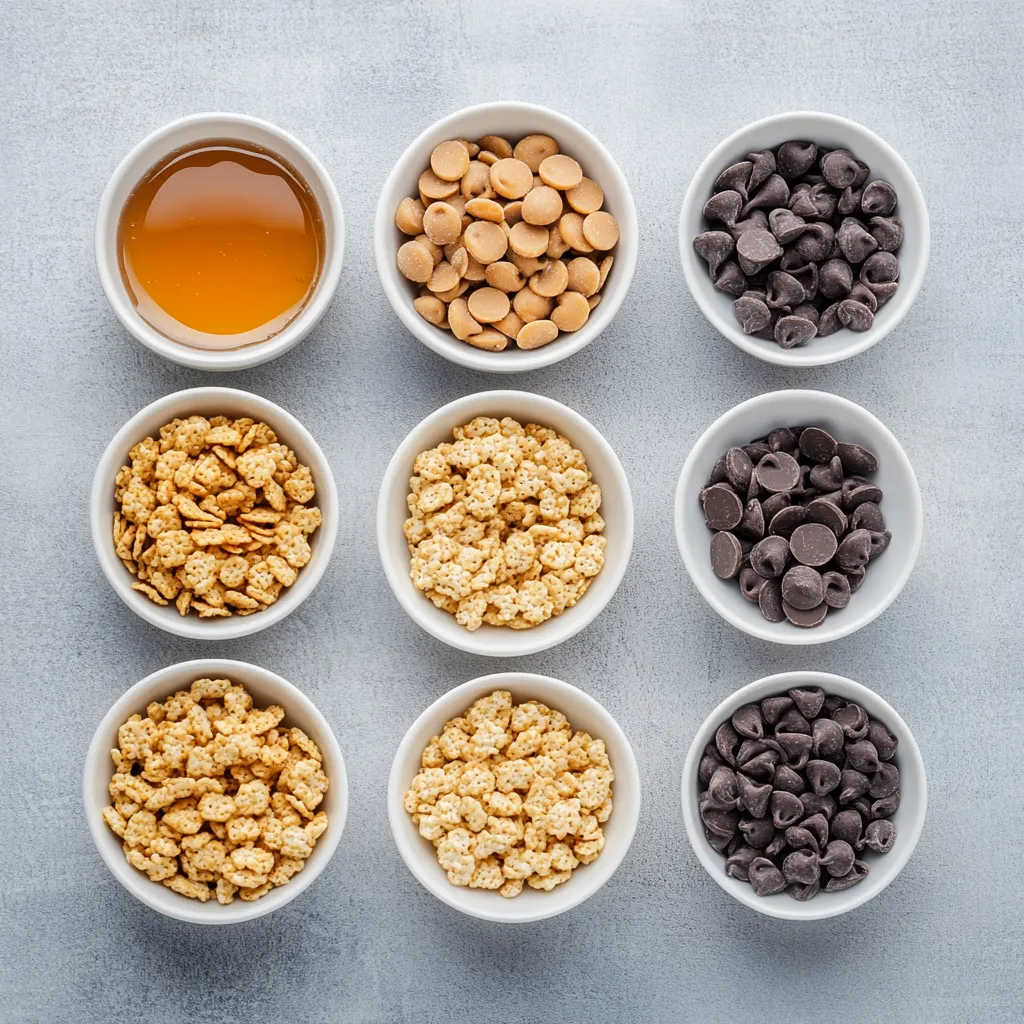
– 1 cup creamy peanut butter
– 1 cup honey
– 3 cups Rice Krispies cereal
– 1 cup chocolate chips (optional for melting and drizzling)
Instructions
1. In a medium mixing bowl, combine the creamy peanut butter and honey. Mix thoroughly until the mixture is smooth and well incorporated.
2. Gradually fold in the Rice Krispies cereal, ensuring each piece is coated with the peanut butter and honey mixture. Take care to keep the cereal crisp and avoid crushing it.
3. Once all the ingredients are combined, lightly grease your hands and scoop out portions of the mixture to form small balls, approximately 1 inch in diameter. Place each ball onto a baking sheet lined with parchment paper.
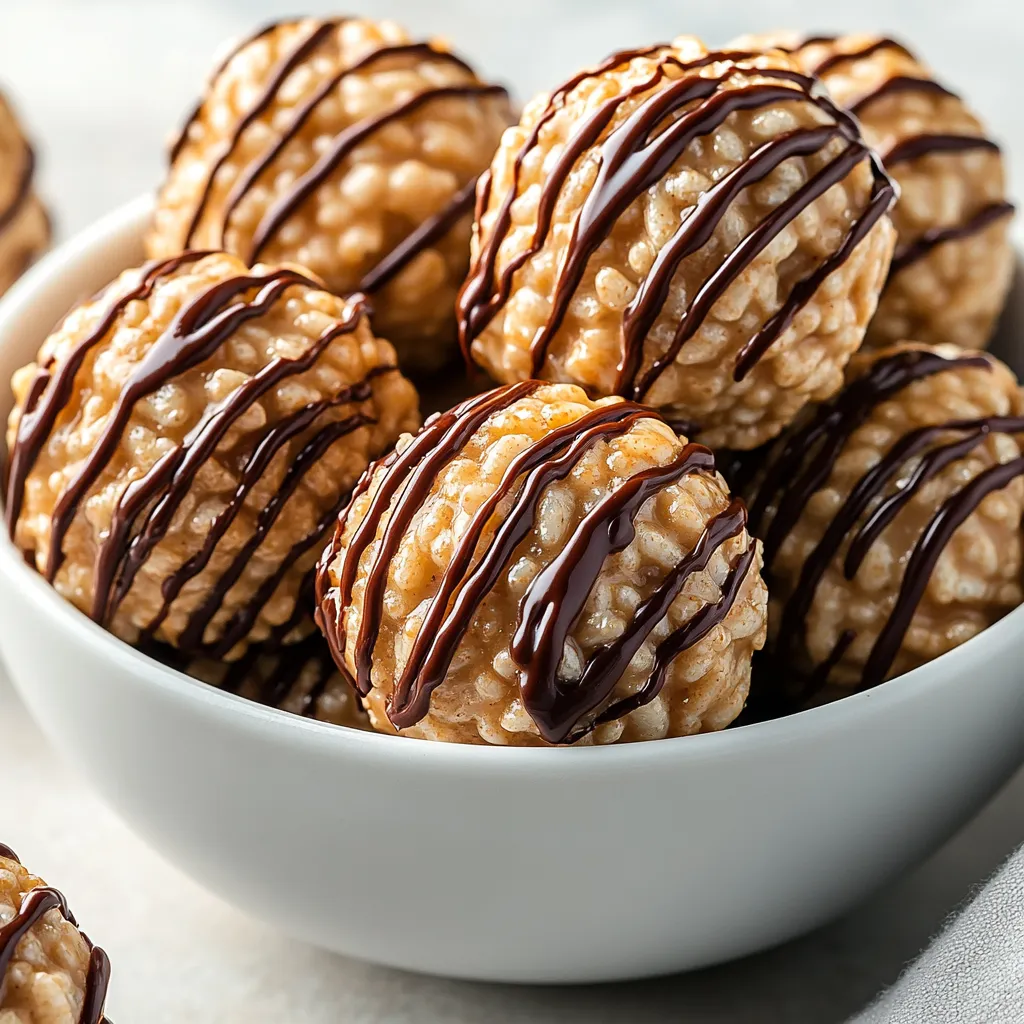
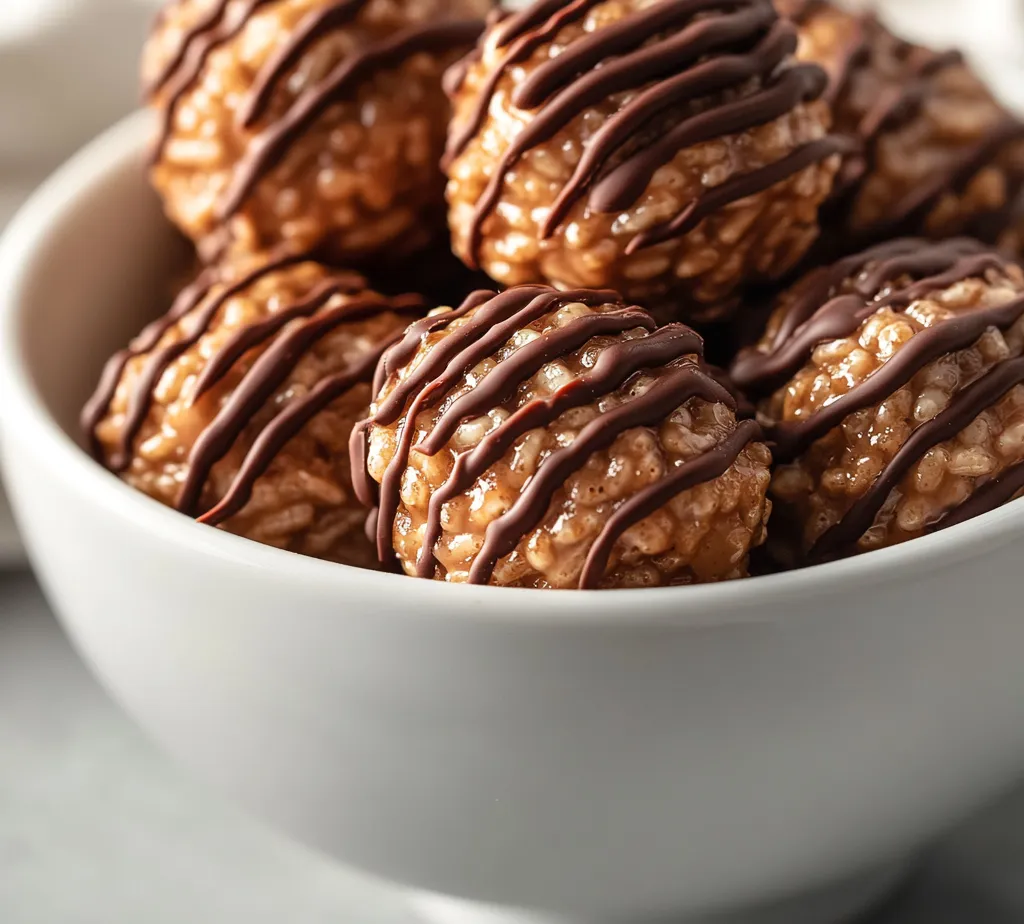
4. If you choose to use chocolate, melt the chocolate chips in a microwave-safe bowl. Heat in 30-second intervals, stirring after each interval until the chocolate is completely smooth. Drizzle the melted chocolate over the bliss balls or dip them halfway for a delightful coating.
5. Place the baking sheet in the refrigerator for about 30 minutes to allow the bliss balls to firm up. Once chilled, they are ready to be enjoyed as your delightful no-bake treats!
Preparation Overview
Short and Simple Prep Steps
The preparation of Peanut Butter Rice Krispies Bliss Balls is straightforward and can be broken down into a few easy tasks. Start by combining peanut butter and honey, as these form the base of your bliss balls. After achieving a smooth mixture, gently incorporate the Rice Krispies to preserve their delightful crunch. Next, form the mixture into small balls and arrange them on a lined baking sheet. If you wish, you can further enhance these bliss balls with a drizzle or dip of melted chocolate. Lastly, chill the formed balls in the refrigerator to set before enjoying them.
Tips for Efficient Preparation
To make your preparation process smooth and hassle-free, gather all ingredients before you begin. Utilize a large mixing bowl to ensure you have ample space when combining your ingredients. When melting the chocolate, watch it closely as you adjust the timing for perfect results, avoiding any chance of overheating and seizing it.
Combining Peanut Butter and Honey
Best Practices for Mixing
Properly blending peanut butter with honey is crucial for the ideal texture of your bliss balls. Using a medium mixing bowl gives you enough room to mix without splashing, allowing for a smoother integration of the two ingredients. It’s important to mix thoroughly until the mixture is even and creamy, ensuring that every bliss ball will be deliciously uniform.
Achieving the Right Consistency
Aim for a smooth, homogenous mixture that isn’t too runny but will blend well with the cereals. The desired result is a cohesive blend that will allow the Rice Krispies to adhere properly, creating a wonderful texture in the final treat. Pay attention to the consistency as this will influence the ease with which you can form the bliss balls in the next steps.
Incorporating Rice Krispies
Folding Technique
When adding Rice Krispies, utilize a gentle folding motion instead of stirring vigorously. This technique helps to maintain the cereal’s crispness while ensuring that it is evenly coated with the peanut butter-honey mix. It’s important to be patient during this stage; rushing can lead to a crushed texture that deviates from the desired bliss ball experience.
Avoiding Cereal Crush
To preserve the essential crunch that makes these bliss balls so delightful, avoid overmixing. Too much agitation will lead to crushed Rice Krispies, which can impact the overall texture of your treats. Aim for light and gentle movements when combining the ingredients to ensure the integrity of each piece of cereal remains intact.
Forming the Bliss Balls
Portioning the Mixture
After incorporating the Rice Krispies, it’s time to form your bliss balls. Lightly greasing your hands with a small amount of oil makes this process much easier, preventing the mixture from sticking to your fingers. Take small portions, approximately the size of a tablespoon, and roll them between your palms to create uniform balls.
Proper Size for Bliss Balls
While this recipe suggests forming balls around 1 inch in diameter, you have the flexibility to adjust the size according to your preference. Smaller bliss balls can be bite-sized, while larger ones can serve as more substantial snacks. Regardless of the size, be sure to maintain consistency to ensure even chilling and coating during the next steps.
This brings us to the delightful final phases of creating your Peanut Butter Rice Krispies Bliss Balls. The combination of rich peanut butter, sweet honey, and crunchy cereal creates a satisfying snack that resonates with both the young and the young at heart.
Preparing for Refrigeration
Importance of Chilling
Chilling the Peanut Butter Rice Krispies Bliss Balls after shaping them is not just a formality; it is a crucial step in the process. This allows the mixture to set properly, ensuring that the bliss balls have a firmer texture that holds their shape when served or stored. The interplay of the creamy peanut butter and honey with the rice cereal establishes a binding effect that solidifies when cooled.
Optimal Refrigeration Time
The recommended chilling time for these bliss balls is about 30 minutes in the refrigerator. This is sufficient for the balls to firm up without losing their delightful chewiness. It is important to ensure that they are spaced adequately on the baking sheet, allowing for air circulation around each ball, which aids in the chilling process and ensures even firmness.
Optional Chocolate Coating
Melting Chocolate Chips
If you decide to incorporate the optional chocolate coating, precise melting technique is key to achieving a smooth, glossy finish. Using a microwave-safe bowl, the chocolate chips should be melted in 30-second increments. After each interval, stir the chocolate thoroughly; this distributes the heat evenly and helps prevent overheating, which can lead to a grainy texture. Aim for a silky consistency that can coat or drizzle beautifully over the bliss balls.
Techniques for Drizzling or Dipping
There are two primary techniques for adding the chocolate coating to your bliss balls. If you choose to drizzle, fill a small piping bag or a plastic bag with the melted chocolate and snip a tiny corner to control the flow. This method creates a decorative lattice on top of each ball. Alternatively, for a more indulgent option, dip the bliss balls halfway into the melted chocolate, allowing any excess to drip off before placing them back on the parchment paper to set. Both methods add a delightful chocolatey touch that balances perfectly with the peanut butter and honey.
Decorative Serving Suggestions
Presenting Bliss Balls
Once the bliss balls are chilled and optionally coated in chocolate, presentation is key for any gathering. Use a decorative plate to arrange the bliss balls in an appealing manner. Consider a circular layout or even stacking them for a more dynamic display. The visual aspect enhances the overall experience, making these treats enticing for both the eyes and the palate.
Additional Flair
For added visual and textural appeal, consider sprinkling crushed nuts or coconut flakes around the bliss balls on the serving plate. Not only does this enhance the presentation, but it also introduces extra crunch and flavor that complements the existing ingredients. This could be a mix of chopped peanuts, almonds, or even crushed freeze-dried fruit, catering to both aesthetics and taste.
Nutritional Considerations
Healthy Snack Option
Peanut Butter Rice Krispies Bliss Balls make for a nutritious snack option, as they are packed with protein and healthy fats from the creamy peanut butter. The honey provides a natural source of sweetness without the need for refined sugars. Each ball contains wholesome ingredients that contribute to energy levels, making these treats suitable for various dietary needs, particularly for those looking for a quick yet healthy pick-me-up.
Adjusting Ingredients
If you are health-conscious or would like to make slight adjustments, consider substituting honey with natural sweeteners like maple syrup or agave nectar. Similarly, if you are looking for a lesser calorie option, using a light honey or a stevia-based syrup could work while still achieving that sweet flavor. However, be mindful that such alterations may slightly affect the final texture or taste, so a bit of experimentation may be necessary.
Serving Size and Storage
How Many Bliss Balls Per Serving
This recipe yields about 20 bliss balls, making it an excellent choice for sharing at parties, potlucks, or family gatherings. Depending on individual preferences, a suitable serving size may be 2 to 3 bliss balls per person, especially when served alongside other snacks or desserts.
Storage Tips
To maintain freshness and prolong shelf life, store any leftover bliss balls in an airtight container in the refrigerator. They can typically last for up to one week when stored properly. Make sure to allow some space between the bliss balls to prevent them from sticking together. If longer storage is needed, consider freezing the bliss balls. Line them on a baking sheet to freeze individually, then transfer to a freezer-safe container or bag. This way, you can have delightful snacks on hand for a quick treat.
Variations and Customizations
Flavor Modifications
For those eager to explore different flavor profiles, there are plenty of opportunities for customization. Substituting the creamy peanut butter with other nut or seed butters, such as almond or sunflower seed butter, allows you to experiment with new tastes while maintaining similar textures. Additionally, varying the type of sweetener — using coconut sugar or honey — can lead to interesting flavor nuances.
ins and Toppings
Creativity can flourish when considering mix-ins and toppings. Incorporating dried fruit, such as cranberries, raisins, or chopped dates, increases the nutritional value and adds bursts of flavor. You might also consider adding seeds like chia or flaxseeds for added crunch and health benefits. Another great topping idea is sprinkling sea salt atop the chocolate coating, enhancing the flavor experience with a sweet and salty balance.
Conclusion
Peanut Butter Rice Krispies Bliss Balls are a satisfying no-bake treat characterized by a delightful combination of creamy peanut butter, sweetness from honey, and the crunch from Rice Krispies. With a preparation time of just 45 minutes, these bliss balls not only provide excellent taste and texture but also offer flexibility with various serving options and modifications. Their easy storage and nutritional benefits make them a convenient choice for any time of day.

Peanut Butter Rice Krispies Bliss Balls Recipe
Ingredients
- 1 cup creamy peanut butter
- 1 cup honey
- 3 cups Rice Krispies cereal
- 1 cup chocolate chips
Instructions
- In a medium mixing bowl, combine the creamy peanut butter and honey. Mix thoroughly until smooth.
- Gradually fold in the Rice Krispies cereal, ensuring each piece is coated without crushing it.
- Lightly grease your hands and scoop out portions to form small balls, about 1 inch in diameter.
- Place each ball onto a baking sheet lined with parchment paper.
- If using chocolate, melt the chocolate chips in a microwave-safe bowl in 30-second intervals, stirring until smooth.
- Drizzle the melted chocolate over the bliss balls or dip them halfway for a coating.
- Refrigerate the baking sheet for about 30 minutes to firm up the bliss balls.
- Once chilled, enjoy your delightful no-bake treats!