

Introduction
Kitchen Sink Cookies are a delightful treat that embodies the spirit of creativity in baking. These cookies are famously known for their myriad of ingredients, which can include anything from chocolate chips to various nuts and dried fruits. The name “kitchen sink” comes from the idea that you can throw in whatever you have on hand, making them a versatile and resourceful choice for home bakers. The balance of sweet and salty flavors enhances the cookie-dough experience, making every bite an indulgent treat. These cookies are perfect for any occasion—from family gatherings to casual weeknight desserts. They are particularly beloved during holidays and festive seasons when baking is at its peak.
The history of Kitchen Sink Cookies in American cuisine stems from a “throw everything in” mentality that many home cooks embraced. They offer a unique way to explore flavor combinations and use up leftover ingredients. Whether you prefer walnuts or pecans, dark chocolate chips or white chocolate, the beauty of these cookies is in their flexibility. They’re often enjoyed warm, straight from the oven, with a comforting glass of milk, providing a sense of nostalgia and warmth that resonates with many.
Quality ingredients play a crucial role in this recipe, impacting not only the taste but also the texture of the cookies. Each element, from the type of sugar used to the nuts and dried fruits, contributes to the final product’s flavor and consistency. By selecting high-quality ingredients, you can elevate the experience from merely enjoyable to utterly irresistible.
Recipe Overview
– Prep Time: 15 minutes
– Cook Time: 12 minutes
– Total Time: 27 minutes
– Course: Dessert
– Cuisine: American
– Servings: Makes approximately 24 cookies
– Calories: About 150 per cookie
These Kitchen Sink Cookies have a wonderful flavor profile that combines the sweetness of chocolate chips with the chewy texture of dried cranberries and the crunch of nuts. The unsweetened shredded coconut adds a unique tropical flair that sets them apart from traditional cookie recipes. Together, these ingredients create a treat that’s rich, chewy, crunchy, and utterly satisfying, making them a favorite among cookie enthusiasts.
The versatility of these cookies is one of their key attributes. Not only can you mix and match the add-ins according to your pantry’s contents, but you can also adjust them based on personal taste preferences. Popular options like different kinds of nuts, chocolates, or even candies can transform the basic recipe into an entirely new experience each time. This adaptability keeps the excitement alive in the kitchen and invites bakers to experiment freely.
Homemade cookies have maintained their popularity in American households for generations, serving as nostalgic treats that bring families together. There’s something special about baking a batch of cookies at home, filling the space with warm, inviting aromas. Sharing these cookies with loved ones creates a bond over a simple pleasure that resonates far beyond the kitchen.
Ingredients
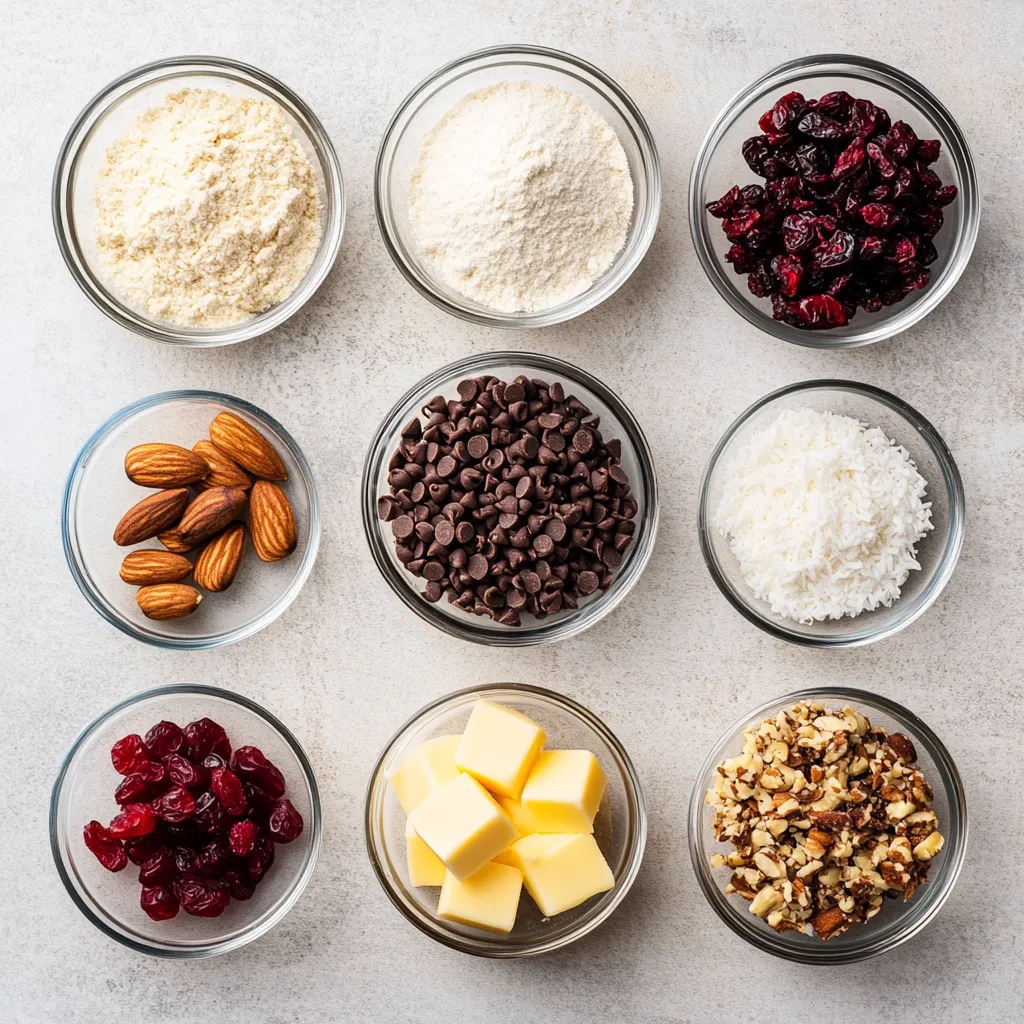
– 1 cup unsalted butter, softened to room temperature
– 1 cup packed brown sugar
– 1/2 cup granulated sugar
– 2 large eggs, at room temperature
– 1 teaspoon pure vanilla extract
– 2 1/2 cups all-purpose flour
– 1 teaspoon baking soda
– 1/2 teaspoon fine sea salt
– 1 cup semi-sweet chocolate chips
– 1/2 cup chopped nuts (choose between walnuts or pecans)
– 1/2 cup dried cranberries, roughly chopped
– 1/2 cup unsweetened shredded coconut
Breaking down the ingredients reveals their essential roles in creating the perfect Kitchen Sink Cookie. First and foremost is the unsalted butter, which is key in achieving a creamy texture and rich flavor. Make sure it’s softened—too hard, and it won’t incorporate well; too melted, and you risk the cookies spreading too much.
The combination of packed brown sugar and granulated sugar brings a unique sweetness and moisture to the cookies. Brown sugar, with its molasses content, lends depth of flavor and slight chewiness, while granulated sugar helps with the cookie’s crispness.
Two large eggs bind the ingredients, adding moisture and helping the cookies rise. The inclusion of pure vanilla extract enhances the overall flavor, adding warmth and depth to the cookie dough.
For the dry ingredients, all-purpose flour, baking soda, and fine sea salt are essential. The flour provides structure, baking soda helps the cookies spread and rise, and the salt enhances the flavors of sweet ingredients.
The mix-ins bring the “kitchen sink” element, with semi-sweet chocolate chips adding pockets of rich chocolate flavor. The optional chopped nuts, such as walnuts or pecans, offer a lovely crunch, while the dried cranberries provide a hint of tartness. Lastly, unsweetened shredded coconut introduces a delightful tropical note that ties the various components together.
Instructions
1. Begin by preheating your oven to 350°F (175°C). Prepare a baking sheet by lining it with parchment paper to prevent sticking.
2. In a large mixing bowl, combine the softened butter, brown sugar, and granulated sugar. Use a hand mixer or stand mixer to beat the mixture until it becomes light and fluffy, which should take about 3-4 minutes.
3. Add the eggs to the mixture one at a time, ensuring each is fully incorporated before adding the next. Then, mix in the vanilla extract until well combined.
4. In a separate medium bowl, whisk together the all-purpose flour, baking soda, and sea salt. This will ensure that your dry ingredients are evenly mixed and will help the cookies rise properly.
5. Gradually incorporate the dry mixture into the wet ingredients, stirring gently until just combined. Be careful not to overmix, as this can make the cookies tough.
6. Gently fold in the chocolate chips, chopped nuts, dried cranberries, and shredded coconut until they are evenly distributed throughout the dough.
7. Using a tablespoon or a cookie scoop, drop rounded balls of dough onto the prepared baking sheet. Make sure to leave about 2 inches of space between each ball to allow for spreading during baking.
8. Place the baking sheet in the preheated oven and bake for 10-12 minutes, or until the edges are golden brown and the centers appear set but still soft.
9. Once baked, remove the cookies from the oven and let them cool on the baking sheet for 5 minutes. Afterward, transfer them carefully to a wire rack to cool completely.
10. Serve your delightful kitchen sink cookies warm or at room temperature, and enjoy them with a refreshing glass of milk or your favorite beverage!
Insights on oven settings and temperatures for baking cookies
When it comes to baking cookies, the temperature at which you bake them can have a significant impact on their texture and flavor. For the Kitchen Sink Cookies Delight recipe, a preheating temperature of 350°F (175°C) is perfect to achieve that crispy exterior while maintaining a chewy center. This moderate heat allows the cookies to spread just enough to ensure they bake evenly without becoming too flat or overcooked.
Using an oven thermometer can be beneficial to avoid discrepancies in temperature. Home ovens may not always be accurate, resulting in cookies that are either underbaked or burnt. Furthermore, if you’re baking multiple trays of cookies at once, it’s advisable to rotate them halfway through the baking process. This adjustment helps to ensure that cookies in the back of the oven—often baking slower—receive equal heat as those in the front.
Timing crucial: indicators for perfect doneness
Timing is a key element in perfecting batches of cookies. In the specific case of Kitchen Sink Cookies, the recommended baking time is between 10 to 12 minutes. However, various indicators can help you determine if they are done. Look for edges that turn golden brown, while the centers remain slightly soft. They will firm up as they cool.
If you prefer a chewier cookie, you may want to err on the side of slightly underbaking them. Conversely, for a more crunchy texture, allow them to bake for the full 12 minutes. Personal preference plays a significant role in determining doneness—so keep your ideal texture in mind!
Cooling cookies: techniques for ensuring optimal texture
Cooling cookies properly is essential for developing the right texture. Once you’ve removed the cookies from the oven, allow them to sit on the baking sheet for about 5 minutes. This resting time enables the cookies to firm up, making it easier to transfer without breaking. Following this, using a wire rack can help allow air to circulate around the cookies and prevent them from getting soggy on the bottom.
Keep in mind that the cooling method also affects the final texture. If you want a softer cookie, you might want to cool them on a plate or in a container instead of letting them sit on a wire rack. This keeps the humidity levels higher around the cookies. On the other hand, if you want them crispy, the wire rack is the best choice.
Serving Suggestions
Ideal pairings: drinks and sides for serving with cookies
Kitchen Sink Cookies are versatile and pair wonderfully with various beverages. A classic choice would be a tall glass of cold milk, which acts as a perfect complement to the rich flavors of chocolate and sweet mix-ins. For those who prefer a warm drink, coffee or hot chocolate can be delightful options as well. Additionally, serving them alongside ice cream can transform these cookies into a scrumptious dessert sundae.
Presentation tips: creating an inviting display
Presentation can enhance the enjoyment of your cookies, turning them into an appealing centerpiece. Arrange them neatly on a decorative platter or tiered stand, showcasing the colorful mix of ingredients. Adding a sprinkle of extra chocolate chips or coconut flakes on top of the cookies can provide a beautiful finish. You might also consider garnishing the plate with fresh fruit like strawberries or raspberries to provide a contrast in color and freshness.
Creative serving ideas: different ways to enjoy these cookies
Kitchen Sink Cookies can be enjoyed in various creative ways beyond just eating them plain. Chop them up and sprinkle them over yogurt or oatmeal for a delightful breakfast twist. You can also layer them with whipped cream and fruit for an easy parfait. For a more decadent option, sandwich two cookies with your favorite ice cream flavor and roll the edges in chopped nuts or sprinkles for a fun treat suitable for celebrations.
Flavor Variations
Additional mix-ins for seasonal cookies: suggestions for variations
While the original Kitchen Sink Cookies recipe is delicious as is, it also opens the door to several flavor variations that can align with different seasons or celebrations. During fall, consider adding pumpkin spice or substituting dried cranberries with dried apples or pears to evoke cozy autumn flavors. In the summer, incorporating citrus zest, such as lemon or orange, can add a refreshing taste.
Exploring flavor profiles by changing nuts or dried fruits
Experimenting with different nuts or dried fruits is an effective way to create unique flavor combinations. Instead of using walnuts or pecans, try macadamia nuts for a buttery flavor. Similarly, swapping dried cranberries for chocolate-covered raisins or even dried cherries can elevate the overall taste profile. Each variation offers a different mouthfeel and complements the existing ingredients.
Combining spices for a unique twist (e.g., cinnamon or nutmeg)
Adding spices can enhance the flavor complexity of Kitchen Sink Cookies. For instance, a teaspoon of cinnamon can provide warmth and richness, perfect for cooler months. Alternatively, nutmeg can add a subtle earthiness. A pinch of sea salt can also enhance the sweetness, achieving a balanced profile. Experimenting with spices can put a creative spin on this classic treat.
Storage Tips
Best practices for storing cookies for maximum freshness
To maintain the freshness of your Kitchen Sink Cookies, store them in an airtight container at room temperature. They can typically last for up to a week without losing quality. Layering small sheets of parchment paper between each cookie can prevent them from sticking together. Ensure that the container is completely sealed to keep moisture out, which is crucial for maintaining that desirable chewy texture.
Freezing and thawing instructions for long-term storage
For extended storage, consider freezing your cookies. Place the cooled cookies in a single layer on a baking sheet and freeze them for 1 to 2 hours. Once frozen, transfer them to a zip-top freezer bag or an airtight container. Make sure to label the container with the date for tracking purposes. When ready to enjoy, simply thaw them at room temperature or reheat them briefly in the oven for a delightful warm treat.
How to maintain the texture of cookies when stored
To retain the ideal texture of your cookies, avoid refrigerating them, as cold temperatures can dry them out. Instead, keep them in a cool, dry place. If you notice them becoming a bit stale, consider placing a slice of bread in the container; the moisture from the bread can help restore some softness.
Troubleshooting Common Issues
Addressing common baking issues: flat cookies, dough spread
If your cookies turn out flat despite following the recipe, checking your butter’s temperature could be key. If the butter is too warm or melted when mixed with the sugars, it can cause the cookies to spread more than desired during baking. Ensure that you are using softened butter that still holds its shape.
Solutions for overbaking or underbaking
In cases where cookies appear overbaked, keep track of baking times closely and rely on visual cues as a guide. If cookies are consistently underbaked, reevaluate your oven temperature or consider investing in an oven thermometer to calibrate its heat accurately. Proper baking sheets can also influence results; be sure to use ones made of heavy-gauge steel, as they conduct heat evenly.
Tips for adjusting the recipe for high-altitude baking
Baking at high altitudes may require adjustments to your ingredient measurements. For every 1,000 feet above sea level, consider reducing the sugar slightly and increasing the flour to maintain the dough structure. This modification helps to counteract the effects of lower atmospheric pressure which can cause cookies to spread too much.
Nutritional Information
Detailed nutritional breakdown per cookie: calorie count and main ingredients
For those who are mindful of dietary choices, the Kitchen Sink Cookies contains about 150 calories per cookie. Key ingredients such as chocolate chips, nuts, and dried cranberries contribute not only to the flavor but also provide varying nutritional benefits, making these cookies a balanced indulgence.
Discussion on how to make the recipe healthier (e.g., sugar substitutes)
To make these cookies healthier, you can experiment with sugar substitutes such as coconut sugar, honey, or maple syrup which may offer lower glycemic impact. Additionally, using whole wheat flour in place of all-purpose flour can increase fiber content without compromising the flavor profile too drastically.
Nutritional benefits of certain add-ins (e.g., nuts, cranberries)
The addition of nuts to the cookies not only contributes flavor but also introduces healthy fats and protein. Dried cranberries are packed with antioxidants and can enhance heart health. Together, these ingredients make Kitchen Sink Cookies an enjoyable snack that can offer more than just sweetness.
Conclusion
Kitchen Sink Cookies offer a delightful combination of flavors and textures, making them a perfect treat for any occasion. With relatively quick preparation and baking time, these cookies can satisfy sweet cravings while allowing for endless customization. Enjoy them fresh from the oven or at room temperature for an irresistible snack.