
Introduction
Exploring the rich, comforting flavors of homestyle stuffing brings warmth to any meal, especially during celebratory occasions. This hearty stuffing recipe is packed with a medley of aromatic herbs, fresh vegetables, and the option for added components to enhance texture and taste. Perfectly crispy on the outside and tender on the inside, this dish is a bellwether of traditional family gatherings.
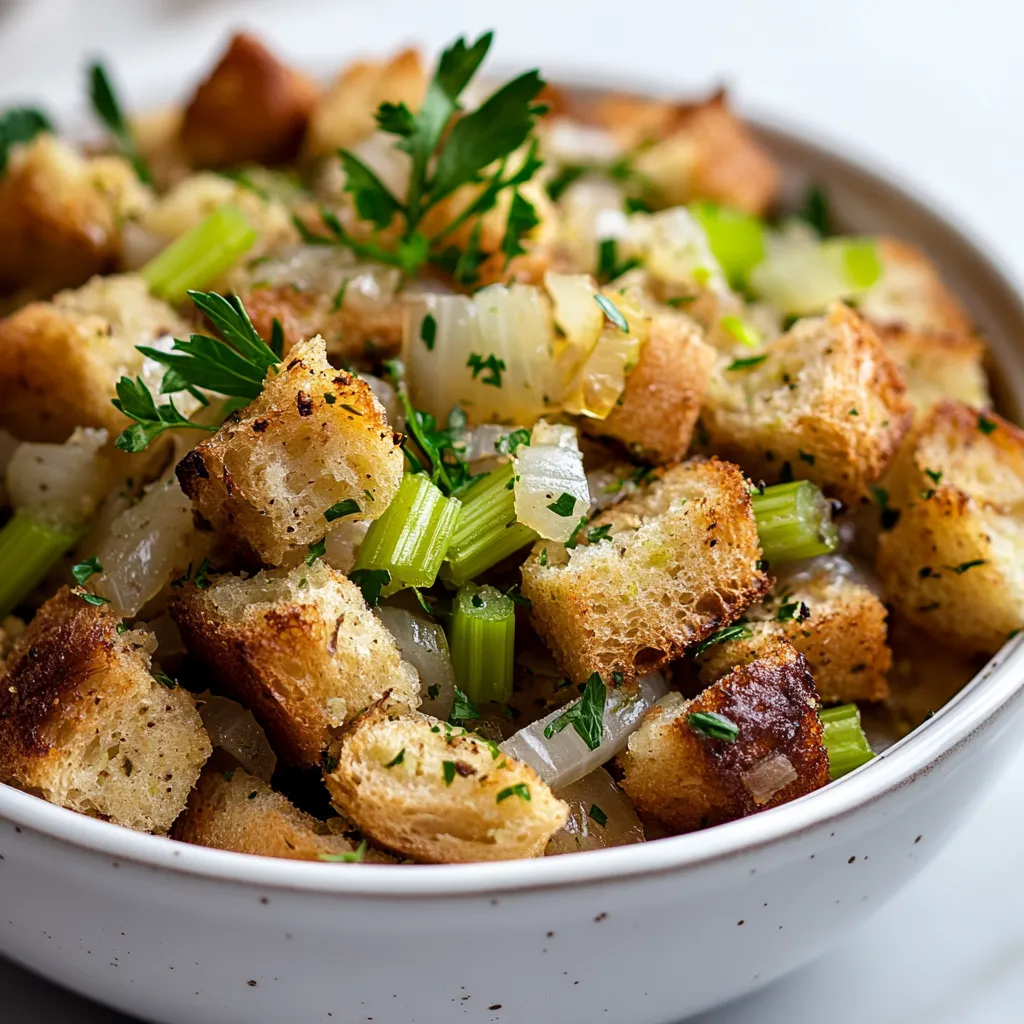
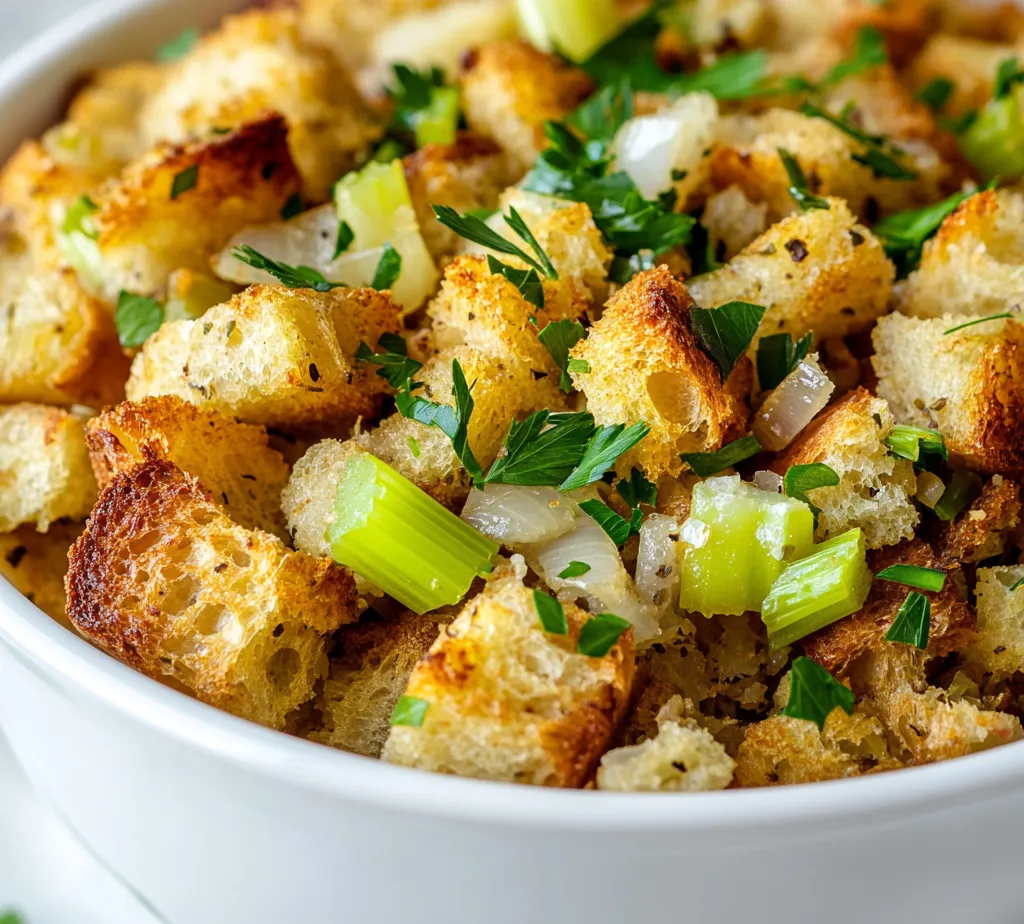
Often, stuffing is seen as a mere side dish, but it can easily take center stage on your dining table. This version is particularly special, featuring rustic bread as its backbone, which absorbs the savory broth and melds beautifully with onions, celery, and a blend of aromatic herbs. Whether served alongside a magnificent roast or as part of a cozy, familial meal, this hearty stuffing encapsulates the essence of home-cooked comfort.
As the holiday season approaches or when you simply want to evoke those fond memories of gathering with loved ones, this stuffing recipe will bring joy and satisfaction. It invites the warm, inviting aromas of sage and thyme into your kitchen, awakening the appetite in everyone present. Dive in and discover how to create this delightful dish that promises to become a cherished staple in your culinary repertoire.
Recipe Overview
– Total Time: 1 hour
– Prep Time: 20 minutes
– Servings: 8-10
– Difficulty: Not specified in the recipe
This scrumptious stuffing recipe showcases the marriage of crusty rustic bread with savory butter, fragrant herbs, and sautéed vegetables. Its diversity makes it an ideal side dish for holiday feasts or a comforting complement to everyday home-cooked meals.
Ingredients
An essential aspect of any great dish, the ingredients not only uphold the flavor but also contribute to the overall experience. This recipe includes:
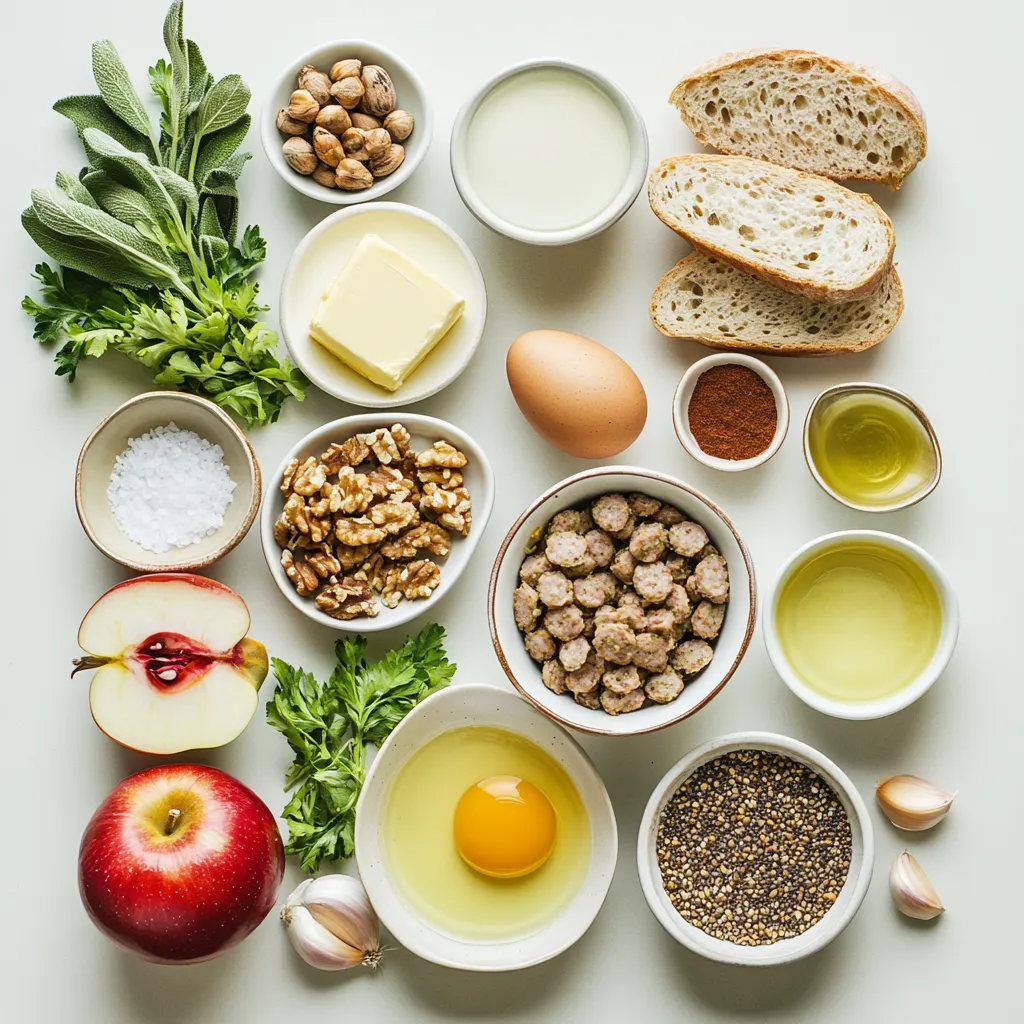
– 1 loaf of rustic bread (approximately 1 pound), cut into 1-inch cubes
– 1/2 cup unsalted butter
– 1 large onion, finely diced
– 3 celery stalks, finely diced
– 3 cloves garlic, minced
– 1 tablespoon fresh sage, chopped (or 1 teaspoon dried sage)
– 1 tablespoon fresh thyme, chopped (or 1 teaspoon dried thyme)
– 1 tablespoon fresh parsley, chopped
– 1 teaspoon salt
– 1/2 teaspoon freshly ground black pepper
– 2 to 3 cups low-sodium chicken or vegetable broth
– 2 large eggs, beaten
– Optional: 1 cup cooked sausage, crumbled or 1 cup diced apples or chopped nuts for added texture and flavor
Instructions
1. Preheat your oven to 350°F (175°C). Spread the bread cubes in a single layer on a baking sheet and toast them in the oven for approximately 10-15 minutes, or until they are dry and lightly golden. Remove from the oven and set aside to cool.
2. In a large skillet over medium heat, melt the butter. Add the diced onion and celery, sautéing for about 5-7 minutes until they become tender and translucent.
3. Mix in the minced garlic, sage, thyme, parsley, salt, and pepper. Continue to cook for an additional 2 minutes, allowing the flavors to meld and the garlic to become fragrant.
4. In a large mixing bowl, combine the toasted bread cubes with the sautéed vegetable mixture. If you choose to enhance the stuffing, fold in the cooked sausage, diced apples, or chopped nuts at this point.
5. Gradually pour in 2 cups of broth, mixing gently until the bread is evenly moistened. If the mixture appears dry, add more broth as needed to reach your desired consistency.
6. Fold in the beaten eggs, ensuring they are well-distributed throughout the stuffing mixture.
7. Transfer the stuffing into a greased 9×13 inch baking dish, spreading it out evenly to ensure even cooking.
8. Cover the dish tightly with aluminum foil and bake in the preheated oven for 30 minutes. After this time, remove the foil and continue baking for an additional 15-20 minutes, or until the top is golden brown and crispy.
9. Allow the stuffing to cool for a few minutes before serving. This hearty stuffing is the perfect companion to your Thanksgiving feast!
Preparing the Bread
The bread is the foundation of the stuffing, and selecting a quality rustic loaf is crucial to ensure a flavorful and texturally rich dish. To begin, the first step is to toast the bread cubes. This technique not only dries out the bread, making it better suited to absorb the flavorful broth later on, but it also helps create that desired crispiness once baked.
To achieve the perfect toast, spread the bread cubes in a single layer on a baking sheet. Preheat your oven to 350°F (175°C) and place the baking sheet inside for around 10-15 minutes. The goal is to have the cubes dry and lightly golden. Keeping an eye on them is key, as you want to avoid burning the edges while ensuring sufficient toasting for structural integrity. After toasting, remove them from the oven and let them cool before combining them with the other ingredients.
The choice of bread can significantly affect the flavor and texture of the stuffing. Rustic bread, with its thicker crust and heartier texture, not only stands up well against the moist elements but also adds an earthy flavor that enhances the dish. Allowing the bread cubes to cool post-toasting is essential for optimal mixing; warm, toasted bread can lead to a soggy stuffing if introduced too soon into moist mixtures.
Sautéing the Vegetables
Next, the sautéing of the vegetables is a vital step that infuses the stuffing with rich flavors. A large skillet is ideal for this task, as it provides ample space to evenly cook the diced onion and celery. Begin by melting the unsalted butter over medium heat; this sets a savory base for the vegetables to cook in.
Once the butter has melted, add the diced onion and celery to the skillet. Sauté these ingredients for about 5-7 minutes; the aim is to achieve tenderness while allowing the vegetables to release natural sweetness. Monitoring the heat is crucial, as high temperatures can burn the onions, leading to a bitter taste in your stuffing.
After the onions and celery have softened and become translucent, it’s time to incorporate the minced garlic, along with the fresh herbs: sage, thyme, and parsley. Add the salt and freshly ground black pepper as well. This is an essential part of the process; the aromatic properties of garlic and herbs should be activated through a brief cooking time, around 2 additional minutes, ensuring they meld beautifully with the sautéed vegetables.
This step highlights the entire kitchen’s aromas, enhancing the anticipation of that first delicious bite of stuffing.
Assembling the Stuffing
Assembling the stuffing is where the magic truly happens, combining all the crafted elements into one harmonious dish. Start by taking a large mixing bowl and combining the toasted bread cubes with the sautéed vegetable mixture from the skillet. It is essential to mix these ingredients gently to ensure an even distribution of the flavorful vegetables throughout the bread cubes.
Should you opt for any optional enhancements like crumbled sausage, diced apples, or chopped nuts, now is the time to fold them into the mixture. These ingredients introduce exciting contrasts in flavor and texture, elevating the stuffing from traditional to uniquely flavorful.
Next, gradually pour in the 2 cups of low-sodium chicken or vegetable broth. It’s important to add this liquid slowly and mix gently until the bread cubes become evenly moistened. Keep an eye on the consistency; if the mixture appears dry, do not hesitate to add more broth until you reach your desired wetness. Ensuring that the bread is adequately moistened will result in a tender stuffing rather than a dry one.
Now, fold in the beaten eggs carefully, making sure they are evenly incorporated throughout the mixture. The eggs serve to bind everything together, creating a cohesive stuffing that maintains its integrity during baking. Once combined, transfer the prepared stuffing into a greased 9×13 inch baking dish. Spread it evenly to promote even cooking, and it’s ready for the oven, where all of these carefully layered flavors will meld together beautifully.
Broth Addition
Incorporating broth is critical for achieving the desired consistency of your stuffing. The key is to add the broth gradually. Start with the specified 2 cups, gently mixing it into the bread cube and vegetable mixture. Pay close attention to the texture; the mixture should be moist but not overly soggy. If you find that your stuffing appears dry after adding the broth, don’t hesitate to pour in an additional 1/4 to 1/2 cup of broth.
To troubleshoot any dryness, keep a few additional broth on standby. This ensures that you maintain control over the texture without making it too wet. If you’ve accidentally added too much broth, consider adding a handful of extra toasted bread cubes to absorb the excess moisture.
Incorporating Eggs
The addition of beaten eggs serves a dual purpose: it binds the stuffing together and adds richness. It’s essential to fold the beaten eggs evenly into the mixture to ensure cohesive binding throughout. To do this effectively, pour the beaten eggs over the stuffing mixture and use a spatula to lift and fold the ingredients gently, ensuring the eggs are distributed without breaking down the bread too much. A well-mixed stuffing will be easier to scoop and hold together beautifully once baked.
Baking Techniques
Choosing the Right Baking Dish
Using the correct baking dish can significantly impact your stuffing’s overall texture and cooking time. A standard 9×13 inch glass or ceramic dish is ideal for this recipe as it allows for even heat distribution, promoting uniform cooking. Avoid using metal dishes, as they may cook the stuffing too quickly and could result in burnt edges.
Foil Covered Baking
Covering the dish tightly with aluminum foil during the first part of the baking process helps create steam, which keeps the stuffing moist. Remove the foil for the final 15-20 minutes of baking to allow the top to brown beautifully. This two-step approach guarantees a deliciously moist interior and a perfect crispy exterior.
Achieving the Perfect Crisp
To ensure your stuffing develops a beautiful golden-brown crust, a few steps are crucial. First, make sure not to overcrowd the baking dish—spreading the stuffing evenly in a single layer aids in browning. After uncovering the dish, if you want an extra crispy top, consider placing it under the broiler for a minute or two, keeping a close eye to prevent burning.
Flavorful Variations
Sausage Stuffing
For those who appreciate added depth of flavor, incorporating cooked sausage into your stuffing is an excellent option. Use either breakfast sausage or Italian sausage, crumbled and pre-cooked. Stirring in a cup of crumbled sausage will infuse the stuffing with savory richness, complementing the herbs and vegetables beautifully.
Fruit & Nut Additions
Adding diced apples or chopped nuts can enhance the stuffing’s texture and flavor profile. Apples introduce a touch of sweetness, which contrasts nicely with the savory elements, while chopped nuts provide crunch. If you choose to incorporate these extras, allow them to briefly cook with the onions and celery to meld their flavors before mixing them with the bread cubes.
Vegan Adaptations
To make a vegan-friendly version of this stuffing, substitute the unsalted butter with plant-based butter or olive oil, and use flax eggs or aquafaba as a binder in place of the beaten eggs. Ensure that the broth you use is vegetable-based, and you can still include the same herbs and vegetables for flavor.
Presentation Tips
Rustic Serving Ideas
For a traditional touch, serve the stuffing directly from the baking dish. This rustic approach not only appeals visually but also allows guests to serve themselves. For a more elegant presentation, consider scooping portions into individual ramekins, which can add a charming touch to your table setup.
Individual Ramekins
Using ramekins for individual servings is an easy way to elevate your meal presentation. Portioning the stuffing into these smaller dishes allows for a personalized touch and can be especially appealing for special occasions or dinner parties. Ensure each ramekin is greased properly before filling it with stuffing to facilitate easy servings.
Garnishing Techniques
For added visual appeal and freshness, consider garnishing your stuffing with chopped fresh herbs, such as parsley or thyme. A sprinkle of herbs on top not only brightens the dish but also enhances its aroma, inviting guests to dive in.
Storing Leftovers
Proper Cooling
Before storing any leftover stuffing, ensure that it has cooled completely. Cooling the stuffing to room temperature before storage is crucial for preserving its texture and preventing bacteria growth.
Storage Methods
Once cooled, transfer the stuffing to an airtight container. Refrigerate it if you plan to consume it within a few days. If you wish to store it longer, consider freezing it in an airtight container or freezer bag. Remember to label your container with the date for easy tracking.
Time Guidelines
Properly stored stuffing can last around 3-4 days in the refrigerator. If frozen, it can maintain quality for up to 2 months. For best results when reheating, thaw it overnight in the refrigerator before warming it up in the oven to achieve a resembled freshness.
Pairing Suggestions
Complementary Dishes
This hearty homestyle stuffing pairs beautifully with a variety of main dishes. Classic pairings include roast turkey, baked ham, or herb-crusted chicken. The stuffing not only acts as a side dish but also complements these proteins with its rich flavors.
Beverage Pairings
To complement the savory notes of the stuffing, consider a light-bodied white wine, such as Sauvignon Blanc, or a fruity red like Pinot Noir. Non-alcoholic options like sparkling apple cider or a cranberry spritzer also beautifully accompany this comforting dish.
Seasonal Sides
Enhance your meal by serving the stuffing alongside seasonal vegetables, such as roasted Brussels sprouts or green beans almondine. A vibrant mixed salad can also bring a refreshing contrast to the rich stuffing, creating a balanced plate.
Conclusion
This hearty homestyle stuffing combines the right mix of textures, with a crispy top and moist interior, delivering on both flavor and comfort. With a total prep and cooking time of about an hour, it is a satisfying addition to any meal, especially during festive gatherings. The thoughtful combination of ingredients not only complements the dish but also enhances the entire dining experience through each delightful bite.

Hearty Homestyle Stuffing
Ingredients
- 1 loaf rustic bread cut into 1-inch cubes
- ½ cup unsalted butter
- 1 large onion finely diced
- 3 stalks celery finely diced
- 3 cloves garlic minced
- 1 tablespoon fresh sage chopped
- 1 tablespoon fresh thyme chopped
- 1 tablespoon fresh parsley chopped
- 1 teaspoon salt
- ½ teaspoon freshly ground black pepper
- 2-3 cups low-sodium chicken or vegetable broth
- 2 large eggs beaten
- 1 cup cooked sausage crumbled (optional)
- 1 cup diced apples optional
- 1 cup chopped nuts optional
Instructions
- Preheat your oven to 350°F (175°C). Toast the bread cubes on a baking sheet for 10-15 minutes until dry and golden.
- Melt the butter in a large skillet over medium heat. Add the onion and celery, sauté for 5-7 minutes until tender.
- Stir in the garlic, sage, thyme, parsley, salt, and pepper. Cook for an additional 2 minutes.
- Combine the toasted bread cubes with the sautéed vegetables in a large mixing bowl.
- Pour in 2 cups of broth, mixing gently until the bread is moistened. Add more broth if needed.
- Fold in the beaten eggs until well-distributed.
- Transfer the mixture to a greased 9x13 inch baking dish and spread evenly.
- Cover with aluminum foil and bake for 30 minutes. Remove foil and bake for another 15-20 minutes until golden brown.
- Let cool for a few minutes before serving.