
Introduction
Discover the delightful world of no-bake desserts with these irresistibly rich and creamy buckeye bars. Combining the classic flavors of peanut butter and chocolate, these treats offer a perfect balance of sweetness and a satisfying texture that melts in your mouth. Whether you’re hosting a gathering or simply indulging yourself, these bars can be prepared quickly and effortlessly. With a short list of ingredients and no baking required, they are an ideal option for those who crave a delicious treat without the fuss.
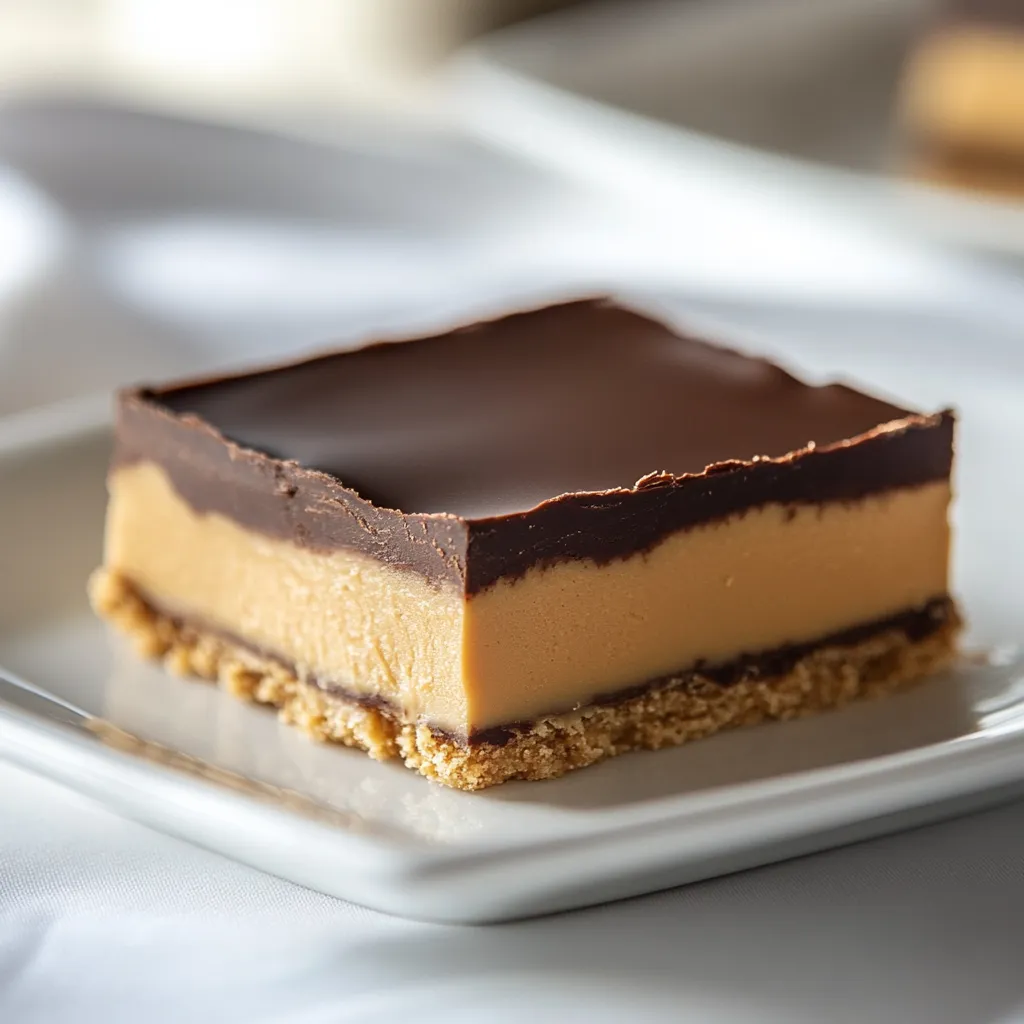
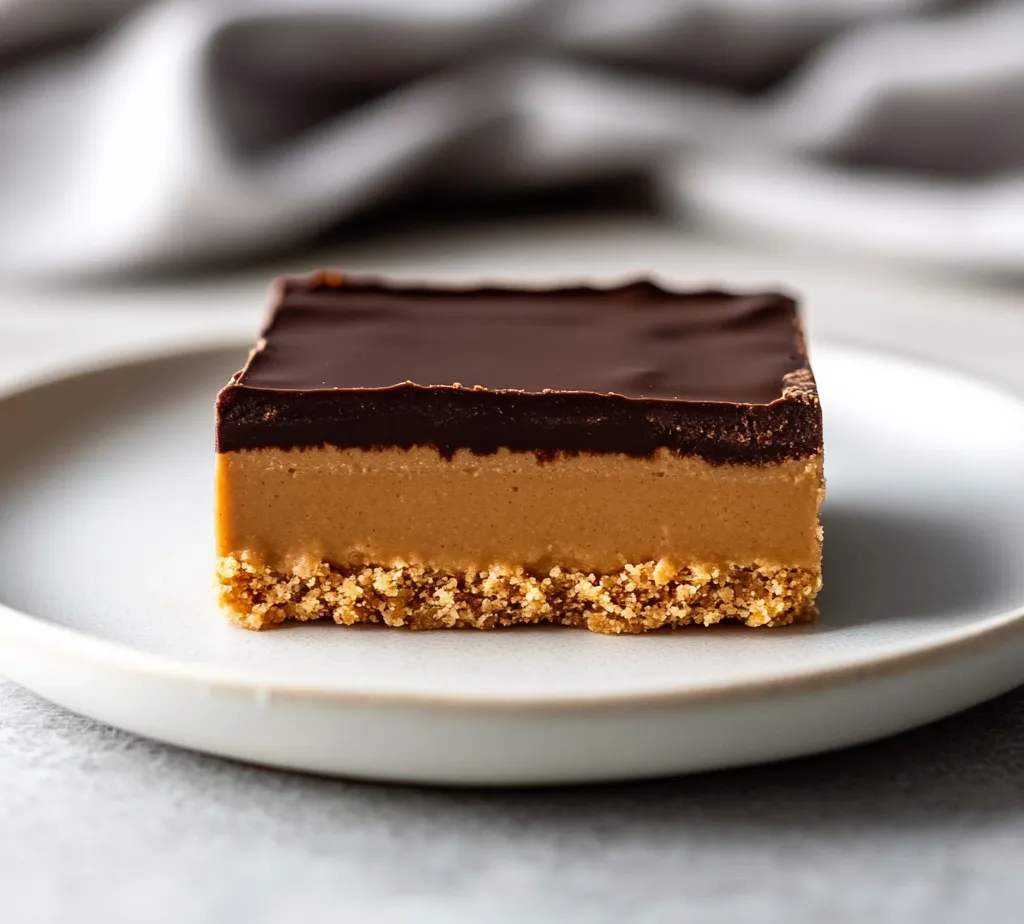
What makes these no-bake buckeye bars particularly appealing is their versatility. They can be served as a casual dessert during a family dinner, or dressed up for special occasions like birthdays and holidays. The combination of creamy peanut butter blended with a smooth chocolate topping creates a nostalgic flavor profile reminiscent of the beloved buckeye candies. Each bite delivers a satisfying crunch from the graham cracker crumbs, complementing the creaminess of the filling and the richness of the chocolate on top.
Not only are these bars a crowd-pleaser, but they also store well in the refrigerator, making them perfect for meal prep or as an easy grab-and-go snack.
Recipe Overview
– Total Time: 2 hours 20 minutes
– Prep Time: 20 minutes
– Yield: 16 bars
– Difficulty: Not specified in the recipe
Ingredients
A detailed list of the components needed to prepare the no-bake buckeye bars includes:
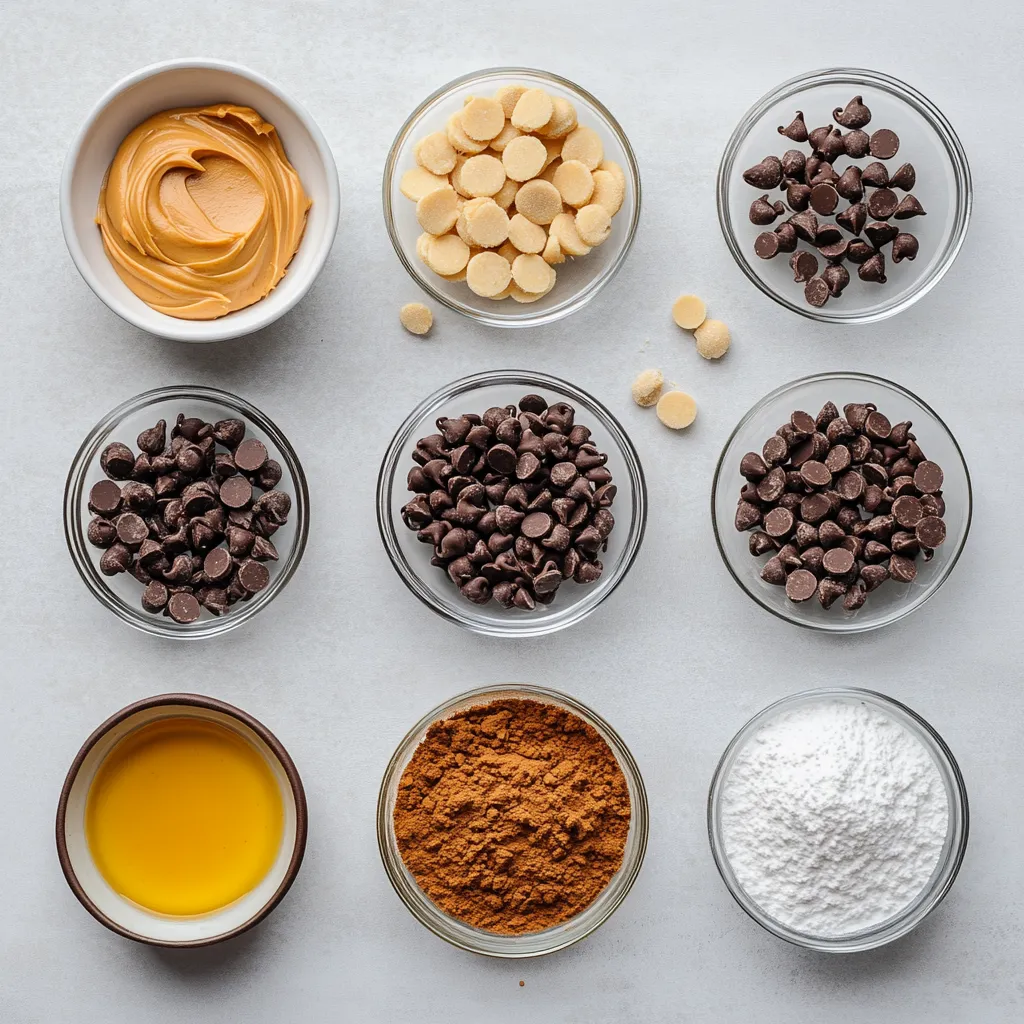
– 1 cup creamy peanut butter
– 1/2 cup unsalted butter, softened to room temperature
– 2 cups powdered sugar
– 2 cups graham cracker crumbs
– 1 teaspoon pure vanilla extract
– 1 1/2 cups semi-sweet chocolate chips
– 1 tablespoon coconut oil (optional, for a smoother chocolate finish)
Instructions
1. In a spacious mixing bowl, combine the creamy peanut butter and softened unsalted butter. Using a hand mixer or a sturdy spatula, blend the two until the mixture is completely smooth and creamy.
2. Gradually incorporate the powdered sugar into the peanut butter mixture, adding it in small amounts. Mix thoroughly after each addition to ensure a thick, cohesive blend forms.
3. Gently fold in the graham cracker crumbs and vanilla extract, mixing until fully integrated and a thick dough-like consistency is achieved.
4. Prepare an 8×8 inch baking pan by lining it with parchment paper, ensuring that there’s some overhang on the sides to facilitate easy removal later.
5. Transfer the peanut butter mixture into the lined baking pan, pressing it down firmly and evenly to create a smooth base. Use a spatula to level the surface.
6. In a microwave-safe bowl, combine the semi-sweet chocolate chips and coconut oil (if using). Heat in the microwave, in increments of 30 seconds, stirring well in between until the chocolate is fully melted and silky smooth.
7. Carefully pour the melted chocolate over the peanut butter layer in the pan, using a spatula to spread it evenly across the entire surface.
8. Place the pan in the refrigerator and allow the bars to chill for a minimum of 2 hours, or until the chocolate topping has fully set.
9. Once set, gently lift the bars out of the pan using the parchment paper overhang. Place on a cutting board and cut into squares or bars, as desired.
10. Serve your delightful no-bake buckeye bars to family and friends and watch them disappear!
Preparing the Peanut Butter Mixture
Understanding the importance of a well-made peanut butter base is crucial for the overall success of the bars. The first step involves blending creamy peanut butter with softened unsalted butter until the mixture achieves a smooth, creamy consistency. This combination will serve as the heart of the dessert.
Combining Ingredients
To achieve the desired texture, begin by placing the creamy peanut butter in a spacious mixing bowl, then add the softened unsalted butter. Utilizing a hand mixer or a sturdy spatula, blend these ingredients until a completely smooth and homogenous mixture is formed. A well-mixed base is key to ensuring that each bite of the bars is deliciously creamy and flavorful.
Incorporating Sugar
Next, it’s time to gradually add in the powdered sugar. This step is particularly significant as the sugar will help create the ideal level of sweetness and thick consistency for the mixture. It’s best to add the powdered sugar in small amounts, mixing thoroughly after each addition. Doing so will prevent clumping and allow for a better-integrated blend that enhances the overall richness of the dessert.
Folding in Graham Crackers and Vanilla
Once the powdered sugar is fully incorporated, gently fold in the graham cracker crumbs along with the pure vanilla extract. This combination adds depth of flavor and texture to the mixture, transforming it into a thick dough-like consistency that serves as the perfect foundation for your buckeye bars.
Preparing the Baking Pan
Using the right methods to prepare your baking pan ensures successful bar removal and serves as a foundation for a neat presentation. The preparation of the pan might seem like a minor step, but it’s essential for ensuring that your bars maintain their shape and can be served easily.
Lining the Pan
To begin with, take an 8×8 inch baking pan and line it with parchment paper. Make sure to leave some overhang on the sides for later removal. This small but effective technique allows for easy lifting of the completed bars, eliminating the frustration of sticking or breaking.
Ensuring a Smooth Base
After lining the pan, transfer the peanut butter mixture into it. Using a spatula, press the mixture down firmly and evenly, ensuring that the surface is smooth and level. This attention to detail not only improves the appearance of the bars but also helps to ensure that they set evenly in the refrigerator, leading to a consistent texture throughout.
Melting the Chocolate Topping
Creating a smooth chocolate layer is a critical step and can influence the visual appeal and taste of the bars. The chocolate topping is what brings the entire dessert together, providing a perfect complement to the creamy peanut filling underneath.
Choosing the Right Chocolate
When it comes to selecting chocolate for this recipe, opt for high-quality semi-sweet chocolate chips. The quality of chocolate you choose can greatly enhance the overall flavor profile of the dessert. Semi-sweet chocolate, with its balanced sweetness and smoothness, provides the perfect contrast to the richness of the peanut butter base.
Melting Techniques
To melt the chocolate properly, combine the semi-sweet chocolate chips with coconut oil (if you’re using it) in a microwave-safe bowl. Heat the mixture in the microwave in increments of 30 seconds, stirring well in between each interval. This method prevents burning and ensures that the chocolate becomes silky smooth, ready for pouring over the peanut butter mixture. When done correctly, the melted chocolate should create a glossy finish on top of the buckeye bars.
Optional Coconut Oil
Incorporating coconut oil into the chocolate is an optional enhancement that can significantly improve the final product’s texture and appearance. The main reason one might choose to include coconut oil is to achieve a shinier finish on the chocolate layer. The addition of coconut oil helps to create a smoother, more fluid chocolate consistency that makes spreading over the peanut butter base much easier. It can also aid in preventing the chocolate from cracking when cut, ensuring a clean slice. If you prefer a firmer chocolate layer, you can omit the coconut oil. This decision often depends on personal preference regarding texture and sheen, so feel free to experiment to find what suits your taste best.
Assembling the Bars
The assembly phase is critical for the successful layering of flavors that is characteristic of these buckeye bars. Properly executing each step ensures that the bars have the right balance of peanut butter and chocolate, leading to a satisfying culinary experience.
Pouring the Chocolate
Once your peanut butter base is prepared and well-pressed into the baking pan, it’s time to pour the melted chocolate on top. Carefully pour the melted chocolate over the peanut butter layer, aiming for the center to allow the chocolate to naturally flow towards the edges. Use a spatula to gently spread the chocolate, ensuring an even distribution across the entire surface. This step is vital to ensure that every bite has a perfect ratio of chocolate to peanut butter.
Chilling the Bars
After the chocolate has been evenly poured and spread, place the assembled bars in the refrigerator. Chilling is essential for the chocolate to set properly; a minimum of 2 hours is recommended. This time allows the chocolate to harden sufficiently, so it adheres well to the peanut butter layer. Not only does this help with presentation, but it also makes cutting the bars much easier, as a well-set chocolate layer is less likely to crack or separate from the underlying peanut butter.
Cutting and Serving the Bars
Properly cutting and serving these bars enhances their presentation and enjoyment. Attention to detail during these steps can elevate the perceived quality of the dessert.
Removing from the Pan
Once the bars have chilled and the chocolate is firmly set, it’s time to remove them from the pan. This can be easily accomplished by utilizing the parchment paper overhang, which acts like a sling. Gently pull on the edges of the parchment paper to lift the entire block of bars out of the pan. Take care not to pull too hard to avoid tearing the paper or damaging the edges of the bars.
Cutting Techniques
When it comes to cutting these delectable treats, the choice between squares or rectangles ultimately comes down to personal preference. For smaller bites, consider cutting them into squares about 1-2 inches in size. If you’re serving at a party or gathering, consider cutting them into larger rectangles to make a more substantial offering. Using a sharp, warm knife can help achieve clean cuts; dipping the knife in hot water and drying it before slicing can prevent the chocolate from cracking.
Presentation Tips
Enhancing the visual appeal of the bars can elevate the dessert experience during gatherings. A thoughtful presentation can make these no-bake bars look even more inviting.
Creative Garnishes
Before the chocolate layer completely sets, consider sprinkling some crushed graham cracker crumbs or a touch of sea salt over the top for a delightful contrast against the rich chocolate. These simple garnishes can boost the overall flavor profile and add an extra layer of sophistication.
Plating Suggestions
When it’s time to serve, place the bars on a decorative platter. You can further enhance the display by garnishing with whole peanuts or small chocolate shavings. Arranging the bars artistically can stimulate appetites and create a visually appealing centerpiece for your dessert table.
Storage Instructions
Understanding the proper way to store the bars can ensure their freshness and quality. Proper storage is essential for maintaining the delicious flavors and textures of your buckeye bars.
Room Temperature vs. Refrigeration
These no-bake buckeye bars can be stored at room temperature for a short period, ideally no more than two days. However, for an extended shelf life, refrigeration is recommended. When stored in the fridge, the bars can remain fresh for up to a week. Make sure to keep them in an airtight container to prevent them from absorbing any unwanted odors from the fridge.
Freezing Options
If you want to enjoy the buckeye bars even longer, freezing them is a great option. To do this, cut the bars into your desired shape, then wrap each piece tightly in plastic wrap and place them in a freezer-safe container. They can be stored in the freezer for up to three months. When you’re ready to indulge again, simply remove the bars from the freezer and let them thaw in the fridge for a few hours before serving. This method allows for convenient snacking without compromising taste.
Flavor Variations and Customization
Explore different ways to jazz up the classic no-bake buckeye bars to suit individual tastes. Variations can cater to a wide range of preferences, providing exciting alternatives.
Alternative Nut Butters
Consider experimenting with different nut butters, such as almond or cashew. These substitutions can offer unique flavors and textures that can refresh the classic buckeye experience while still maintaining the essential creamy consistency. Each nut butter brings its distinct taste that can elevate the overall dessert.
Adding Mix-Ins
To add a textural contrast and further enhance the flavor, introduce additional mix-ins like chopped nuts, M&M’s, or crispy rice cereal into the peanut butter base. These ingredients can provide crunchiness and fun colors that make the bars more appealing, especially for children or festive occasions.
Conclusion
These no-bake buckeye bars combine the creamy comfort of peanut butter with the rich indulgence of chocolate, offering a delightful treat with a perfectly balanced flavor profile. The preparation takes just over two hours, making them a quick yet impressive dessert option. Their soft and smooth texture complemented by a chocolate shell creates a satisfying experience every time.

Irresistible No-Bake Buckeye Bars
Ingredients
- 1 cup creamy peanut butter
- ½ cup unsalted butter softened
- 2 cups powdered sugar
- 2 cups graham cracker crumbs
- 1 teaspoon pure vanilla extract
- 1 ½ cups semi-sweet chocolate chips
- 1 tablespoon coconut oil optional
Instructions
- Combine creamy peanut butter and softened butter in a mixing bowl until smooth.
- Gradually add powdered sugar, mixing thoroughly after each addition.
- Fold in graham cracker crumbs and vanilla extract until fully integrated.
- Line an 8x8 inch baking pan with parchment paper.
- Press the peanut butter mixture into the lined pan evenly.
- Melt chocolate chips and coconut oil in the microwave, stirring until smooth.
- Pour melted chocolate over the peanut butter layer and spread evenly.
- Refrigerate for at least 2 hours until chocolate is set.
- Lift bars out using parchment paper and cut into squares.
- Serve and enjoy your no-bake buckeye bars.