
Introduction
The No-Bake Peanut Butter Bliss Balls Recipe is a delightful and easy-to-make treat that caters to both peanut butter lovers and those with a sweet tooth. With no baking required, this recipe is perfect for individuals who are short on time but still want to enjoy a delicious snack. Packed with wholesome ingredients, these bliss balls are ideal for a quick dessert or as a nutritious snack to indulge in throughout the day.
Imagine a sweet and satisfying energy boost that you can whip up in no time. Each bite is a wonderful blend of creamy peanut butter, chewy oats, and sweet chocolate, making these bliss balls not just tempting but also nourishing. Whether you’re preparing for a family gathering, a mid-afternoon pick-me-up, or simply stocking the fridge with snacks, these bliss balls are versatile enough to suit any occasion or craving.
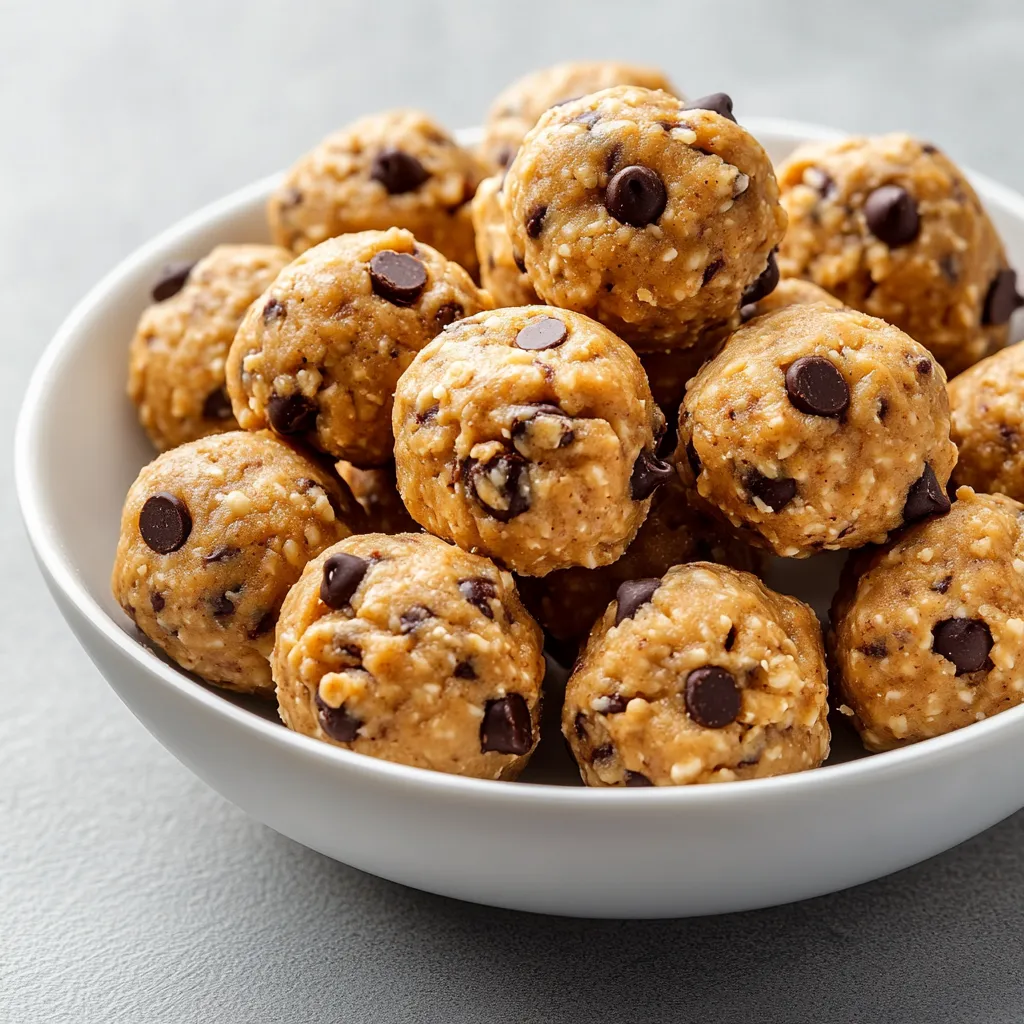
What sets this recipe apart is the blend of textures and flavors that come together harmoniously without the need for any baking. They are not only delicious but also easy to customize according to your preference. Each bliss ball is about an inch in diameter, making them the perfect, poppable treat. The process is straightforward, requiring minimal effort yet yielding impressive results that everyone will love.
Recipe Overview
– Prep Time: 15 minutes
– Cook Time: Not specified in the recipe
– Total Time: 45 minutes
– Course: Dessert Snack
– Cuisine: American
– Servings: 12
– Calories: Approximately 150 per serving
This American-inspired dessert snack features a harmonious blend of creamy peanut butter, hearty oats, and sweet chocolate chips, finished with a hint of vanilla and a sprinkle of salt. Ideal for any occasion, this recipe yields 12 bliss balls, each approximately 150 calories, making it a satisfying and guilt-free indulgence.
Ingredients
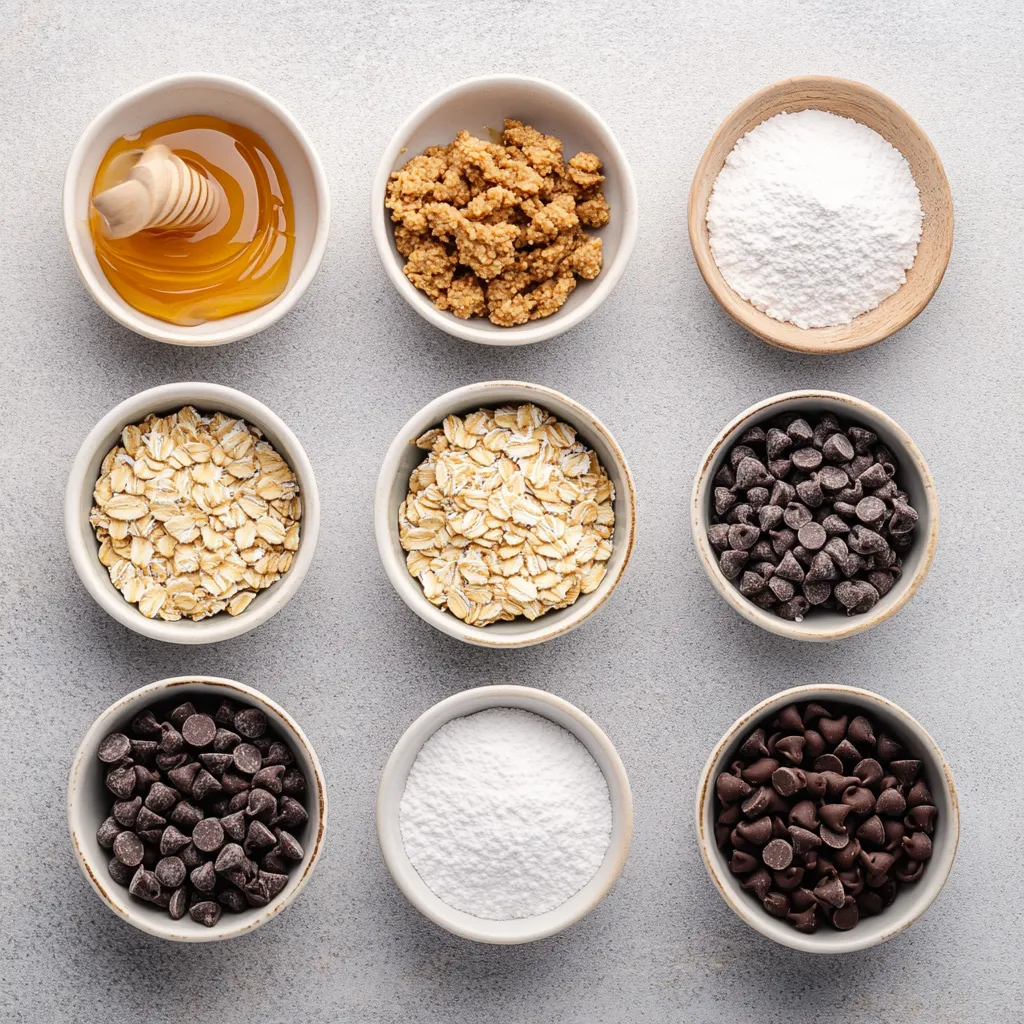
– 1 cup creamy peanut butter
– 1 cup rolled oats
– 1/2 cup honey
– 1/2 cup semi-sweet chocolate chips
– 1/2 cup powdered sugar
– 1 teaspoon pure vanilla extract
– A pinch of sea salt
Instructions
1. In a spacious mixing bowl, combine the creamy peanut butter, honey, and pure vanilla extract. Use a spatula or wooden spoon to stir the mixture until it is smooth and well-blended.
2. Next, add the rolled oats, powdered sugar, and a pinch of sea salt to the peanut butter mixture. Stir thoroughly until all ingredients are fully integrated and form a cohesive dough.
3. Gently fold in the semi-sweet chocolate chips, ensuring they are evenly distributed throughout the mixture without breaking them.
4. With clean hands, scoop out small amounts of the mixture and roll them into balls, each approximately 1 inch in diameter. This should yield about 12 balls.
5. Place the formed peanut butter balls onto a baking sheet lined with parchment paper, making sure they are spaced apart to prevent sticking.
6. Once all the mixture has been rolled into balls, refrigerate the baking sheet for at least 30 minutes. This will help the balls firm up and maintain their shape.
7. After chilling, transfer the peanut butter bliss balls to an airtight container for storage. Keep them stored in the refrigerator for the best flavor and texture.
8. Indulge in these delightful no-bake peanut butter bliss balls as a quick snack or a sweet treat at any time of the day!
Mixing the Base
Combining the Peanut Butter and Honey
The foundation of the No-Bake Peanut Butter Bliss Balls begins with creating a creamy base. Start by measuring out 1 cup of creamy peanut butter, which not only provides a rich texture but also infuses the bliss balls with its signature flavor. Next, add in 1/2 cup of honey—this natural sweetener will enhance the overall taste and act as a binding agent within the mixture. Using a spatula or wooden spoon, gently stir these two ingredients together, making sure they are well-combined. It’s important to achieve a smooth, creamy consistency before moving onto the next ingredient.
Adding Flavor with Vanilla Extract
To elevate the flavor of the bliss balls, incorporate 1 teaspoon of pure vanilla extract. This seemingly simple addition makes a significant impact, imparting a warm, aromatic quality to the mix. Stir the vanilla in thoroughly, ensuring that its essence is distributed evenly through the creamy peanut butter and honey mixture.
Achieving a Smooth Consistency
As you mix, watch for any lumps or inconsistencies; it’s crucial that the peanut butter and honey blend seamlessly to form a smooth, cohesive base. This will create an impeccable texture for the bliss balls and ensure an even flavor profile throughout.
Incorporating Dry Ingredients
Adding Rolled Oats for Texture
The next step is where the bliss balls gain their delightful chewiness. Introduce 1 cup of rolled oats to the peanut butter mixture. Not only do these oats add a wholesome texture, but they also contribute to the nutritional value, making these treats a great source of energy.
Sweetening with Powdered Sugar
To further enhance the treat’s sweetness, gradually mix in 1/2 cup of powdered sugar. This ingredient will not only serve to accentuate the overall flavor but will also help to thicken the mixture slightly, creating a more dough-like consistency that’s easy to handle later.
Balancing Flavors with Sea Salt
Don’t forget to season the mixture correctly! A pinch of sea salt is essential for balancing out the sweetness and elevating the flavors. It enhances the taste while bringing forth the rich notes of the peanut butter.
Final Touches
Folding in Semi-Sweet Chocolate Chips
Now comes the fun part—adding in the chocolate. Gently fold in 1/2 cup of semi-sweet chocolate chips, taking care not to crush them during the mixing process. These chips will provide bursts of chocolatey flavor in every bite of the bliss balls, appealing to chocolate lovers everywhere.
Ensuring Even Distribution
As you fold, make sure the chips are evenly distributed throughout the mixture. This ensures that every bliss ball is a harmonious blend of peanut butter, oats, sweetness, and chocolate.
Rolling the Bliss Balls
Rolling Techniques for Uniformity
Once your mixture is ready, it’s time to form your bliss balls. Use clean hands to scoop out small amounts of the mixture. Aim for a size of about 1 inch in diameter for each ball, which makes them the perfect bite-sized treat. This step may require a bit of patience, but rolling them evenly will ensure a consistent size and texture.
Suggested Size for Each Ball
Rolling the balls to the right size is important both for presentation and for ensuring that the calorie count remains accurate. With about 12 servings expected from this recipe, you should have 12 bliss balls ready for enjoying.
Chilling for Perfection
Importance of Refrigeration for Structural Integrity
After forming the balls, they must be chilled. Lay them out on a baking sheet lined with parchment paper, making sure they are spaced apart to prevent sticking. This step is crucial as refrigeration helps to firm them up, ensuring they hold their shape when you pop them in your mouth.
Recommended Chilling Time
Refrigerate the bliss balls for at least 30 minutes. This time allows the ingredients to meld together while resulting in a texture that is both chewy and satisfying. Once chilled, they will be ready to be transferred to a storage container, where they are best kept to maintain their freshness.
Presentation Tips
Arranging for Aesthetic Appeal
When it comes to serving your No-Bake Peanut Butter Bliss Balls, presentation can make all the difference. A decorative plate can elevate the overall experience, making the bliss balls appear even more appealing. Scatter some extra chocolate chips or crushed nuts around them as garnishes for an inviting look.
Drizzling for an Extra Touch
For an added layer of indulgence, consider drizzling a bit of melted chocolate over the top of each bliss ball. The process involves gently melting some chocolate until it reaches a pourable consistency. Semi-sweet or dark chocolate works wonderfully for this. Use a spoon or a piping bag for precision. This final touch not only enhances the visual but also adds an extra depth of flavor to the delicious treats.
The Role of Peanut Butter
Peanut butter plays a fundamental role in the No-Bake Peanut Butter Bliss Balls, providing creaminess and a distinct flavor that elevates the overall taste experience. Not only is peanut butter delicious, but it is also packed with nutrients. It offers protein, healthy fats, and a variety of vitamins and minerals, making it an excellent base for a healthy snack. The creamy peanut butter brings both moisture and richness to the recipe, which is essential for forming the bliss balls without adding any unnecessary liquids.
In addition to its impressive nutritional profile, peanut butter lends a satisfying texture to the bliss balls. The absence of added sugar in the recipe means that the natural sweetness from the honey and the chocolate chips balances beautifully with the nutty flavor of the peanut butter. This creates a harmonious taste experience that satisfies sweet cravings while also providing a wholesome snack option.
Honey’s Influence on Sweetness
Honey is another key ingredient in this delightful recipe, contributing not only sweetness but also moisture. It acts as a natural sweetener, providing a unique flavor profile that complements the peanut butter and chocolate. Unlike traditional refined sugars, honey offers a more complex taste, imbued with floral notes that enhance the overall flavor of the bliss balls.
Furthermore, honey brings with it health benefits, including antioxidants and natural antimicrobial properties. The combination of honey with peanut butter results in a delicious blend that binds the ingredients together, forming smooth, cohesive balls. Being a liquid sweetener, honey also helps prevent the mixture from becoming too dry, ensuring each bliss ball has a moist and delectable bite.
Chocolate’s Impact on Overall Taste
The incorporation of semi-sweet chocolate chips not only amps up the flavor but introduces a layer of richness that makes these bliss balls truly irresistible. The balance between the savoriness of the peanut butter and the sweetness of the chocolate creates a multifaceted taste experience that appeals to both chocolate lovers and peanut butter aficionados alike.
By choosing semi-sweet chocolate chips over other varieties, you achieve a perfect balance of sweetness and richness. This specific type of chocolate contributes to a well-rounded flavor without overpowering the other ingredients. It offers a delightful contrast to the nuttiness of the peanut butter and the floral notes of the honey, creating a complete treat.
Textural Experience
Creamy vs. Crunchy Elements
The textural experience of the No-Bake Peanut Butter Bliss Balls is equally important as the flavors. The creamy base from the peanut butter serves as a perfect counterpoint to the crunchy texture of the rolled oats. This interplay between smoothness and crunch enhances the overall enjoyment of the snack. Each bite provides a satisfying contrast—creamy peanut butter melts in your mouth while the oats deliver a hearty chewiness.
The use of rolled oats not only adds texture but also contributes to the nutritional value of the bliss balls. They offer essential fiber that aids digestion and promotes a feeling of fullness, making these snacks a wholesome option even in a dessert category.
The Importance of the Chill
How Chilling Affects Texture
Chilling the bliss balls is a critical step that transforms the mixture from a sticky dough to a firm and manageable bite-sized treat. Refrigeration allows the peanut butter to solidify slightly, as the fats in it become more stable, ensuring that the bliss balls maintain their shape even after being removed from the fridge. This results in a delightful texture that remains intact when you bite into them, providing both firmness and a satisfying mouthfeel.
Maintaining the Right Firmness
The right chill time of at least 30 minutes is necessary for achieving the desired texture. If not chilled adequately, the bliss balls may be too soft and difficult to handle. Conversely, if they are left to chill for too long, they could become overly firm. Proper chilling ensures a happy medium, resulting in bliss balls that are easy to enjoy straight from the refrigerator, making them an ideal go-to snack.
Nutritional Breakdown
Healthy Ingredients
Peanut butter and rolled oats contribute significantly to the nutritional value of the No-Bake Peanut Butter Bliss Balls. Peanut butter not only provides healthy fats but also a substantial amount of protein, making these treats a good option for those looking to include more protein in their diets. Its abundant nutrient profile delivers vitamins such as E, K, and various B vitamins crucial for energy metabolism.
Rolled oats, on the other hand, are a powerhouse of fiber that supports digestive health. They also contain antioxidants and essential vitamins such as B1, B5, and minerals like manganese and phosphorus, making this snack an excellent source of essential nutrition that supports overall health.
Caloric Content
Understanding the caloric distribution is vital for anyone monitoring their intake. Each serving of these bliss balls contains approximately 150 calories, which is very reasonable for a dessert snack. The ingredients chosen are nutrient-dense, ensuring that these calories come from wholesome sources without unnecessary additives. Their relatively low calorie count allows for guilt-free indulgence while satisfying cravings for something sweet.
Variations and Substitutions
Flavor Delicious Alternatives
While the original recipe for the No-Bake Peanut Butter Bliss Balls is outstanding, there are countless ways to customize the flavor profile to suit individual tastes. Different nut butters, such as almond or cashew butter, can be used in place of peanut butter to create unique variations. Each nut butter brings its characteristic taste and nutritional benefits, allowing for endless exploration.
In terms of sweeteners, alternative options like maple syrup, agave nectar, or coconut nectar can be used for those seeking to avoid honey. Each alternative imparts different nuances and pairing flavors that can personalize your bliss ball experience even further.
Adding Nutritional Boosts
To increase the nutritional value of the bliss balls, there are several possible boost ingredients to consider. Incorporating seeds like chia, flaxseed, or hemp seeds not only adds texture but also delivers additional protein, essential fatty acids, and fiber. For even more nutritional punch, consider adding dried fruits such as cranberries or raisins for natural sweetness and a bit of chew.
For those looking to up the protein content further, incorporating protein powders into the mixture can create a satisfying on-the-go snack that supports fitness goals or curbing hunger pangs.
Storage Suggestions
Best Practices for Keeping the Bliss Balls Fresh
For optimal freshness, storing the bliss balls in an airtight container is recommended. Glass or plastic containers with tight seals will keep the snacks safe from air exposure, ensuring that they maintain their delightful taste and texture. It’s also advisable to place parchment paper between layers if you’re stacking them to avoid sticking.
Optimal Refrigeration Techniques
Storing the bliss balls in the refrigerator not only preserves their flavor but helps keep them firm and delicious. Establishing a dedicated shelf in your fridge for snacks can also ease access and encourage healthy snacking habits. It’s best to consume the bliss balls within a week for peak flavor, although they are safe to eat beyond that timeframe if stored correctly.
Shelf Life
How Long They Stay Fresh
These No-Bake Peanut Butter Bliss Balls can typically remain fresh in the refrigerator for about a week. If you wish to keep them longer, consider freezing them, which can extend their shelf life for up to three months. When frozen, they can simply be pulled out and thawed for a quick snack.
Signs of Spoilage to Watch For
While these bliss balls can last a while, it’s important to be aware of signs of spoilage. If you notice a change in color, texture, or an unpleasant odor, it’s best to err on the side of caution and discard them. Proper storage practices will help minimize spoilage risks and keep your snacks enjoyable.
Serving Suggestions
Ideal Occasions for Enjoying Bliss Balls
These bliss balls shine as an after-school snack, providing a nutritious pick-me-up for kids and adults alike. Their wholesome ingredients make them an excellent choice for those busy days when you need something satisfying but not overly indulgent. They are also perfect for parties and gatherings as guests will appreciate a healthier snacking option.
Pairing Ideas
Enhancing the bliss ball experience can be done through thoughtful pairings. These can complement beverages such as milk, smoothies, or herbal teas. Additionally, serving the bliss balls alongside fresh fruit, yogurt, or a small cheese platter can elevate any snacking occasion. Their versatile nature means they fit effortlessly into various snacking scenarios, whether at home or on the go.
Conclusion
The No-Bake Peanut Butter Bliss Balls are a delightful fusion of creamy, savory, and sweet flavors, offering a satisfying treat that doesn’t require any baking time. With a preparation time of just 15 minutes, these bliss balls are perfect for snacking or dessert, providing wholesome nutrition with a rich taste experience, all while clocking in at approximately 150 calories each.

No-Bake Peanut Butter Bliss Balls Recipe
Ingredients
- 1 cup creamy peanut butter
- 1 cup rolled oats
- ½ cup honey
- ½ cup semi-sweet chocolate chips
- ½ cup powdered sugar
- 1 teaspoon pure vanilla extract
- a pinch sea salt
Instructions
- In a mixing bowl, combine the creamy peanut butter, honey, and vanilla extract until smooth.
- Add rolled oats, powdered sugar, and sea salt; stir until fully integrated.
- Fold in the chocolate chips gently.
- Roll the mixture into balls, about 1 inch in diameter.
- Place the balls on a parchment-lined baking sheet, spaced apart.
- Refrigerate for at least 30 minutes to firm up.
- Transfer to an airtight container for storage.
- Enjoy as a quick snack or sweet treat!