
Introduction
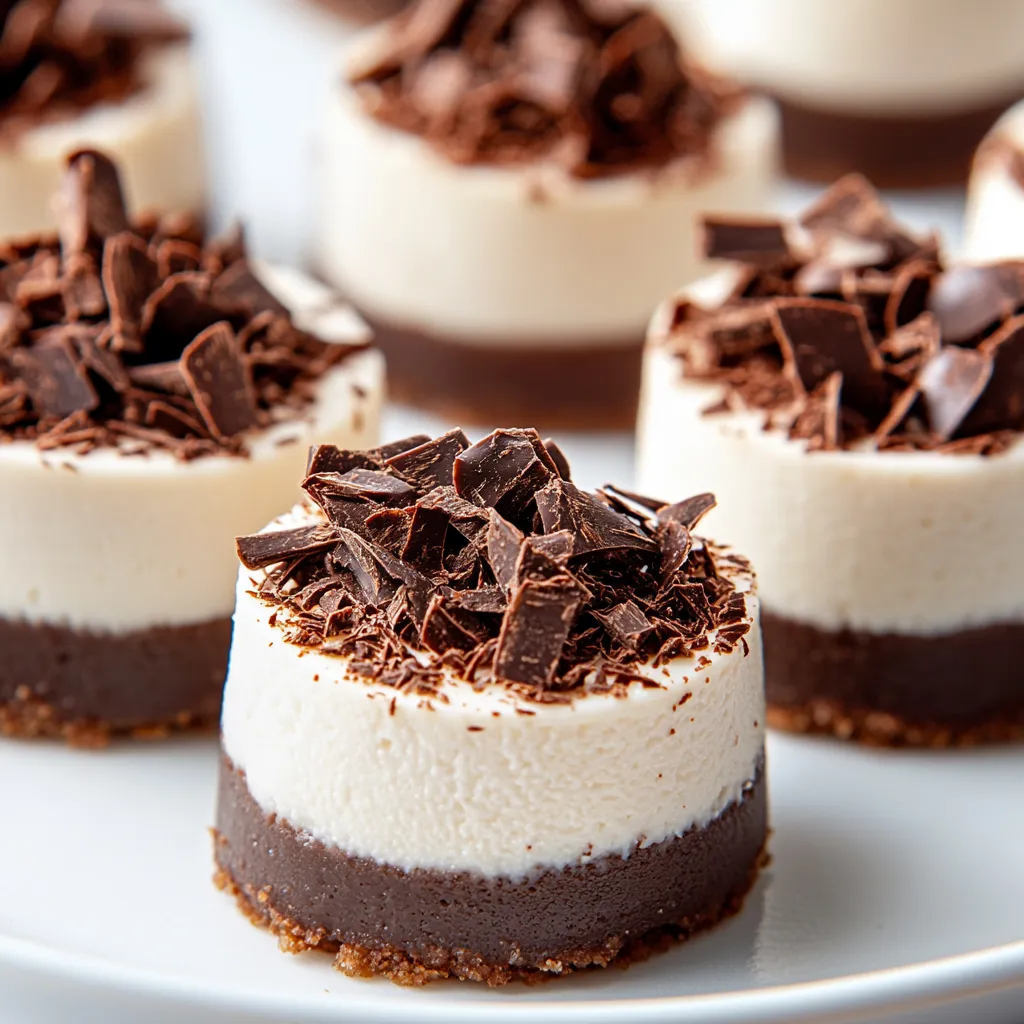
Delve into the world of decadent desserts with mini chocolate cheesecake bites. These delightful treats combine the rich flavors of chocolate and cream cheese, creating a bite-sized indulgence that’s perfect for any occasion. With their creamy filling nestled in a crunchy chocolate graham cracker crust, these cheesecake bites are not only visually appealing but also incredibly satisfying to eat. Whether you’re hosting a gathering or simply satisfying your sweet tooth, these cheesecake bites are sure to impress your guests. They also make for an ideal treat to celebrate special milestones or to surprise your loved ones with something sweet, any time of the year.
These mini chocolate cheesecake bites boast a perfect balance of sweetness and richness, making them an enticing choice for dessert aficionados and casual snackers alike. Each bite melts in your mouth, delivering an exquisite flavor experience. The versatility of these cheesecakes allows them to fit seamlessly into various occasions, from birthday parties to holiday celebrations or even as a delightful finish to a family dinner.
Recipe Overview
– Total Time: 2 hours 30 minutes
– Prep Time: 20 minutes
– Yield/Servings: 24 bites
– Difficulty: Not specified in the recipe
Ingredients
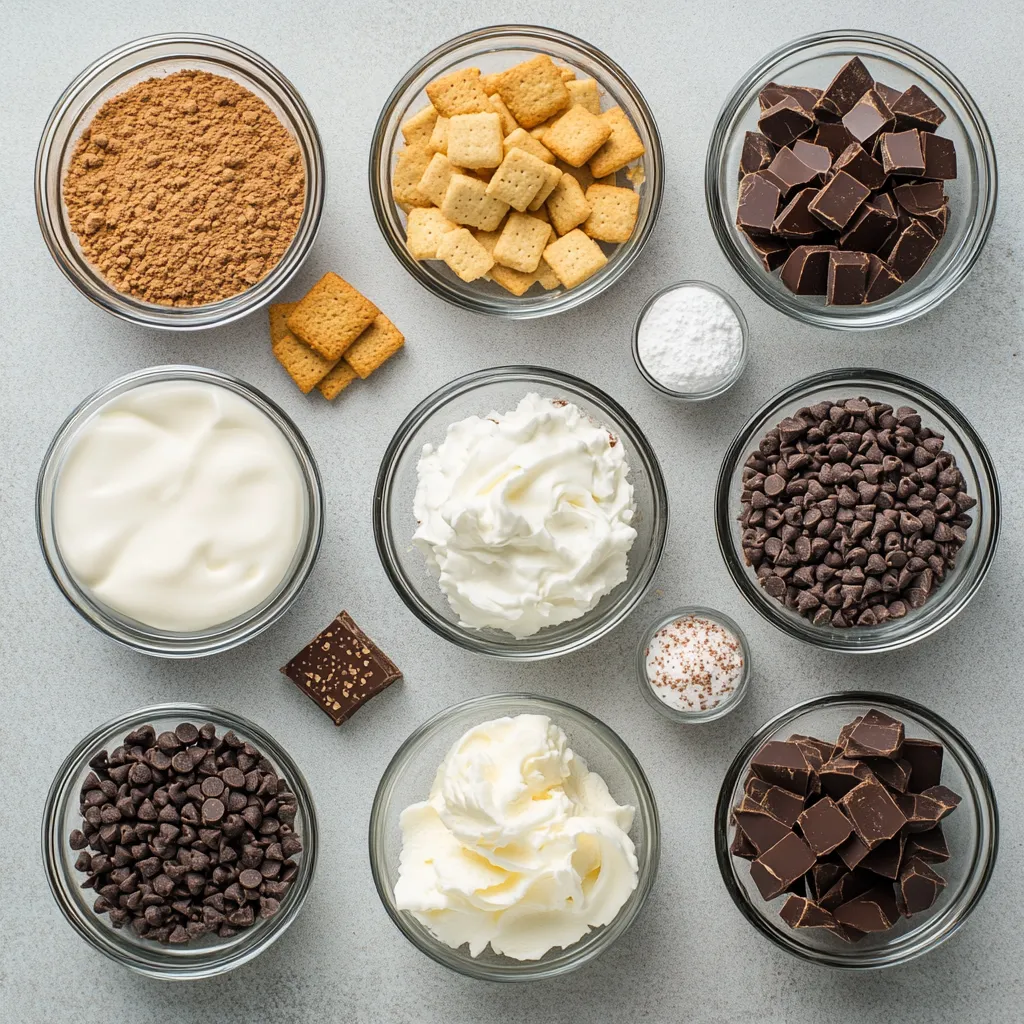
For the Crust
– 1 cup chocolate graham cracker crumbs
– 1/4 cup granulated sugar
– 1/2 cup unsalted butter, melted
For the Cheesecake Filling
– 8 oz cream cheese, softened to room temperature
– 1/2 cup powdered sugar
– 1/2 cup sour cream
– 1 tsp vanilla extract
– 1/2 cup semi-sweet chocolate chips, melted and slightly cooled
Optional Toppings
– Whipped cream, for topping
– Chocolate shavings or cocoa powder, for garnish
Instructions
1. Preheat the Oven: Begin by preheating your oven to 350°F (175°C). Prepare a mini muffin tin by lining it with paper liners, which will make it easier to remove the cheesecake bites later.
2. Prepare the Crust: In a medium-sized mixing bowl, combine the chocolate graham cracker crumbs and granulated sugar. Pour in the melted butter and stir until the mixture is well combined and has a texture similar to wet sand.
3. Form the Crusts: Take about 1 tablespoon of the crumb mixture and press it firmly into the bottom of each muffin liner to create an even and compact crust. Place the muffin tin in the preheated oven and bake for 5-7 minutes. Once done, remove from the oven and allow the crusts to cool completely.
4. Make the Cheesecake Filling: In a large mixing bowl, use an electric mixer to beat the softened cream cheese until it is smooth and creamy. Gradually add the powdered sugar, mixing until fully incorporated and there are no lumps.
5. Add Remaining Ingredients: Fold in the sour cream, vanilla extract, and melted chocolate. Mix until the filling is completely smooth and well combined, ensuring a rich and decadent flavor.
6. Fill the Crusts: Spoon the cheesecake filling into each cooled crust, filling them about 3/4 full to allow for slight expansion as they set.
7. Chill: Place the filled muffin tin in the refrigerator and let the cheesecake bites chill for at least 2 hours, or until they have set firmly.
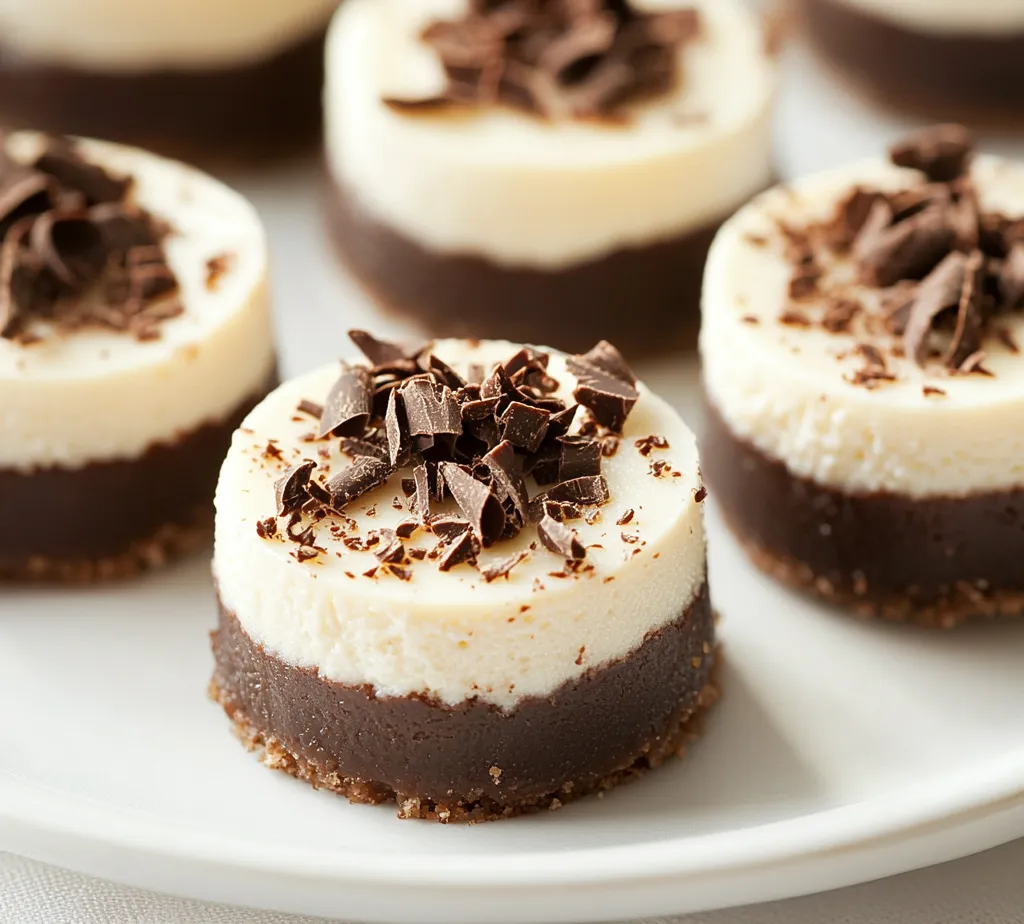
8. Serve: After chilling, carefully remove the mini cheesecakes from the muffin tin. Top each bite with a dollop of whipped cream, if desired, and finish with a sprinkle of chocolate shavings or a light dusting of cocoa powder for an elegant touch.
9. Enjoy: Serve these delightful mini chocolate cheesecake bites chilled and savor the delicious blend of flavors!
Equipment Needed
Preparing mini chocolate cheesecake bites requires a few essential kitchen tools that will facilitate the overall process and ensure successful results.
Mixing Bowls
Using the right mixing bowls is crucial in dessert preparation. For this recipe, a medium-sized bowl is necessary for mixing the crust ingredients, while a larger bowl is ideal for preparing the cheesecake filling. The size allows for ample space to combine and mix without spilling, ensuring a smooth and well-mixed consistency.
Electric Mixer
An electric mixer is highly recommended for achieving a smooth and creamy cheesecake filling. Beating the softened cream cheese with an electric mixer, as opposed to mixing by hand, greatly reduces the risk of lumps, creating a velvety texture. This tool will help blend other ingredients like powdered sugar and melted chocolate uniformly, ensuring that every bite bursts with flavor.
Mini Muffin Tin
A mini muffin tin is essential for shaping the cheesecake bites. This specific tin allows for bite-sized portions, making them perfect for events or gatherings. The mini muffin cups hold just the right amount of crust and filling, yielding perfectly portioned desserts that are easy to enjoy without the need for a fork.
Paper Liners
Using paper liners is not only practical for easy removal of the cheesecake bites but also enhances presentation. These liners prevent the cheesecakes from sticking to the tin, facilitating a quick and clean release. Additionally, colorful or themed paper liners can elevate the visual appeal when serving at parties or special occasions.
Step-by-Step Preparation
Preparing mini chocolate cheesecake bites involves a straightforward yet methodical approach to ensure the best flavors and textures are achieved in each bite.
Preheat the Oven
The first step in the baking process is preheating the oven to 350°F (175°C). This initial preparation is critical as it ensures that the mini cheesecakes bake evenly and thoroughly. Having the right temperature pre-set allows for timely baking and optimal texture in the crust, providing a solid base for the creamy filling that follows.
Prepare the Crust
To prepare the crust, combine chocolate graham cracker crumbs with granulated sugar in a medium bowl. Pouring in melted butter is key for binding the crumbs and sugar together. Stirring until the mixture resembles wet sand guarantees that the crust holds its shape once baked. This step is crucial for establishing a delicious, crunchy layer that complements the soft filling.
Form the Crusts
Using your hands or a small spoon, take about 1 tablespoon of the crumb mixture to form the crusts. Pressing this firmly into the bottom of each muffin liner ensures the base is compact and even. A well-formed crust will maintain its structure and provide a satisfying crunch to balance the creamy cheesecake layer. After pressing the mixture down, the muffin tin is placed in the oven for 5-7 minutes, allowing the crusts to set.
Bake the Crusts
Baking the crusts for the indicated time is crucial to achieving the right texture. After this time, you should check for a slight firmness and a gentle browning at the edges, which indicates that the crusts are ready. Once baked, allow them to cool completely before adding the cheesecake filling, as this helps prevent the filling from melting or losing its shape when ladled in.
Create the Cheesecake Filling
The journey to creating the perfect cheesecake filling starts by achieving an ultra-smooth texture. First, ensure that your cream cheese is at room temperature; this is critical as cold cream cheese can lead to a lumpy filling that fails to blend seamlessly with the other ingredients. Using an electric mixer, blend the softened cream cheese until it reaches a silky consistency—approximately 2-3 minutes on medium speed should suffice.
Once the cream cheese is smooth, you’ll gradually add in the powdered sugar while mixing. This gradual incorporation helps in achieving a more uniform mixture, minimizing the likelihood of grit from the sugar. After the powdered sugar is fully combined, it is vital to scrape down the sides of the mixing bowl using a spatula to ensure every bit is well mixed.
Combine All Ingredients
The next step is melding all the key ingredients for the cheesecake filling. Fold in the sour cream—this ingredient is essential not only for its creamy texture but also for the slight tang it adds, balancing the sweetness of the sugar. Next, pour in the vanilla extract for added depth of flavor. Finally, introduce the melted semi-sweet chocolate; make sure it has cooled slightly to prevent curdling the cream cheese.
Using a gentle folding technique combines these ingredients without deflating the cream cheese, ensuring a rich, dense texture that is characteristic of classic cheesecakes. Aim for a homogeneous blend, one that is free from lumps or streaks of chocolate, as this will enhance the decadence of each bite.
Filling the Crusts
It’s time to fill those crusts! Using a tablespoon or a small cookie scoop, carefully spoon the cheesecake filling into each of the cooled crusts. Ensure to fill each crust about 3/4 full, as the filling will expand slightly as it sets. Overfilling might lead to spills over the sides, compromising the aesthetics of the mini cheesecakes. A neat filling job not only ensures uniformity in appearance but also allows room for garnishing later.
Chilling the Cheesecakes
Chilling is a crucial step in the cheesecake preparation process. Once the mini cheesecakes are filled, they should be placed in the refrigerator to firm up for at least 2 hours. During this time, the flavors will meld beautifully, and the filling will set into a creamy, firm consistency.
If preferred, you could chill them overnight; a longer chilling period allows the cheesecake flavor to develop deeper and enhances the overall texture. The cooling process is what transforms the filling from a soft batter into a sliceable treat, making it one of the most important aspects of this recipe.
Serving Suggestions
To elevate the enjoyment of these mini chocolate cheesecake bites, exploring various serving ideas enhances their appeal.
Dollop of Whipped Cream
Adding a dollop of whipped cream on top of each cheesecake bite can dramatically enhance both the visual and taste appeal. The creamy, light texture of the whipped cream contrasts delightfully against the denser cheesecake, providing a balance of richness that makes each bite feel indulgent yet light.
Garnishing with Chocolate
For an elegant touch, consider garnishing with chocolate shavings or a dusting of cocoa powder. Chocolate shavings can be made by carefully peeling a chocolate bar with a vegetable peeler, resulting in delicate curls that add a professional flair. Cocoa powder, on the other hand, can be lightly dusted over the top, creating an appealing visual while asserting the chocolate flavor without adding extra sweetness.
Adding Fresh Ingredients
Fresh elements can add bursts of flavor and color. Consider placing a few fresh raspberries, strawberries, or mint leaves around the cheesecake bites or on top. These additions not only enhance the dish’s appearance but also impart contrasting flavors that can elevate the overall tasting experience.
Storage Tips
Proper storage can help maintain the freshness and flavors of your mini cheesecake bites, ensuring you can enjoy them over a few days.
Refrigeration Guidelines
Store any leftover mini cheesecake bites in an airtight container in the refrigerator. They will maintain their best quality for up to 5 days. The refrigerator helps retain the creamy texture and protects against moisture buildup, which could lead to a soggy crust. Make sure to keep them slightly spaced, as they are delicate and can easily stick together.
Freezing Options
If you need to store the cheesecake bites for a longer period, freezing is an excellent option. To do this, allow the bites to set completely, then carefully transfer them to a baking sheet lined with parchment paper and freeze until solid. Once frozen, you can move them to a more compact airtight container or freezer-safe bag. They’ll last for about two months in the freezer. To enjoy, thaw them in the refrigerator overnight for best results, allowing the texture to return to its creamy state.
Variations of the Recipe
Adapting this delightful recipe to your taste preferences can lead to new creations.
Additional Flavors
For those looking to customize their cheesecake filling, consider adding flavored extracts like almond or orange for unique twists. You can also incorporate mix-ins like chopped nuts or crushed cookies for subtle textures within the creamy filling.
Crust Alternatives
While the chocolate graham cracker crust is a classic, you can switch things up by using crushed Oreo cookies or vanilla wafer cookies for varied flavor profiles. Gluten-free graham crackers are also an excellent alternative for those with gluten sensitivities.
Different Toppings
Explore a range of toppings to finish off your cheesecake bites. Fruit compote, caramel drizzle, or even a sprinkle of sea salt can create an interesting juxtaposition to the sweetness of the cheesecake. Each topping can tell a different story and transform your mini cheesecakes into unique dessert experiences.
Nutritional Information
Gaining insight into the nutritional aspects of mini chocolate cheesecake bites can help with portion control.
Caloric Overview
Each cheesecake bite contains approximately 100-120 calories. While this may vary based on ingredient brands and preparation methods, being aware of the caloric content can help you enjoy these treats in moderation.
Ingredient Benefits
Key ingredients like cream cheese provide calcium and protein, while dark chocolate brings antioxidants along with the indulgence. Enjoying these bites can offer a sweet escape while still providing some nutritional value.
Serving Size Considerations
With an ideal serving size at one to two bites, this allows for guilt-free indulgence, satisfying sweet cravings without overindulgence. Balancing enjoyment with moderation is essential.
Conclusion
These mini chocolate cheesecake bites deliver a delightful combination of rich chocolate and creamy textures. With a manageable preparation time and elegant presentation options, they make an irresistible treat for any occasion. Enjoy them chilled to fully appreciate the harmonious blend of flavors and textures in every bite.

Mini Chocolate Cheesecake Bites Recipe
Ingredients
- 1 cup chocolate graham cracker crumbs
- ¼ cup granulated sugar
- ½ cup unsalted butter melted
- 8 oz cream cheese softened
- ½ cup powdered sugar
- ½ cup sour cream
- 1 tsp vanilla extract
- ½ cup semi-sweet chocolate chips melted
- Whipped cream for topping (optional)
- Chocolate shavings or cocoa powder for garnish (optional)
Instructions
- Preheat the oven to 350°F (175°C) and line a mini muffin tin with paper liners.
- In a bowl, combine chocolate graham cracker crumbs and granulated sugar, then add melted butter and mix until combined.
- Press 1 tablespoon of the mixture into each muffin liner to form a crust and bake for 5-7 minutes.
- In a large bowl, beat softened cream cheese until smooth, then gradually add powdered sugar until fully incorporated.
- Fold in sour cream, vanilla extract, and melted chocolate until the filling is smooth.
- Spoon the cheesecake filling into each cooled crust, filling them about ¾ full.
- Chill the filled muffin tin in the refrigerator for at least 2 hours until set.
- Carefully remove the mini cheesecakes from the tin and top with whipped cream if desired.
- Garnish with chocolate shavings or cocoa powder before serving.