

Introduction
Cinnamon rolls hold a special place in the hearts of many food lovers, and for good reason. These sweet, pillowy delights combine the warm, aromatic spices of cinnamon and nutmeg with a rich, buttery filling that melts in your mouth. Whether you’re preparing for a cozy brunch, a festive gathering, or simply indulging on a weekend, homemade cinnamon rolls are the perfect treat to share with family and friends. The anticipation builds as the rolls bake, filling the kitchen with an enchanting aroma that beckons everyone to the table.
Homemade treats, particularly those like these heavenly cinnamon rolls, instill a sense of warmth and personal touch that store-bought options simply can’t match. There’s something magical about watching the dough rise, knowing you will soon enjoy the fruits of your labor. Each roll offers a taste of comfort, blending rich flavors and textures that promise satisfaction in every bite.
What makes these cinnamon rolls stand out is their incredible softness and that gooey, decadent filling. Unlike many other versions, this recipe results in rolls that are delightfully fluffy on the inside, while the luscious cream cheese frosting perfectly complements the warm spices. The contrast between the sweet, creamy topping and the aromatic, slightly spiced filling creates a delightful sensory experience.
Recipe Overview
– Total Time: 2 hours
– Prep Time: 30 minutes
– Yield/Servings: 12 rolls
– Difficulty: Not specified in the recipe
Ingredients
Main Dough Ingredients
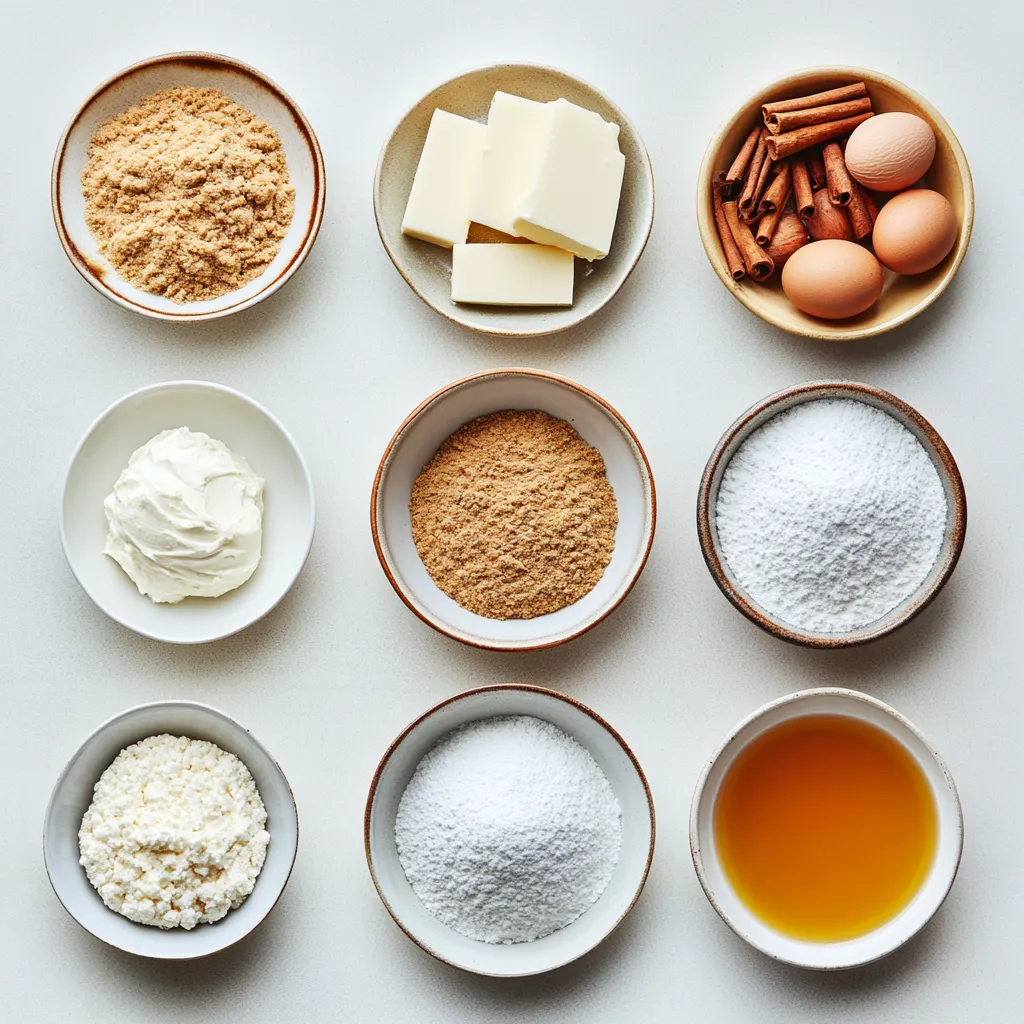
– 4 cups all-purpose flour (plus extra for dusting)
– 1/2 cup granulated sugar
– 1 packet (2 1/4 tsp) active dry yeast
– 1 teaspoon salt
– 1/2 cup whole milk, warmed to about 110°F (43°C)
– 1/2 cup unsalted butter, melted and slightly cooled
– 2 large eggs
– 1 tablespoon pure vanilla extract
Filling Ingredients
– 1/2 cup unsalted butter, softened to room temperature
– 1 cup packed brown sugar
– 2 tablespoons ground cinnamon
– 1/2 teaspoon ground nutmeg (optional)
Cream Cheese Frosting Ingredients
– 4 oz cream cheese, softened
– 1/4 cup unsalted butter, softened
– 1 cup powdered sugar
– 1 teaspoon pure vanilla extract
– 1-2 tablespoons milk (to reach desired consistency)
Instructions
1. Prepare the Dough: In a large mixing bowl, whisk together 2 cups of flour, granulated sugar, active dry yeast, and salt. In another bowl, combine the warmed milk, melted butter, eggs, and vanilla extract, mixing well until fully incorporated. Gradually add the wet mixture to the dry ingredients, stirring until you achieve a cohesive mixture.
2. Knead the Dough: Incorporate the remaining flour, one cup at a time, until a soft dough forms. Transfer the dough to a floured surface and knead for 5-7 minutes or until the dough is smooth and elastic.
3. First Rise: Place the kneaded dough into a greased bowl, cover it with a damp cloth or plastic wrap, and allow it to rise in a warm spot for about 1 hour or until it has doubled in size.
4. Prepare the Filling: In a small mixing bowl, blend the softened butter, brown sugar, ground cinnamon, and nutmeg (if using) until well combined and smooth.
5. Roll Out the Dough: After the dough has risen, gently punch it down to release air. Roll it out on a floured surface into a rectangle approximately 16×24 inches in size.
6. Spread the Filling: Spread the cinnamon filling evenly over the rolled-out dough, ensuring to leave a small border around the edges.
7. Roll and Cut: Starting from one long edge, carefully roll the dough into a tight log. Using a sharp knife or dental floss, slice the log into 12 equal pieces for uniform rolls.
8. Second Rise: Arrange the rolls in a greased baking dish, leaving a little space between each one. Cover with a cloth and let them rise for an additional 30-45 minutes or until they have puffed up.
9. Preheat the Oven: While the rolls are rising, preheat your oven to 350°F (175°C).
10. Bake: Bake the cinnamon rolls for 25-30 minutes or until they are golden brown and fully cooked.
11. Make the Frosting: While the rolls bake, beat together the softened cream cheese and butter in a medium bowl until creamy. Gradually add the powdered sugar and vanilla extract, mixing until smooth. Adjust the consistency with milk as needed.
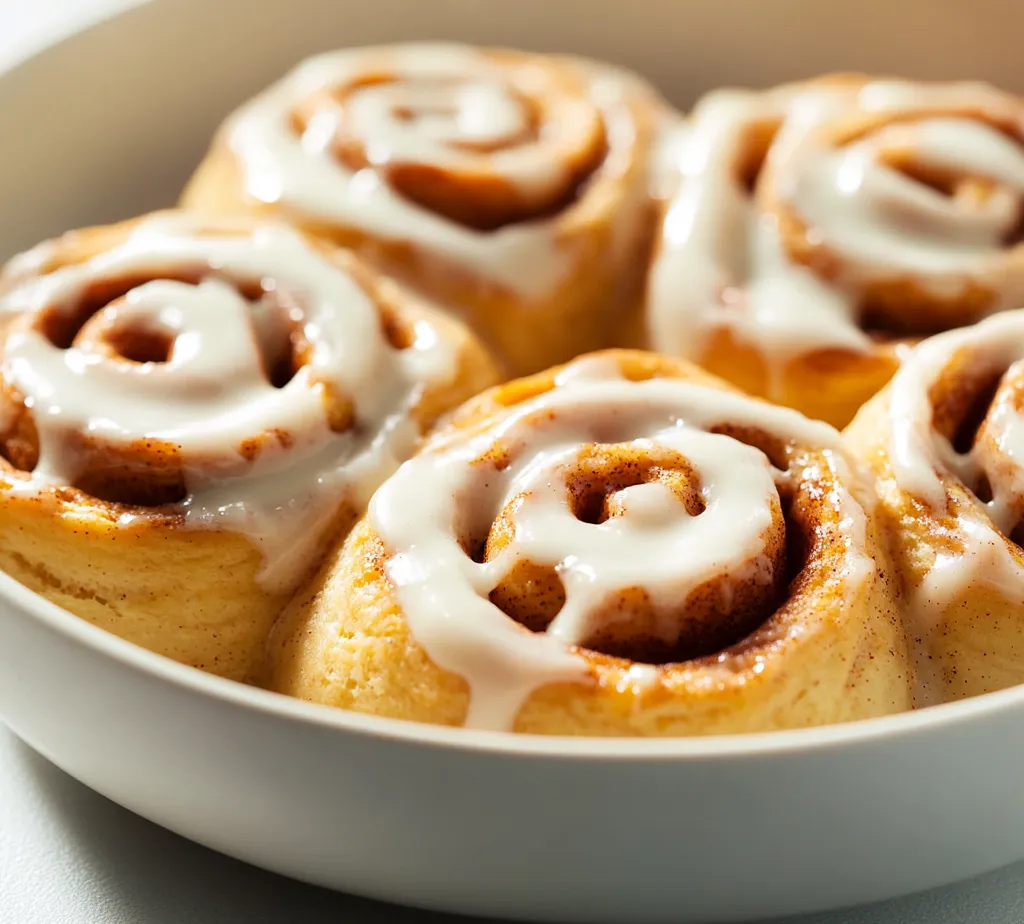
12. Frost the Rolls: Once the rolls are out of the oven, let them cool for about 10 minutes. Generously spread the cream cheese frosting over the warm rolls.
13. Serve & Enjoy: Serve these delightful cinnamon rolls warm and relish the soft, gooey goodness of your homemade treat!
Preparing the Dough
The foundation of any great cinnamon roll starts with an excellent dough, and preparing this dough involves a careful combination of dry and wet ingredients. When mixing the dry components, it’s essential to whisk them thoroughly to ensure that the yeast and salt are evenly distributed throughout the flour. This helps in creating a uniform texture, which leads to more consistent results.
Proper measurement of flour is crucial; packed flour can lead to a denser roll, while too little may result in a sticky mess. Incorporating the wet ingredients follows, where warmth plays a critical role. The milk should ideally be around 110°F (43°C) to activate the yeast effectively. If the liquid is too hot, it may kill the yeast, while too cold won’t activate it, causing the dough not to rise properly.
As the dough comes together, the magic of gluten formation begins. Kneading is a vital step to develop this gluten structure, leading to a soft and elastic dough. Techniques include folding and pressing the dough; a well-kneaded dough will bounce back when poked and feel smooth to the touch.
First Rise
Creating a suitable environment for the dough to rise is fundamental in achieving those light and airy cinnamon rolls. After kneading, the dough should be placed in a greased bowl and covered with a damp cloth or plastic wrap. This covering helps retain moisture while providing warmth, which is essential for the yeast to flourish.
An ideal rising location is somewhere warm, away from drafts. Many bakers find that placing the dough in a slightly warmed oven helps create the perfect rising environment.
Timing is crucial; the dough is typically ready for the next step when it has doubled in size. This may take around an hour, but various factors, such as the ambient temperature and yeast vitality, can influence the time required. Patience is key during this stage; a thoroughly risen dough ensures a better texture and overall experience in the final product.
Preparing the Filling
The filling is what elevates cinnamon rolls from basic to extraordinary. Each ingredient plays a specific role; butter acts as a binder, giving moisture and richness, while brown sugar brings caramel-like sweetness that caramelizes beautifully as the rolls bake. The addition of ground cinnamon provides that unmistakable aroma and flavor, while nutmeg adds a touch of warmth.
When preparing the filling, it’s desirable to blend the ingredients into a smooth consistency. This can be accomplished using a fork or a small mixer. It’s essential to note that the balance of sweetness is crucial: any excess sugar may make the filling overly sweet, while too little could mean a bland experience. Tasting a small amount of the mixture can help ensure it meets your flavor expectations. Recognizing the importance of this filling and its role can elevate your cinnamon rolls to a heavenly status that captivates anyone lucky enough to indulge!
Importance of Even Thickness
Achieving a consistent thickness when rolling out the dough is crucial for ensuring that each cinnamon roll bakes evenly. Rolls that are too thick in some areas may not cook through fully, while those that are too thin can burn or dry out. A uniform thickness not only leads to even cooking but also improves the final visual appeal of the rolls, giving them a professional-looking finish.
Techniques for Rolling
To roll out the dough evenly, start from the center and push outward in all directions. This technique helps maintain even pressure, leading to a consistent thickness throughout the dough. Use a rolling pin, applying gentle yet firm pressure, and periodically lift the dough to prevent sticking. If the dough resists rolling, let it rest for a few minutes; this relaxation allows the gluten to settle, making it easier to work with.
Preventing Sticking with Flour
Flour is your best friend when it comes to preventing sticking. Lightly dust your countertop and rolling pin with flour before placing the dough down. Make sure to add flour as needed during the rolling process, but avoid overdoing it, as this can dry out the dough and affect the roll’s texture. If the dough starts to stick, gently lift and sprinkle more flour underneath.
Maintaining a Tight Roll
As you roll the dough, keep it tight by controlling the roll’s tension. Start by creating a tight initial seam as you begin rolling, ensuring that the filling stays contained within. If the dough becomes loose or starts to unravel, gently pinch it back together to maintain a secure roll.
Spreading the Filling
Ensuring Even Distribution
Distributing the filling evenly across the rolled-out dough is key to achieving that delightful, gooey cinnamon flavor in every bite. Begin from the center and spread outwards towards the edges, ensuring that every section of the dough is generously coated.
Techniques for Spreading
Using an offset spatula or the back of a spoon can help achieve smooth, even coverage of the filling. Start with the softened butter, followed by the brown sugar and cinnamon mixture. Ensure that no corners are left bare, as this can result in some rolls lacking the signature flavor.
Space Management for Borders
Leave about a half-inch border around the edges of the dough when spreading the filling. This prevents any overflow during the rolling process and ensures a clean edge for sealing the dough. If the filling extends to the edge, it may ooze out as the rolls rise and bake, causing a mess.
Tips for Avoiding Mess
To minimize mess when rolling with filling, consider using parchment paper to line your work surface. This makes it easier to lift the rolled dough before placing it in the baking dish, while also keeping your space cleaner. Additionally, use plastic wrap to cover the filling until you’re ready to apply it, which can help keep it fresh and easy to spread.
Containing the Filling
To ensure the filling does not leak out during baking, take the extra step of pressing the edges of the rolled dough together firmly before cutting it into portions. This will contain the sticky goodness inside and create the perfect cinnamon roll experience.
Rolling and Cutting
Techniques for Uniform Rolls
Cutting the rolled dough into equal-sized pieces is essential for even baking and presentation. After rolling the dough into a log, a gentle yet firm approach when slicing is important to avoid compressing the rolls. Try using a serrated knife or unflavored dental floss to slice through the dough without squishing it.
Using Tools for Precision
For added precision, you can use a ruler to measure the thickness of each cut. Aim for about 1.5 inches per roll, which is standard for achieving fluffy, properly risen rolls. Using equally sized rolls results in uniform baking and ensures everyone gets the same delicious treat.
The Importance of Equal Portions
Equal portions are vital not just for fairness, but they also contribute to consistent baking times. If some rolls are substantially larger than others, the smaller ones may overbake, while the larger ones may remain doughy. Striving for uniformity in size will yield a perfect batch every time.
Handling the Dough Log
Tips for Keeping the Roll Tight
As you cut the dough, handle each piece gently to retain their shape. If any rolls feel loose, you can gently reshape them by tucking the edge beneath and rolling slightly in your palms to create tighter rolls. This makes sure they rise beautifully during the second rise.
Second Rise
Importance of the Second Rise
The second rise is critical for developing the cinnamon rolls’ soft, fluffy texture. During this time, the yeast continues to work, introducing air pockets in the dough which ensures a light and airy final product. Skipping this step or rushing through it can result in dense rolls.
Creating a Fluffy Texture
In addition to volume, the second rise allows the gluten structure in the dough to relax, creating a tender crumb. The gentle warmth during this period encourages the yeast to produce carbon dioxide, which will help lift the rolls as they bake.
How to Set Up the Rolls for Success
For optimal results, place the rolls in a warm, draft-free environment while they undergo the second rise. A turned-off oven with the light on or near a warm window can work well. Cover them lightly with a cloth to retain moisture; this prevents the dough from forming a tough skin.
Timing and Environment
Best Practices for Rise Duration
The recommended rise time for the second rise is about 30-45 minutes, but times may vary based on the room temperature. If your kitchen is cool, they may need a little longer. Always keep an eye on the dough’s volume—aim for it to double in size.
Observing Increased Volume
A visual cue of success is when the dough rolls look puffed and slightly domed. If the rolls feel soft to the touch and spring back gently, you are ready for the next step.
Preheating the Oven
Importance of Preheating
Preheating your oven is crucial for achieving well-baked cinnamon rolls. Introducing the rolls to a hot environment from the very start helps the yeast stay active and leads to a beautifully risen and golden exterior.
Ensuring Even Baking
A preheated oven ensures that baking begins evenly, preventing the outside from browning before the inside has had time to cook through. A good rule of thumb is to aim for a consistent temperature of 350°F (175°C) during the preheating process.
Recommended Oven Temperature
This temperature is commonly used for baking bread and pastries, as it strikes the perfect balance between browning the outside and cooking the inside thoroughly. Always check with a reliable oven thermometer if you suspect your oven’s accuracy to prevent issues during baking.
Baking the Rolls
Correct Baking Time
Bake the cinnamon rolls for 25-30 minutes, checking for visual cues towards the end of the baking time. The tops should become a lovely golden brown, and the rolls should feel firm yet slightly springy to the touch.
Signs to Look For
Besides the golden color, other signs of proper baking include the aroma filling the kitchen and initial bubbling from the filling around the edges of the rolls. Visual inspection is key; if they are not yet golden, give them a few more minutes.
Achieving Golden Brown Perfection
To achieve that coveted golden brown top, rotate the baking dish halfway through the baking time. This will ensure even browning on all sides, encouraging a uniform color across your rolls.
Cooling Techniques
Best Practices to Maintain Softness
Allow the rolls to cool in the pan for about 10 minutes before frosting. During this time, they continue to set and develop that characteristic gooey texture. Avoid leaving them out for too long, as this could lead to a crust forming on the surface.
Making the Frosting
Ingredients and Their Importance
The frosting of your cinnamon rolls adds the final touch of sweetness and creaminess. The combination of cream cheese and butter yields a frosting that is both rich and spreadable, perfectly complementing the cinnamon flavor.
Why Use Cream Cheese
Cream cheese is essential due to its tangy flavor and ability to create a rich, luscious texture. It balances the sweetness of the sugar while contributing to a creamy consistency that adheres beautifully to the rolls.
Role of Butter in Frosting
Butter adds an extra layer of richness and aids in achieving a fluffy, spreadable texture. Ensure that it is softened to room temperature for easy mixing; this allows for a smoother and creamier result when combined with cream cheese.
Mixing for Perfect Consistency
Techniques for Creaminess
To achieve a smooth frosting, begin mixing the softened cream cheese and butter together until well incorporated. Gradually add the powdered sugar until fully mixed, then incorporate the vanilla extract. Keep mixing until there are no lumps left and the mixture is light and fluffy.
Adjusting With Milk as Needed
If your frosting is too thick, add milk one tablespoon at a time until you have reached your desired consistency. Aim for a spreadable but somewhat thick frosting; too runny may lead to drips off your warm cinnamon rolls.
Frosting the Rolls
Timing for Frosting Application
Frost the rolls immediately after they have cooled for about 10 minutes. Frosting a warm roll helps the frosting melt slightly and soak into the crevices, enhancing the flavor and giving that perfect gooey profile.
Best Practices for Warm Rolls
Use a spatula to generously apply the frosting across the tops of the warm cinnamon rolls. The heat from the rolls will slightly melt the frosting, allowing it to cover more area and absorb deliciously into the rolls.
Techniques for Even Distribution
For an even distribution, work in a back-and-forth motion across the surface of the rolls, ensuring every bun is equally frosted. You may also use a piping bag for a more delicate application, especially if you are looking for a finished display.
Presentation Tips
Zigzag Drizzling for Aesthetic Appeal
For an inviting presentation, consider drizzling extra frosting over the rolls in a zigzag pattern. This not only enhances visual appeal but creates a delightful experience for the eyes and palate alike.
Adding Final Touches Like Cinnamon or Nuts
If desired, finish with a dusting of additional ground cinnamon or finely chopped nuts for added texture and flavor. These simple touches enhance the aesthetic and can elevate the overall taste experience.
Serving and Enjoying
Serving Suggestions
For an optimal enjoyment experience, serve the cinnamon rolls warm, ideally straight from the oven. Accompany them with a side of hot coffee or tea to balance the sweetness with a touch of warmth.
Presentation Styles
Arrange the rolls on a rustic wooden board or a delicate cake stand to create a charming display. This makes for a delightful centerpiece for brunch or dessert tables.
Best Practices for Enjoyment
Tips for Maintaining Warmth
If not serving immediately, cover the cinnamon rolls with aluminum foil or a clean kitchen towel to keep them warm and soft. Avoid chilling them as the dough may dry out and affect the texture.
Creating a Cozy Atmosphere
Create a cozy atmosphere while serving by dimming lights and adding some music – a warm cup of coffee or hot chocolate can enhance the experience, inviting everyone to indulge in this sweet treat.
Conclusion
The Heavenly Soft & Gooey Cinnamon Rolls are a delightful blend of sweet, warm flavors wrapped in a fluffy, tender dough. With their rich cream cheese frosting, each bite offers a perfect balance of gooey and soft textures. Timing and patience are essential for achieving ultimate indulgence, making them an excellent treat for any occasion.

Heavenly Soft and Gooey Cinnamon Rolls
Ingredients
- 4 cups all-purpose flour
- ½ cup granulated sugar
- 1 packet active dry yeast
- 1 teaspoon salt
- ½ cup whole milk
- ½ cup unsalted butter
- 2 large eggs
- 1 tablespoon pure vanilla extract
- ½ cup unsalted butter
- 1 cup packed brown sugar
- 2 tablespoons ground cinnamon
- ½ teaspoon ground nutmeg
- 4 oz cream cheese
- ¼ cup unsalted butter
- 1 cup powdered sugar
- 1 teaspoon pure vanilla extract
- 1-2 tablespoons milk
Instructions
- In a large bowl, whisk together 2 cups of flour, sugar, yeast, and salt.
- Combine warmed milk, melted butter, eggs, and vanilla in another bowl, then mix with dry ingredients.
- Add remaining flour gradually until a soft dough forms, then knead for 5-7 minutes.
- Let the dough rise in a greased bowl for about 1 hour until doubled in size.
- Mix softened butter, brown sugar, cinnamon, and nutmeg for the filling.
- Roll out the dough into a rectangle, spread the filling, and roll tightly.
- Cut the log into 12 equal pieces and arrange in a greased baking dish.
- Let the rolls rise for another 30-45 minutes, then preheat the oven to 350°F.
- Bake for 25-30 minutes until golden brown.
- Beat cream cheese and butter, then mix in powdered sugar and vanilla for frosting.
- Spread frosting over warm rolls and serve.