
Introduction
Indulge your sweet tooth with these Decadent Peanut Butter Butterfinger Bliss Balls. Combining the rich, creamy flavor of peanut butter with the iconic crunch and sweetness of Butterfinger candy bars, these bliss balls are a true treat. Perfect for any celebration, whether it’s a birthday party, holiday gathering, or just a special dessert night at home, these balls are sure to impress your friends and family with their delightful flavor and appealing look.
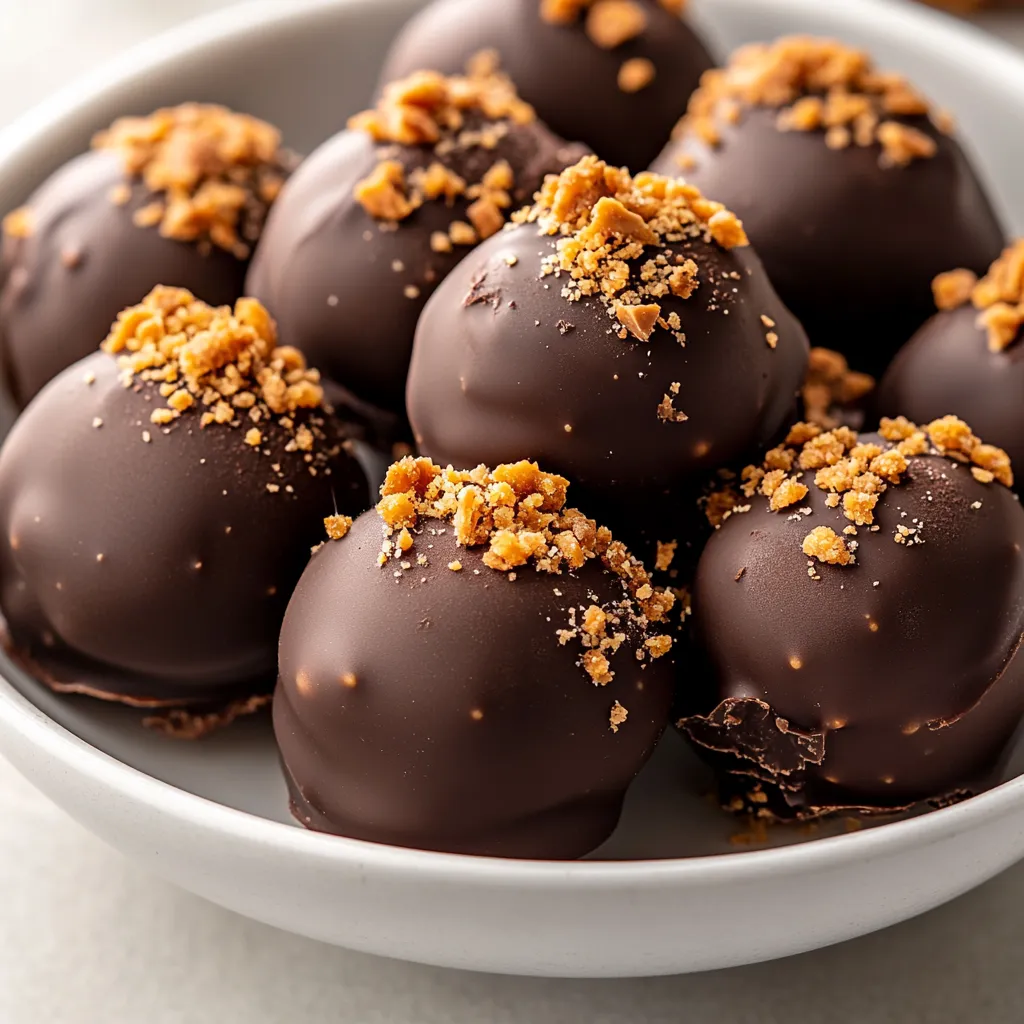
The unique texture of these bliss balls makes each bite an experience. The creamy peanut butter forms a luscious base, while the crushed Butterfinger adds a delightful crunch that contrasts beautifully with the smooth chocolate coating. They are not only delicious but also visually appealing, making them an excellent choice for serving at gatherings or even as a homemade gift.
Whether you’re savouring them alone or sharing them with loved ones, these peanut butter bliss balls promise an irresistible blend of taste and texture—great for those who appreciate the combination of sweet and salty in a single bite.
Recipe Overview
– Total Time: 1 hour
– Prep Time: 15 minutes
– Yield: 20 bliss balls
– Difficulty: Not specified in the recipe
Description
These bliss balls feature a delightful pairing of peanut butter and Butterfinger flavor that is both creamy and crunchy. They incorporate easy-to-find ingredients and require simple preparation steps, making them a fantastic choice for both novice and experienced bakers alike.
Flavor Profile
The primary flavors of these bliss balls come from creamy peanut butter and sweet Butterfinger candy bars, creating a deliciously sweet and savory experience that is hard to resist. The addition of milk chocolate gives a rich chocolate layer, enhancing the overall flavor and making them incredibly addictive.
Occasion Suitability
These bliss balls are ideal for various occasions, from casual gatherings with friends to more formal celebrations such as birthdays and holiday parties. They are fun to serve and even more fun to eat, making them a perfect addition to any dessert table.
Ingredients
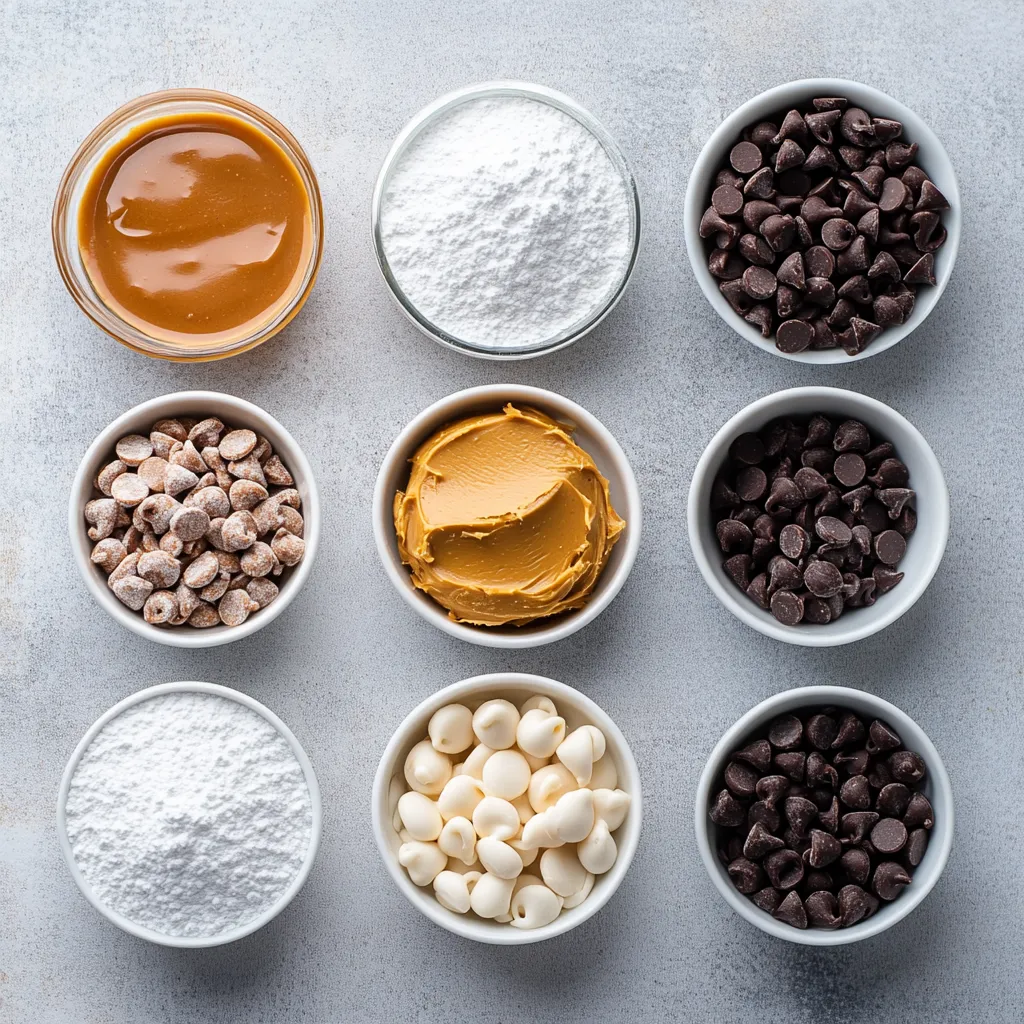
– 1 cup creamy peanut butter
– 1/2 cup powdered sugar
– 1 cup finely crushed Butterfinger candy bars (approximately 4-5 bars)
– 1/2 teaspoon pure vanilla extract
– 1 cup milk chocolate chips
– 1 tablespoon coconut oil (optional, for a silkier melt)
– Additional crushed Butterfinger for garnish (optional)
List of Main Ingredients
The main ingredients in this recipe are simple yet effective, allowing the flavors to shine through. Creamy peanut butter and finely crushed Butterfinger form the base of the balls, while powdered sugar sweetens the mixture and vanilla extract adds depth. The chocolate chips create the glossy coat that makes these treats so visually appealing.
Ingredient Substitutions
Not specified in the recipe. If you desire variations, consider using natural peanut butter for a less sweet, more wholesome option, or swap out the milk chocolate chips for dark chocolate for a richer, more intense flavor.
Optional Garnishes
The recipe mentions an optional garnish of additional crushed Butterfinger for enhancing both beauty and flavor. This simple touch can elevate your presentation, making the treats not only taste good but also look delightful on the serving platter.
Preparation Steps
Mixing the Dough
Start by selecting a medium-sized mixing bowl and combining creamy peanut butter, powdered sugar, crushed Butterfinger, and vanilla extract. It is essential to stir the mixture thoroughly until it transforms into a cohesive dough, ensuring all ingredients are well-mixed. This step is crucial for achieving the right texture, allowing the dough to hold its shape when rolled into balls.
Shaping the Bliss Balls
Once the dough is well-blended, the next step involves forming the bliss balls. Take portions of the dough with your hands and roll them into small balls, approximately 1 inch in diameter. It’s best to keep them uniform in size for even coating and a pleasing presentation. After rolling, arrange the balls on a baking sheet lined with parchment paper, making sure they are close but not touching to allow for easy handling later on.
Chilling for Firmness
After shaping all the balls, place the baking sheet in the freezer and let them chill for about 30 minutes. This chilling process is vital as it helps firm up the peanut butter mixture, making it easier to dip into chocolate later. The chill also enhances the flavors, ensuring each bite is as delicious as possible.
Melting the Chocolate
Choosing the Right Chocolate
For this recipe, milk chocolate chips are specified, which provide a sweet and creamy coating that complements the rich peanut butter filling. If you’re looking to customize, you may choose to experiment with other chocolate types, such as dark or semi-sweet, but keep in mind that the final taste will vary accordingly.
Melting Techniques
To melt the milk chocolate chips, use a microwave-safe bowl and heat the chocolate in 30-second intervals. Stir after each interval to ensure even melting and prevent burning. This technique helps maintain smooth, glossy chocolate that will coat the bliss balls beautifully. Patience is key; keep an eye on the chocolate to achieve the perfect consistency.
Adding Coconut Oil for a Glossy Finish
If you desire a shinier finish on your chocolate coating, the recipe suggests stirring in coconut oil once the chocolate has fully melted. This optional step results in a more luxurious texture, ensuring that the chocolate covers the bliss balls evenly and provides an appealing visual gloss.
Coating the Bliss Balls
Proper Dipping Technique
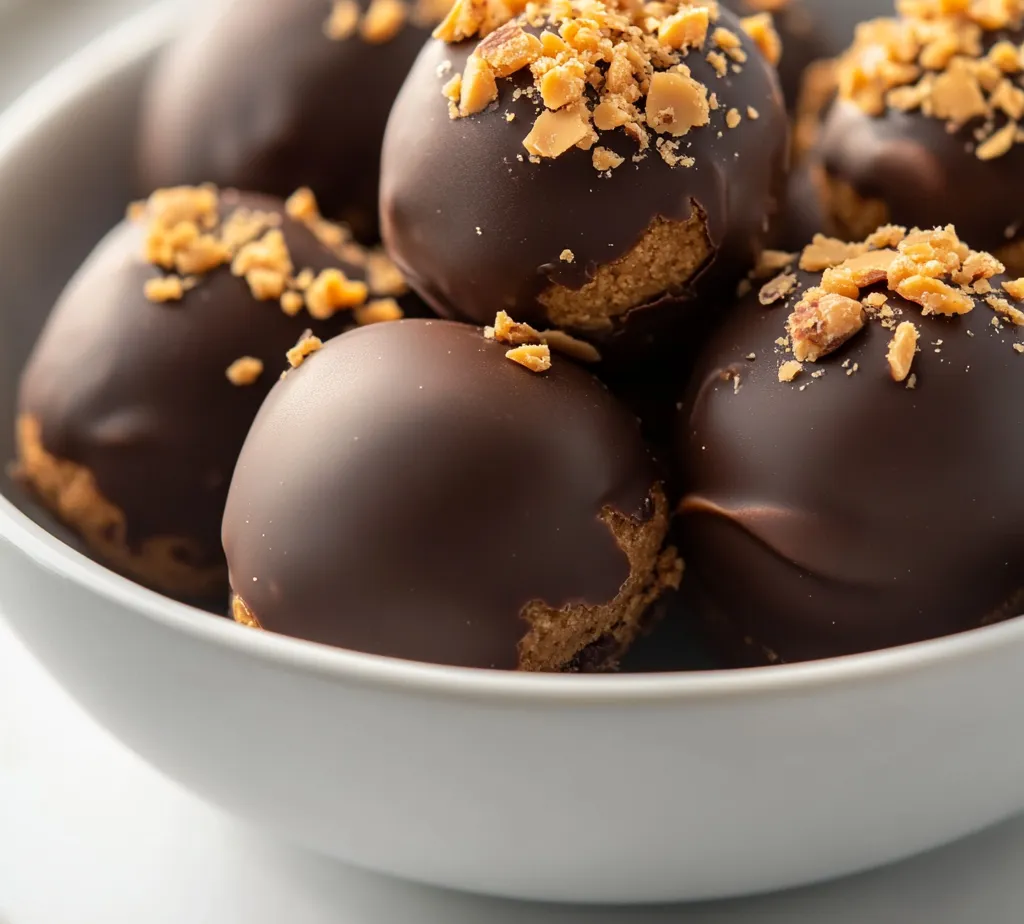
Once the peanut butter balls have chilled, it’s time to coat them in the melted chocolate. For the best coverage, dip each ball into the melted chocolate, using a fork to help manage the process. Ensure each ball is entirely coated before lifting it from the chocolate, allowing any excess to drip back into the bowl. This technique ensures they are not overly thick and maintains a smooth finish.
Allowing Excess Chocolate to Drip
When you lift the bliss balls from the chocolate, allow any excess to drip off before placing them back on the parchment-lined baking sheet. This step is crucial for avoiding clumps of chocolate that can spoil the visual appeal of your treats. A gentle shake can help remove additional chocolate, leading to a perfect finish.
Additional Garnishing Options
Before the chocolate sets, consider sprinkling additional crushed Butterfinger on top of each ball for a delightful topping that complements the rich flavors. This optional step not only adds extra texture but also enhances the visual appeal, making your bliss balls look even more tempting.
Chilling and Setting
Importance of Chilling Chocolate-Covered Balls
After all the bliss balls have been coated in chocolate, they need to go back into the refrigerator for another 15-20 minutes. This chilling period is essential for firming up the chocolate coating, ensuring it sets perfectly. A well-chilled chocolate shell provides a satisfying bite, enhancing the overall enjoyment of these delicious treats.
Optimal Chilling Time
For optimal texture and flavor, it is important to chill the peanut butter bliss balls properly. The initial chilling time of 30 minutes in the freezer is crucial, as it allows the ingredients to firm up, making the balls easier to handle and dip into chocolate. If you find that your mixture is still too soft or sticky during rolling, you may consider extending the chilling time by an additional 10 to 15 minutes, especially in warmer environments. Following the final assembly, an additional 15-20 minutes in the refrigerator allows the chocolate coating to set thoroughly, maintaining the balls’ charming round shape.
Signs that the Chocolate is Hardened
Understanding when the chocolate has adequately hardened is essential to ensure that your bliss balls have the perfect finish. Look for a matte appearance on the surface of the chocolate instead of a glossy one. A gentle touch will reveal a firm texture. Additionally, if the chocolate no longer transfers onto your fingers when pressed lightly, it is a strong indicator that the chocolate has completely set. If in doubt, allow the bliss balls to chill a little longer; this will not harm the texture and helps avoid the disappointment of a gooey mess.
Presentation Tips
Serving Suggestions
Serving these bliss balls can enhance the overall experience. For gatherings, arrange the balls on a decorative platter, creating adjacently colorful layers by placing light and dark candies, fresh fruits, or a drizzle of chocolate sauce around them. This not only highlights their appealing texture but also adds visual contrast. For a more casual presentation, opting for a glass jar filled with these treats can invite guests to help themselves easily.
Decorative Enhancements
To elevate the appearance of your bliss balls further, consider applying decorative enhancements. Dipping half of each bliss ball into chocolate instead of whole covering provides a stunning two-tone effect. You could also enrobe them with colorful sprinkles or even finely chopped nuts, adding a textural contrast that complements the creamy base. If you have used coconut oil, a light shimmer will enhance the allure, making them even more irresistible.
Highlighting the Flavor Contrast
Don’t shy away from using contrasting flavors to amplify the bliss balls’ tastes. Adding a sprinkle of sea salt on top of each chocolate-coated ball provides a delightful salty-sweet balance that heightens the experience. Another option is to dust a touch of cocoa powder or coconut flakes over the completed product, enhancing the visual appeal while imparting additional flavors.
Storage Instructions
Best Practices for Storing Bliss Balls
Proper storage of your bliss balls is crucial for maintaining their texture and flavor integrity. Keep these treats stored in an airtight container to prevent moisture from altering their delightful consistency. Line the container with parchment paper, particularly if layering the balls, to avoid sticking.
Shelf Life and Freshness Tips
When stored adequately in the refrigerator, these peanut butter delight balls can remain fresh for up to one week. If you want to prolong their enjoyment, consider freezing them. Placed in an airtight freezer-safe container, these bliss balls can last for up to three months. Remember that while the texture might slightly change upon defrosting, the flavors will remain intact.
Freezing Options for Future Enjoyment
To freeze, allow the bliss balls to harden completely in the refrigerator first. Next, lay them flat on a baking sheet for a brief time to prevent sticking. Once they are frozen solid, transfer them to a labeled freezer bag or container. Thaw them in the refrigerator overnight for the best results, maintaining the ideal flavor and texture.
Recipe Variations
Vegan Adaptations
Adapting this recipe for a vegan audience is straightforward. Simply substitute the creamy peanut butter with a natural, vegan-friendly peanut butter option and replace the milk chocolate chips with vegan chocolate brands available in stores. Ensure that the powdered sugar you use does not include bone char in its processing if strict adherence to vegan principles is desired.
Variations in Nut Butters
For those looking to experiment with flavors, substituting peanut butter with other nut butters can produce delicious results. Almond butter or cashew butter can provide a different taste profile while delivering similar textures. Just be cautious with the flavors of the candy bars you choose, as they may interact uniquely with nut butter choices.
Experimenting with Different Candy Bars
In place of Butterfinger bars, consider utilizing different candy bars to switch up the flavor profile. Snickers or Milky Way could add a delightful caramel hint, while a crunchy candy like Crunch bars could offer an interesting texture variation. Whichever bar chosen, ensure they are finely crushed for even distribution.
Nutritional Information
Calories per Serving
Each bliss ball contains approximately 110 calories, making them a satisfying yet indulgent treat to enjoy in moderation. Taking into consideration the variety of ingredients, it’s crucial to keep the portion sizes in check.
Breakdown of Macronutrients
In terms of macronutrients, each bliss ball typically provides around 5g of protein, 7g of fat, and 10g of carbohydrates. The combination of peanut butter and chocolate contributes to protein intake, while the sugar from the candy bars adds to the carbohydrate total.
Health-Friendly Adjustments
For those looking to make health-conscious adjustments, consider reducing the amount of powdered sugar or replacing it with a sugar substitute suited for baking. Alternatively, experimenting with different nut butter options can yield variations in healthy fats and protein levels.
Serving Suggestions
Best Pairings for Parties
These bliss balls can pair beautifully with a variety of beverages and party snacks. For a beverage option, a cold glass of almond milk or coffee can nicely complement the richness of the treats. Pairing them with fruit, such as fresh strawberries or banana slices can offer a refreshing contrast.
Complementary Beverages
When considering drinks to serve alongside the peanut butter bliss balls, think about hot chocolate, milkshakes, or flavored iced teas for a refreshing touch. Even a selection of herbal teas will add a different dimension to the dessert spread.
How to Incorporate into Dessert Tables
These bliss balls can also be a fantastic addition to dessert tables at celebrations. Position them alongside cupcakes, cookies, and brownies to create a balanced display of textures and flavors. Using labels to describe various treats will intrigue your guests as they explore the dessert offerings.
Conclusion
The Decadent Peanut Butter Butterfinger Bliss Balls deliver an irresistible fusion of creamy peanut butter and crunchy Butterfinger, encapsulated in a rich chocolate coating. With their wonderful texture and sweet profile, they stand out as delightful treats suitable for various occasions. With a total preparation and chill time of about an hour, they are perfect for those seeking a quick yet indulgent dessert option.

Decadent Peanut Butter Butterfinger Bliss Balls for Celebrations
Ingredients
- 1 cup creamy peanut butter
- ½ cup powdered sugar
- 1 cup finely crushed Butterfinger candy bars
- ½ teaspoon pure vanilla extract
- 1 cup milk chocolate chips
- 1 tablespoon coconut oil
- to taste additional crushed Butterfinger for garnish
Instructions
- In a mixing bowl, combine peanut butter, powdered sugar, crushed Butterfinger, and vanilla extract until blended.
- Roll the mixture into small balls, about 1 inch in diameter, and place on a parchment-lined baking sheet.
- Freeze the balls for about 30 minutes to firm them up.
- Melt the milk chocolate chips in a microwave-safe bowl in 30-second intervals, stirring until smooth.
- If desired, stir in coconut oil for a shinier finish.
- Dip each ball into the melted chocolate, ensuring they are fully coated.
- Place the chocolate-covered balls back on the baking sheet and sprinkle with additional crushed Butterfinger if desired.
- Refrigerate for 15-20 minutes to let the chocolate harden.
- Serve chilled or at room temperature at your next gathering.