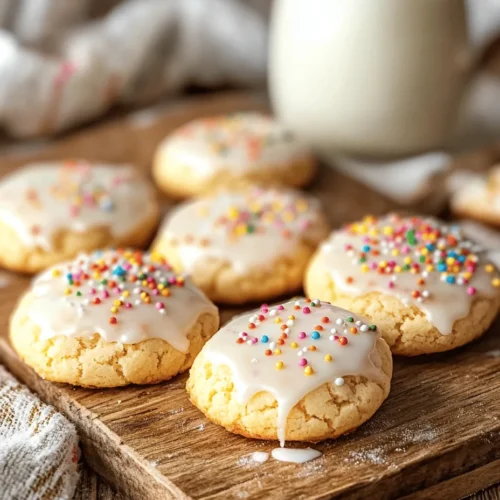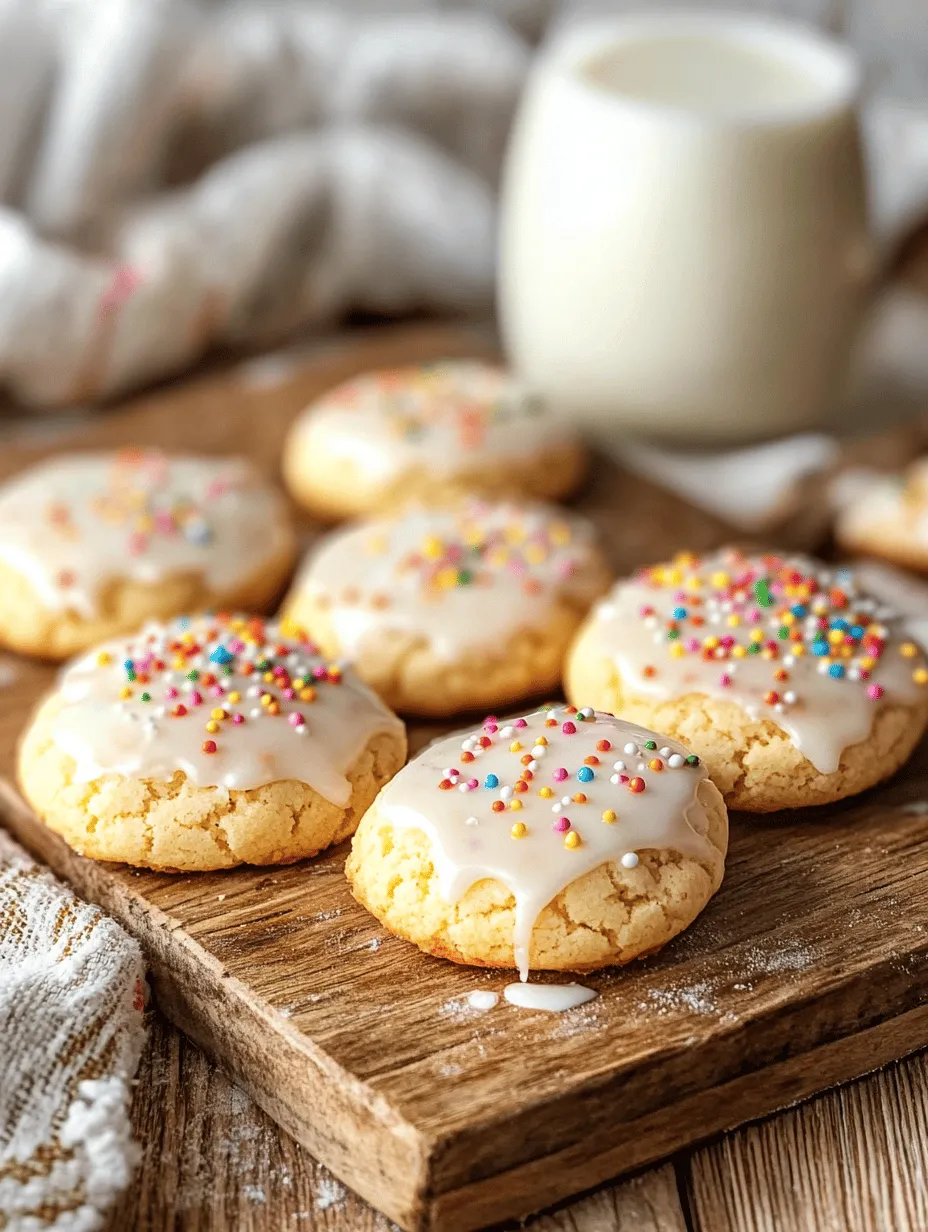
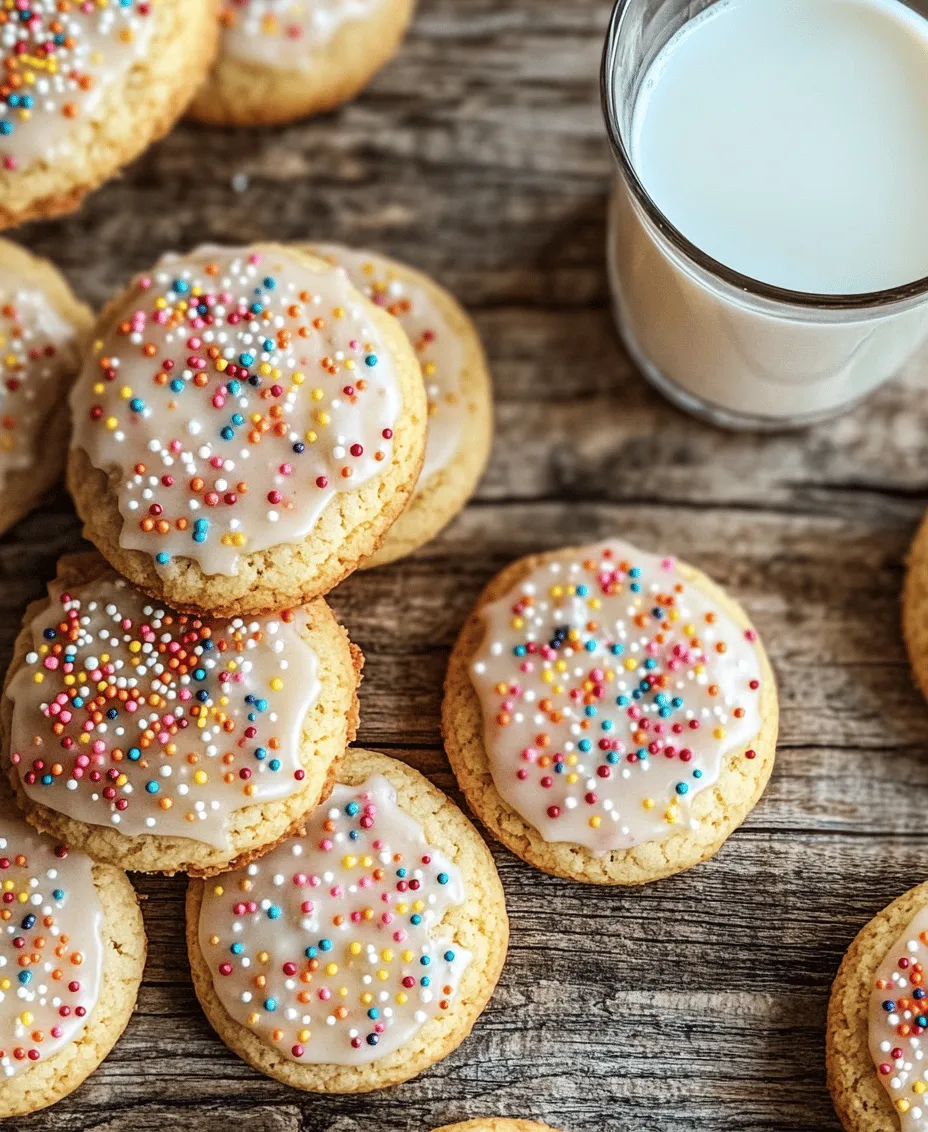
Introduction to Amish Buttermilk Cookies
When it comes to comforting and homestyle desserts, few cuisines can compete with the simplicity and heartwarming flavors of Amish cooking. Rooted in traditions that prioritize quality, community, and wholesome ingredients, Amish cuisine offers a treasure trove of recipes that have been passed down through generations. Among these delightful dishes, Amish Buttermilk Cookies stand out for their unique flavor and irresistible texture.
These cookies encapsulate the essence of Amish baking, showcasing the importance of quality ingredients and the love that goes into every batch. Whether you enjoy them with a warm cup of tea or as a sweet treat at family gatherings, Amish Buttermilk Cookies deliver a comforting experience that evokes feelings of nostalgia and home.
The unique flavor profile of buttermilk cookies comes from the tangy richness of buttermilk, which not only enhances the taste but also contributes to the cookies’ soft and tender crumb. The balance of sweetness, combined with the aromatic hints of vanilla and almond extracts, creates a cookie that is both satisfying and memorable.
In Amish communities, baking is more than just a culinary task; it is a cultural expression, a way of bringing families and friends together. Every cookie baked represents not only a treat but also an opportunity for connection and sharing. This cultural significance is reflected in the care and attention given to each step of the baking process, ensuring that every cookie is a small piece of heritage.
Understanding the Ingredients
To fully appreciate the flavors and textures of Amish Buttermilk Cookies, it’s essential to understand the role of each ingredient in the recipe. Each component serves a specific purpose, contributing to the overall quality of the finished product.
1. All-Purpose Flour: This is the backbone of the cookie, providing structure and texture. The right amount of flour ensures that the cookies hold their shape while remaining soft and chewy.
2. Baking Soda: As a leavening agent, baking soda is crucial for helping the cookies rise. It reacts with the acidity in the buttermilk, creating carbon dioxide bubbles that give the cookies their light and airy texture.
3. Salt: While it may seem minor, salt plays a vital role in enhancing the flavors of all the other ingredients. A pinch of salt can elevate the sweetness and balance the overall taste of the cookie.
4. Unsalted Butter: This ingredient contributes richness and moisture to the cookies. Using unsalted butter allows for better control over the saltiness of the final product, and it helps achieve a tender crumb.
5. Granulated Sugar: Sugar adds sweetness and contributes to the cookies’ texture. It helps create a slightly crisp exterior while maintaining a soft interior.
6. Egg: Acting as a binding agent, the egg provides moisture and stability to the cookie dough. It also adds richness and contributes to the overall flavor.
7. Buttermilk: The star of the show, buttermilk gives the cookies their signature softness and depth of flavor. Its acidity works in harmony with the baking soda, resulting in a perfectly tender cookie.
8. Vanilla and Almond Extracts: These extracts add aromatic complexity and enhance the overall flavor profile of the cookies. The combination of vanilla and almond creates a comforting aroma that is hard to resist.
9. Optional Icing: For those looking to add a touch of sweetness and decoration, icing can be drizzled on top of the cookies. This is a customizable option that allows bakers to express their creativity.
10. Ingredient Substitutions: For those with dietary restrictions or preferences, there are several substitutions that can be made. For example, gluten-free all-purpose flour can replace regular flour, and plant-based butter can be used for a dairy-free version. These alternatives ensure that everyone can enjoy the deliciousness of Amish Buttermilk Cookies.
Step-by-Step Guide to Making Amish Buttermilk Cookies
Now that we have a solid understanding of the ingredients, let’s dive into the step-by-step process of making Amish Buttermilk Cookies. This guide will help you navigate through the preparation, ensuring that your cookies turn out perfectly every time.
Preparation: Setting Up Your Kitchen
Before you begin baking, it’s essential to set up your kitchen for success. Gather all your ingredients and equipment to create a smooth workflow. You will need:
– Mixing bowls
– Measuring cups and spoons
– A whisk or electric mixer
– A spatula
– Baking sheets lined with parchment paper or silicone mats
Importance of Preheating the Oven and Preparing Baking Sheets
One of the critical steps in baking cookies is preheating your oven to the correct temperature. For Amish Buttermilk Cookies, set your oven to 350°F (175°C). Preheating ensures that the cookies bake evenly and achieve the desired texture.
While the oven is heating up, prepare your baking sheets by lining them with parchment paper or silicone mats. This prevents the cookies from sticking and makes cleanup a breeze.
Mixing Dry Ingredients
Begin by combining the dry ingredients in a mixing bowl. This includes all-purpose flour, baking soda, and salt. Whisk them together until they are evenly mixed. This step is crucial as it ensures that the baking soda and salt are distributed throughout the flour, preventing any uneven baking.
Techniques for Whisking and Combining for Even Distribution
Using a whisk, gently aerate the flour mixture while combining the ingredients. This technique helps to incorporate air, which contributes to the lightness of the cookies. Make sure to break up any lumps in the flour to achieve a smooth mixture.
Creaming Butter and Sugar
Next, it’s time to cream the unsalted butter and granulated sugar together. In a large mixing bowl, add the softened butter and sugar. Using an electric mixer on medium speed, beat the mixture until it becomes light and fluffy. This process typically takes about 2-3 minutes.
The creaming method is essential for incorporating air into the butter, which contributes to the cookies’ texture. The light and airy consistency not only helps the cookies rise but also ensures they have that delightful melt-in-your-mouth quality.
As you embark on this baking adventure, remember that each step is crucial to achieving the perfect Amish Buttermilk Cookies. The combination of quality ingredients and careful preparation will result in cookies that are not only delicious but also reflective of the rich baking traditions of the Amish community. Stay tuned for the next part, where we will continue to guide you through the remaining steps of creating these delightful treats.
Incorporating Wet Ingredients
Once your dry ingredients are well-mixed, it’s time to incorporate the wet ingredients into the bowl. Begin by adding the buttermilk, eggs, and vanilla extract to the mixture. These ingredients not only add moisture but also enhance the flavor profile of your cookies. Using a spatula or wooden spoon, gently fold the wet ingredients into the dry mixture. Ensure you mix until just combined; the key here is to avoid overmixing, which can lead to tough cookies rather than the tender, soft texture we desire.
Tips on Mixing to Avoid Overworking the Dough
Mixing is crucial in cookie-making, but overworking the dough can lead to gluten development, resulting in dense cookies. To avoid this, mix the ingredients gently and only until you no longer see dry flour. If you notice that your dough is slightly crumbly, that’s okay! During the next steps, the moisture from the wet ingredients will bind it together. Remember, a few flour streaks are better than a thoroughly mixed dough when it comes to cookies.
Combining Dry and Wet Mixtures
Once your wet ingredients are gently folded into the dry mixture, it’s time to combine them fully. Use your spatula to scrape down the sides of the bowl, ensuring all ingredients are incorporated. The dough should be soft and slightly sticky, but not overly wet. If the dough feels too loose, you can add a tablespoon or two of flour to achieve the desired consistency.
Best Practices for Achieving the Right Consistency
The perfect cookie dough should be soft enough to scoop but firm enough to hold its shape when placed on the baking sheet. A great test is to take a small amount of dough and press it between your fingers; if it holds together without falling apart, you’re on the right track. If your dough seems too dry, you can add a bit more buttermilk, one teaspoon at a time, until you achieve the right texture.
Shaping and Baking the Cookies
When it comes time to shape your cookies, use a cookie scoop or a tablespoon to portion out the dough. Roll the dough into balls, about 1 inch in diameter, and place them on a parchment-lined baking sheet. Ensure you leave enough space between each cookie to allow for spreading — about 2 inches apart is ideal.
How to Properly Space Cookies on the Baking Sheet
Proper spacing is vital for even baking. If the cookies are too close together, they may merge during baking, resulting in a misshapen cookie. Additionally, proper spacing allows for even airflow, ensuring that each cookie bakes uniformly. If you’re baking multiple trays, it’s a good practice to rotate the trays halfway through baking to achieve consistent results.
Signs of Doneness to Look for During Baking
Amish buttermilk cookies typically take about 10-12 minutes to bake at 350°F (175°C). Keep an eye on them as they approach the end of the baking time. Look for a golden edge and a soft, slightly puffy center. The cookies will continue to cook slightly after being removed from the oven, so be careful not to overbake. If the edges are lightly golden but the centers still appear soft, it’s the perfect time to take them out.
Cooling Process
After baking, allow the cookies to cool on the baking sheet for about 5 minutes. This will help them set before transferring them to a wire rack. The cooling process is essential to achieving the right texture, as it allows the cookies to firm up without becoming hard.
Importance of Cooling on a Wire Rack for Texture
Transferring your cookies to a wire rack is crucial. A wire rack promotes airflow around the cookies, preventing them from becoming soggy on the bottom. This step also helps maintain their soft texture while allowing the cookies to cool completely. Let them cool for at least 15 minutes before serving or icing.
The Icing: A Sweet Touch
For an added layer of flavor, you might consider icing your Amish buttermilk cookies. While the cookies are cooling, you can prepare a simple icing.
Ingredients and Preparation for the Optional Icing
Ingredients:
– 1 cup powdered sugar
– 2 tablespoons milk (or more for consistency)
– 1 teaspoon vanilla extract
In a small bowl, whisk together the powdered sugar, milk, and vanilla extract until smooth. The icing should be pourable; if it’s too thick, add an additional teaspoon of milk until you reach the desired consistency.
Techniques for Drizzling Icing Over Cookies
To drizzle the icing over your cookies, you can use a spoon or a piping bag for more precision. If using a spoon, dip it into the icing and let it fall back onto the cookie for a rustic look. Alternatively, if you’re using a piping bag, cut a small hole in the corner and gently squeeze to create a beautiful design. Allow the icing to set before serving to avoid smudging.
Creative Ideas for Garnishing with Sprinkles
To elevate your cookies even further, consider adding colorful sprinkles on top of the icing. This not only adds a festive touch but also makes your cookies visually appealing. Choose sprinkles that match the occasion or the season, such as pastel colors for spring or vibrant shades for summer gatherings.
Serving Suggestions and Pairing Ideas
Amish buttermilk cookies are incredibly versatile and can be enjoyed in various settings. Here are some serving suggestions:
Recommendations for Beverages that Complement the Cookies
Pair your cookies with a warm cup of tea, coffee, or even a glass of milk for a classic combination. The rich, buttery flavor of the cookies complements the bitterness of coffee beautifully, while tea offers a lighter touch. For a refreshing twist, consider serving them alongside a glass of iced lemon tea or a fruit-infused sparkling water.
Ideas for Serving at Gatherings, Parties, or as a Family Treat
These cookies make an excellent addition to any gathering or celebration. Whether it’s a family reunion, birthday party, or holiday gathering, their delightful taste will surely impress. You can also set up a cookie bar where guests can customize their cookies with various toppings, including icing, nuts, and sprinkles.
Discussing the Versatility of Buttermilk Cookies for Different Occasions
The beauty of Amish buttermilk cookies lies in their versatility. They can be dressed up for special occasions with icing and garnishes or enjoyed simply as a comforting snack. Their soft texture and rich flavor make them suitable for both casual and formal settings.
Storage and Shelf Life
To keep your homemade Amish buttermilk cookies fresh, proper storage is essential.
How to Properly Store Cookies to Maintain Freshness
Store your cookies in an airtight container at room temperature. They can last for about a week without losing their delightful texture. If you wish to keep them longer, consider freezing them.
Tips on Freezing Cookies for Longer Shelf Life
To freeze your cookies, allow them to cool completely, then place them in a single layer on a baking sheet. Freeze them for about an hour until solid, then transfer them to a freezer-safe container or zip-top bag. This method prevents the cookies from sticking together, allowing you to take out just the number you need.
Reheating Suggestions to Enjoy Cookies Warm
When you’re ready to enjoy your frozen cookies, simply preheat your oven to 350°F (175°C) and bake them for about 5-7 minutes. This will bring back their fresh-baked warmth and soft texture. Alternatively, you can microwave them for about 10-15 seconds for a quick treat.
Conclusion: The Joy of Baking Amish Buttermilk Cookies
Baking Amish buttermilk cookies is not just about creating a delicious treat; it’s also a delightful process that brings warmth and joy to your kitchen. The combination of simple ingredients and straightforward techniques makes this recipe accessible for bakers of all skill levels. Embracing the art of baking allows you to connect with family traditions, create lasting memories, and share love through homemade goodies.
There’s something truly satisfying about sharing these cookies with loved ones, whether enjoyed alongside a warm beverage or as part of a festive gathering. So, gather your ingredients, roll up your sleeves, and let the sweet aroma of freshly baked cookies fill your home. Happy baking!