Introduction
Samoas cookies, also known as Caramel deLites, are a beloved treat that has captured the hearts and taste buds of cookie lovers everywhere. These delightful cookies are a staple during the Girl Scout cookie season, celebrated for their unique flavor combination of rich caramel, toasted coconut, and smooth chocolate. Each bite is a harmonious blend of textures and flavors that creates an indulgent experience, making them a favorite for both children and adults alike.
The allure of Samoas cookies goes beyond their delicious taste; they evoke memories of childhood and nostalgia, often reminding us of the excitement that comes with supporting the Girl Scouts and enjoying these sweet treats. However, you don’t need to wait for cookie season to indulge in these decadent delights. Making Samoas cookies at home not only allows you to enjoy them year-round but also gives you the satisfaction of baking from scratch. There’s a certain joy that comes from measuring ingredients, mixing dough, and watching cookies come to life in the oven, creating an aroma that fills the kitchen and warms the heart.
In this article, we will explore the rich background of Samoas cookies, delve into the significance of their ingredients, and provide detailed step-by-step instructions on how to create these delicious treats right in your own kitchen.
Understanding Samoas Cookies
Samoas cookies have a storied history, tracing their origins to the Girl Scouts of the USA. Over the years, they have become one of the most popular offerings in the Girl Scout cookie lineup. The cookies are known for their iconic toasted coconut topping, rich caramel filling, and a smooth chocolate coating. The combination of these flavors has made Samoas a staple in many households, especially during the spring months when Girl Scouts sell cookies door-to-door.
The cultural significance of Samoas cookies extends beyond their taste. For many, these cookies represent a sense of community and tradition. They evoke fond memories of childhood experiences—whether it’s the excitement of selling cookies to friends and family or the joy of indulging in a box with loved ones. The nostalgic connection that people have with Samoas cookies makes them not just a treat, but a cherished part of their upbringing.
While purchasing Samoas cookies from local Girl Scouts is convenient, making them at home can elevate the experience. Homemade cookies allow for a personalized touch, enabling bakers to adjust flavors to their liking and share these treats with family and friends throughout the year. Plus, you can ensure that each cookie is made with love, care, and high-quality ingredients, resulting in a truly special batch of cookies.
Ingredients Breakdown
Before we dive into the baking process, let’s take a closer look at the ingredients that come together to create the magic of Samoas cookies. Understanding each ingredient’s role in the recipe can help you appreciate the nuances of flavor and texture that make these cookies so irresistible.
All-Purpose Flour
All-purpose flour is a fundamental ingredient in many baking recipes, and it plays a crucial role in providing structure and texture to Samoas cookies. The gluten content in all-purpose flour gives the cookies their shape and helps them hold together while baking. This ingredient is versatile, making it suitable for a wide range of baked goods, and it forms the base of our cookie dough.
Unsalted Butter
Unsalted butter is essential for adding flavor and moisture to the cookies. The richness of butter enhances the overall taste, creating a decadent mouthfeel that pairs beautifully with the other ingredients. It’s important to use unsalted butter in this recipe, as it allows you to control the amount of salt added and ensures a balanced flavor profile.
Sugars (Granulated and Brown)
Both granulated and brown sugars are used in the Samoas cookie recipe, and each serves a specific purpose. Granulated sugar contributes to the cookie’s crispness, while brown sugar adds moisture and a hint of caramel flavor due to its molasses content. The combination of these two sugars results in a perfect balance of sweetness and texture, giving the cookies a rich, chewy center with a slightly crisp edge.
Vanilla and Coconut Extracts
Vanilla and coconut extracts are key ingredients that enhance the overall flavor profile of Samoas cookies. Vanilla extract adds a warm, sweet note that complements the other flavors, while coconut extract intensifies the coconut essence, making each bite truly tropical. These extracts work together to create a luscious and aromatic cookie that transports you to a sunny paradise.
Shredded Coconut
Shredded coconut is a defining feature of Samoas cookies, providing both texture and flavor. When toasted, coconut develops a rich, nutty aroma and a delightful crunch that pairs perfectly with the chewy caramel. The coconut adds an exotic twist to the cookies, making them distinct and memorable.
Chocolate Chips
The chocolate chips are essential for the final presentation and taste of Samoas cookies. They provide a decadent chocolate coating that contrasts beautifully with the sweet caramel and toasted coconut. Using high-quality chocolate chips will elevate your cookies, ensuring that each bite is rich and satisfying.
Vegetable Oil
Vegetable oil is often used when melting chocolate for coating the cookies. It helps maintain the smoothness of the melted chocolate, preventing it from becoming too thick or clumpy. This ensures an even coating on each cookie, enhancing both the appearance and taste.
Step-by-Step Instructions for Making Samoas Cookies
Now that we have a thorough understanding of the ingredients, let’s dive into the step-by-step instructions for making Samoas cookies. Follow these detailed steps to ensure that your homemade cookies turn out perfectly every time.
Step 1: Preheat the Oven
Before you begin mixing your ingredients, it’s important to preheat your oven to 350°F (175°C). Preheating the oven ensures an even baking temperature, which is crucial for achieving the perfect texture. If the oven is not preheated, the cookies may spread too much or not cook evenly, resulting in a less-than-perfect batch.
Step 2: Prepare Your Baking Sheets
While the oven is preheating, prepare your baking sheets by lining them with parchment paper. This step prevents the cookies from sticking and makes cleanup easier. If you don’t have parchment paper, you can lightly grease the baking sheets with butter or cooking spray.
Step 3: Mix the Dough
In a large mixing bowl, combine the all-purpose flour, granulated sugar, brown sugar, and a pinch of salt. Whisk these dry ingredients together to ensure they are evenly distributed. In a separate bowl, cream together the softened unsalted butter and the sugars until the mixture is light and fluffy. This process introduces air into the dough, helping the cookies rise and become tender.
Once the butter and sugars are well combined, add in the vanilla and coconut extracts. Mix until fully incorporated. Gradually add the dry ingredients to the wet mixture, stirring until a soft dough forms. Be careful not to overmix, as this can lead to tough cookies. The dough should be slightly sticky but hold together when pressed.
Step 4: Form the Cookies
Using a tablespoon or cookie scoop, portion out the dough and roll it into balls. Place the dough balls onto the prepared baking sheets, leaving enough space between each cookie to allow for spreading during baking. To create the iconic Samoas shape, use your thumb or the back of a wooden spoon to press a small indent in the center of each dough ball.
Step 5: Bake the Cookies
Once all the cookies are formed and placed on the baking sheets, it’s time to bake them in the preheated oven. Bake for 10-12 minutes or until the edges are lightly golden brown. Keep an eye on the cookies to avoid overbaking—slightly underbaked cookies will give a chewy texture that is characteristic of Samoas.
Step 6: Cool the Cookies
After baking, remove the cookies from the oven and allow them to cool on the baking sheets for a few minutes. This will give them time to set before transferring them to a wire rack to cool completely. Cooling is a crucial step, as it allows the cookies to firm up and develop their final texture.
As you prepare to finish off your Samoas cookies with caramel and chocolate, the anticipation builds. These steps lay the foundation for an indulgent treat that is sure to impress. Stay tuned for the next part of the article, where we will explore how to assemble and decorate your homemade Samoas cookies to perfection.
Shaping the Cookies
Creating uniformly shaped cookies is essential for both presentation and even baking. To achieve the perfect shape for your Samoas cookies, you can use a few simple techniques. First, ensure that your dough is chilled before you start shaping; this makes it easier to handle and prevents stickiness.
1. Scoop and Roll: Use a cookie scoop to portion out the dough. This ensures that each cookie is the same size. Roll each portion between your palms to form a ball, then flatten it slightly to create a disc shape.
2. Indentations: To create the signature shape of Samoas, you’ll need to make an indentation in the center of each cookie. Use your thumb or the back of a measuring teaspoon to press down firmly enough to form a well, but not so hard that it breaks through the bottom. This well will later hold the caramel-coconut topping.
Toasting the Coconut
Toasting the coconut is a crucial step that enhances its flavor, giving your Samoas that irresistible nutty aroma. Here’s how to do it right:
1. Preheat Your Oven: Set the oven to 350°F (175°C). Spread the shredded coconut evenly on a baking sheet lined with parchment paper.
2. Bake: Place the baking sheet in the oven and toast the coconut for about 5-10 minutes. Keep a close eye on it, stirring occasionally, as shredded coconut can burn quickly. The goal is to achieve a golden-brown color for that rich flavor.
3. Cool: Once toasted, remove the coconut from the oven and let it cool. This step is vital because cooled coconut will mix better with the caramel later on.
Baking the Cookies
Baking the cookies to perfection involves recognizing the visual cues of doneness. Follow these steps for the best results:
1. Preheat Your Oven: While you prepare the cookie dough, preheat your oven to 350°F (175°C).
2. Bake: Arrange the shaped cookies on a parchment-lined baking sheet, leaving some space between each cookie. Bake for 10-12 minutes or until the edges turn a light golden brown and the centers appear set.
3. Cooling: After baking, allow the cookies to sit on the baking sheet for a few minutes before transferring them to a wire rack to cool completely. This ensures they retain their shape and texture.
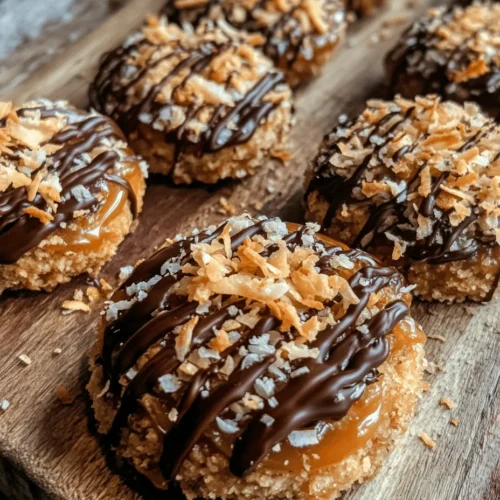
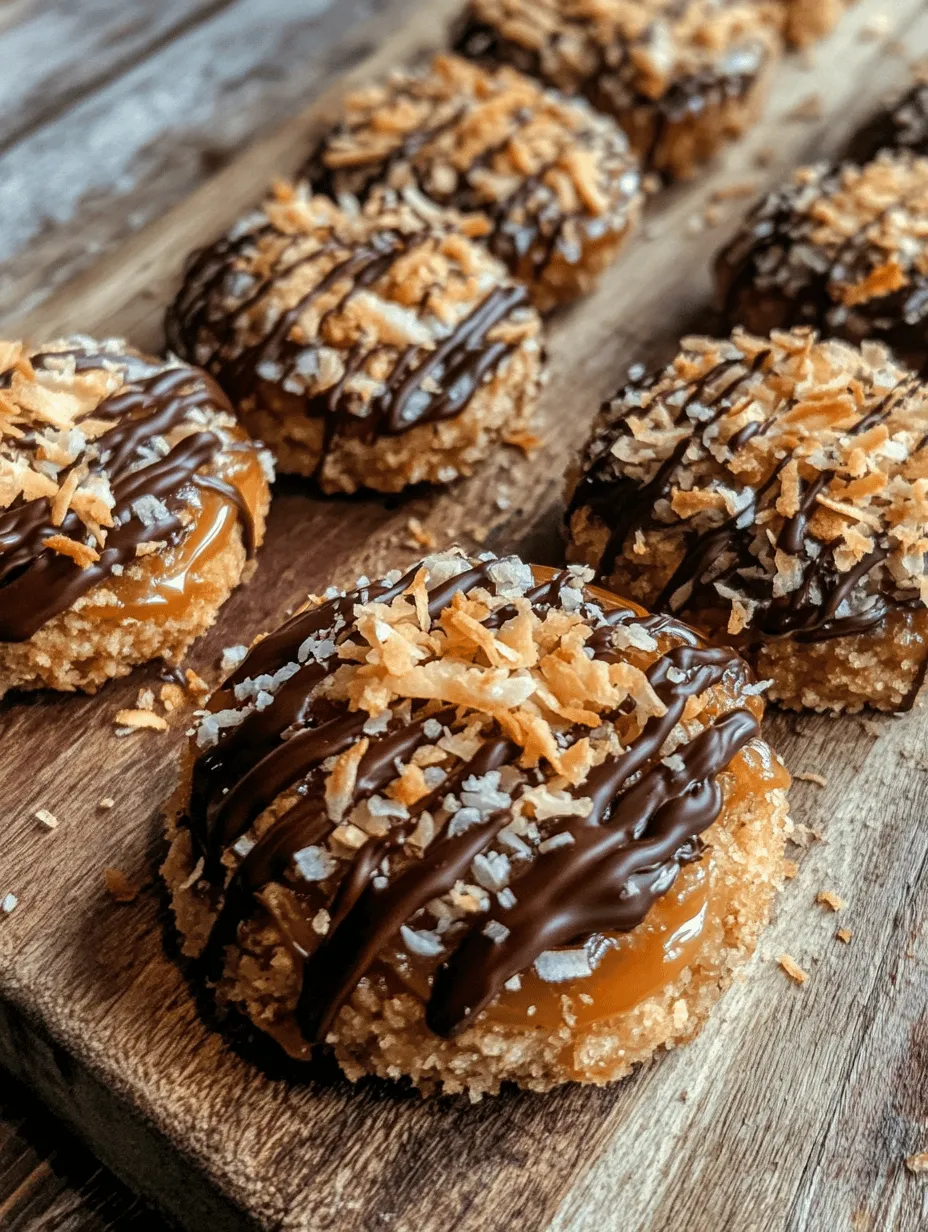
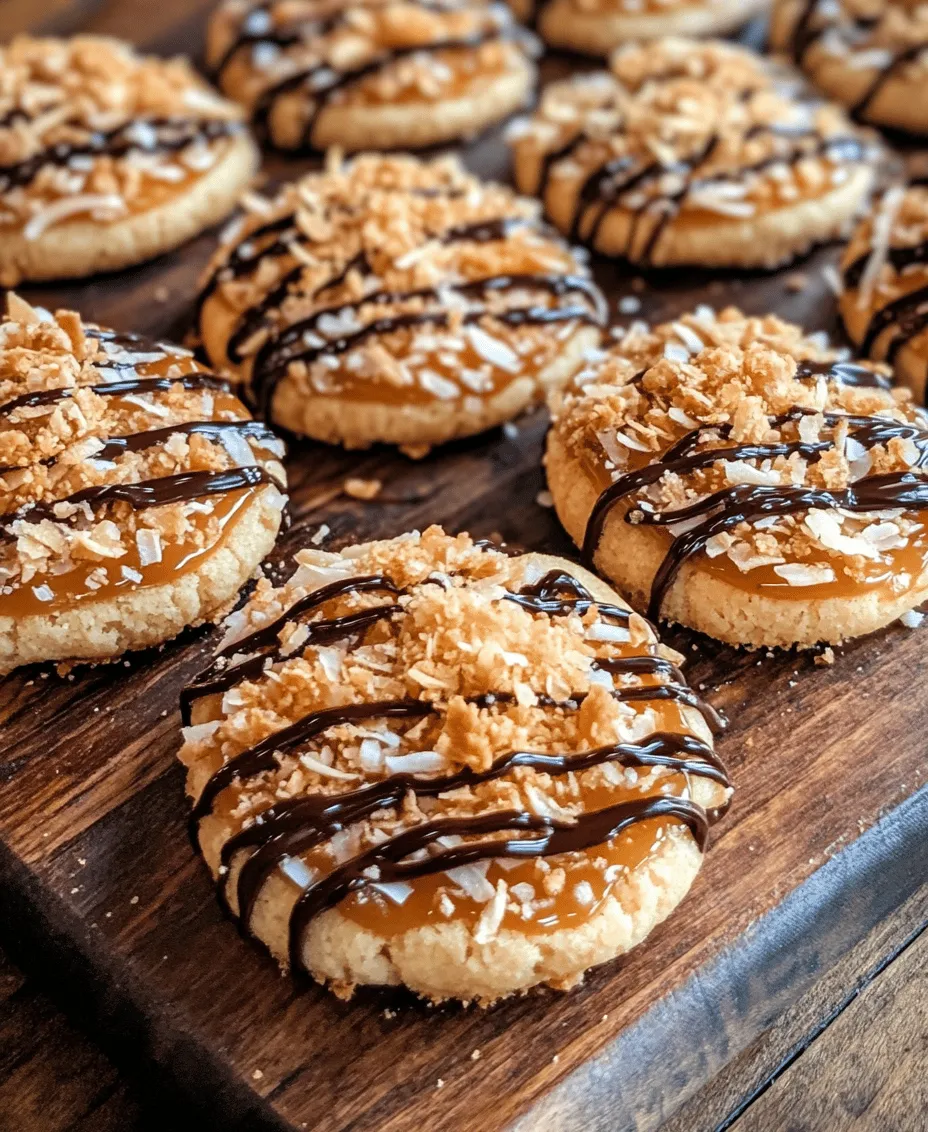
Creating the Caramel-Coconut Topping
The caramel-coconut topping is what makes Samoas cookies truly special. Here’s how to prepare it:
1. Ingredients: In a saucepan over medium heat, combine sweetened condensed milk and brown sugar. Stir continuously until the mixture begins to bubble. This process usually takes around 5-7 minutes.
2. Add Coconut: Once the mixture starts to thicken, fold in your toasted coconut. Stir until the coconut is fully coated in the caramel.
3. Consistency: The mixture should be thick enough to hold its shape but still spreadable. If it’s too runny, continue cooking for a few more minutes until you achieve the desired consistency.
4. Even Distribution: Spoon the caramel-coconut mixture into the indentation of each cooled cookie, using the back of a spoon or an offset spatula to spread it evenly. This step is crucial for ensuring that every bite is packed with flavor.
Melting and Drizzling Chocolate
The chocolate drizzle is the final touch that elevates your Samoas cookies. Here’s how to do this step effectively:
1. Melting Chocolate: Break your chocolate into small pieces and place it in a microwave-safe bowl. Heat in short bursts of 20-30 seconds, stirring in between until the chocolate is completely melted and smooth.
2. Add Vegetable Oil: To achieve a perfect drizzle consistency, mix in a teaspoon of vegetable oil with the melted chocolate. This will help the chocolate flow smoothly when you drizzle it over the cookies.
3. Drizzling Techniques: You can use a fork or a piping bag for drizzling. If using a fork, dip it into the melted chocolate and quickly flick it back and forth over the cookies for a rustic look. For a more uniform drizzle, fill a piping bag with the melted chocolate and snip off a small corner, allowing you to create thin lines over the cookies.
Cooling and Final Presentation
Once the chocolate drizzle is complete, it’s important to let the cookies cool properly. This step ensures that the chocolate hardens and the toppings set, creating the perfect texture.
1. Cooling: Allow the cookies to sit at room temperature for about 30 minutes. If you want to speed up the process, you can place them in the refrigerator for about 10 minutes.
2. Serving Suggestions: Arrange your Samoas cookies on a decorative platter for a beautiful presentation. You can also dust them lightly with powdered sugar for an elegant touch or serve them alongside a cup of coffee or tea.
3. Packaging for Gifting: If you plan to gift your homemade Samoas cookies, consider using a clear cellophane bag tied with a ribbon. This not only looks appealing but also keeps the cookies fresh. For longer storage, place them in an airtight container, separating layers with parchment paper to prevent sticking.
Nutritional Information
When indulging in treats like Samoas cookies, it’s beneficial to be aware of their nutritional content:
1. Overview: Each cookie contains approximately 150 calories, with around 7 grams of fat, 20 grams of carbohydrates, and 2 grams of protein.
2. Moderation: While these cookies are delicious, enjoying them in moderation as part of a balanced diet is essential. Pairing treats with healthier options, such as fresh fruit or nuts, can help satisfy your sweet tooth without overindulging.
Conclusion
Making Samoas cookies at home is not just about enjoying a delicious treat; it’s an experience filled with joy and creativity. The process allows you to connect with the flavors and textures that make these cookies so beloved. From shaping the dough to drizzling chocolate, each step contributes to the final product that you can proudly share with family and friends.
Homemade Samoas cookies are perfect for any occasion, whether it’s a cozy family gathering or a festive celebration. As you explore this recipe, don’t hesitate to add your personal touches—try incorporating different types of chocolate or adjusting the coconut levels to suit your taste. The joy of baking lies not only in the finished product but in the creativity and love you put into each step. So roll up your sleeves, gather your ingredients, and enjoy the delightful process of making these irresistible cookies!