
In the world of breakfast delights, few dishes can compete with the luxurious texture and rich flavors of crème brûlée. This classic French dessert, characterized by its creamy custard base topped with a layer of hard caramelized sugar, offers a delightful experience that tantalizes the taste buds. Now, imagine transforming that indulgent treat into a delightful morning feast—enter the Overnight Crème Brûlée French Toast. This recipe combines the decadence of crème brûlée with the heartwarming comfort of French toast, creating an irresistible dish that is perfect for special occasions or leisurely weekend brunches.
The beauty of Overnight Crème Brûlée French Toast lies in its preparation method. With minimal effort, you can prepare this dish the night before, allowing you to enjoy a hassle-free morning filled with the delightful aroma of freshly baked French toast. Not only does this dish satisfy your sweet cravings, but it also serves as a stunning centerpiece for any breakfast table. As we delve into this article, we will explore the detailed steps, tips, and variations for making this sumptuous breakfast treat that promises to impress family and friends alike.
Understanding the Base: The Brioche Bread
Exploring the Importance of Brioche in French Toast
When it comes to French toast, the type of bread used can make or break the dish. For our Overnight Crème Brûlée French Toast, brioche is the star ingredient. This rich, buttery bread is known for its soft texture and slightly sweet flavor, making it an ideal candidate for soaking in a custard mixture. The airy structure of brioche allows it to absorb the custard without becoming soggy, resulting in a perfectly custardy interior once baked.
Using brioche not only enhances the overall taste of the French toast but also elevates the dish to a gourmet level. The fat content in brioche contributes to a moist and tender texture, while its subtle sweetness complements the caramelized topping that defines crème brûlée. For an extra touch of decadence, consider using challah bread as an alternative. This Jewish egg bread shares similar characteristics to brioche and can yield delicious results.
The Role of Bread Texture and Flavor in the Recipe
The texture and flavor profile of the bread play a critical role in the overall success of the Overnight Crème Brûlée French Toast. A dense, crusty bread may not absorb the custard effectively, leading to an uneven texture. Conversely, brioche’s soft and fluffy nature allows it to soak up the custard mixture, creating a harmonious balance between the creamy filling and the crispy, caramelized top.
Moreover, the sweetness inherent in brioche complements the rich flavors of the custard, enhancing the overall experience of this breakfast dish. The goal is to achieve a delightful contrast between the velvety custard and the crisp, burnt sugar topping, which can only be accomplished with the right choice of bread.
Crafting the Perfect Custard Mixture
Creating the custard for the Overnight Crème Brûlée French Toast is a straightforward yet essential process. The custard is what binds the dish together and infuses it with flavor. Let’s break down the key ingredients and their functions in this delightful mixture.
Key Ingredients and Their Functions
Eggs: The Binding Agent
Eggs are the backbone of any custard mixture, providing structure and creaminess. They act as a binding agent, helping to hold the bread together while contributing to the overall richness of the dish. The proteins in the eggs coagulate during baking, ensuring that the custard sets properly and creates a delightful texture.
For this recipe, large eggs are typically used, and the number of eggs can vary depending on the amount of brioche being soaked. For a standard loaf of brioche, 4 to 6 eggs are recommended to create a luscious custard that envelops the bread.
Dairy Components: Whole Milk vs. Heavy Cream
The choice of dairy components is crucial in achieving the desired creaminess of the custard. While the classic crème brûlée uses heavy cream, for our French toast, a mix of whole milk and heavy cream is often preferred. This combination strikes a balance between richness and lightness, ensuring that the custard is flavorful without being overly heavy.
Using whole milk adds a lightness to the mixture, while heavy cream contributes to the indulgent texture reminiscent of traditional crème brûlée. If you prefer a lighter version, you can substitute part of the heavy cream with more milk; however, keep in mind that this may alter the final texture slightly.
Sweeteners: Granulated vs. Brown Sugar
When it comes to sweetening the custard, both granulated and brown sugar can be used, each offering distinct characteristics. Granulated sugar will provide a clean sweetness, while brown sugar adds a hint of molasses flavor, enhancing the overall complexity of the dish. For the crème brûlée effect, a mix of both sugars is often the best choice, allowing for a balanced sweetness that pairs beautifully with the other ingredients.
Flavor Enhancements: Vanilla and Cinnamon
To elevate the flavor profile of the custard, vanilla extract is a must. It brings a warm, aromatic quality that complements the richness of the brioche and the sweetness of the custard. Additionally, a dash of ground cinnamon can be added for a hint of warmth and spice, enhancing the overall sensory experience of the dish.
Step-by-Step Preparation
Now that we have established the importance of our key ingredients, let’s move on to the step-by-step preparation of Overnight Crème Brûlée French Toast.
Preparing the Baking Dish: Choosing the Right Pan
The first step in preparing your Overnight Crème Brûlée French Toast is selecting the right baking dish. A deep, rectangular baking dish is ideal for this recipe, allowing for even soaking and baking of the brioche slices. A 9×13-inch dish is typically recommended as it holds a standard loaf of brioche comfortably.
Before layering the bread, make sure to lightly grease the baking dish with butter or cooking spray. This will not only prevent sticking but also add a touch of flavor to the crust of the French toast.
Layering the Brioche Bread: Techniques for Optimal Soaking
Once your baking dish is prepped, it’s time to slice the brioche. Depending on your preference, you can cut the brioche into thick slices (about 1 to 1.5 inches thick) or cubes. Thick slices are ideal for a more decadent presentation, while cubes can create a fun, bread pudding-like texture.
Begin layering the brioche slices in the prepared baking dish, ensuring they are snugly packed together. If you’re using cubes, scatter them evenly throughout the dish. For optimal soaking, it’s essential to create a layered structure that allows the custard to permeate every piece of bread.
Whisking the Custard Mixture: Ensuring a Smooth Consistency
In a separate bowl, it’s time to whisk together the custard ingredients. Start by cracking the eggs into a large mixing bowl and whisking them until they are well combined. Next, add in the whole milk and heavy cream, followed by the sugars, vanilla extract, and cinnamon.
Whisk the mixture thoroughly until it reaches a smooth and homogenous consistency. This step is crucial, as any lumps in the custard can lead to an uneven texture in the final dish. For an extra level of smoothness, you can strain the custard through a fine mesh sieve before pouring it over the brioche.
Combining Bread and Custard: Tips for Even Soaking
With the custard mixture ready, it’s time to pour it over the layered brioche. Start by evenly distributing the custard over the bread, ensuring every piece is saturated. You can use a spatula to gently press down on the bread, encouraging it to absorb the custard fully.
After pouring the custard, cover the baking dish with plastic wrap and refrigerate it for at least 4 hours, or overnight if possible. This overnight chilling process allows the bread to soak up the custard thoroughly, resulting in a deliciously custardy texture when baked.
The Overnight Chilling Process
The science behind the overnight soaking is essential to achieving the perfect Overnight Crème Brûlée French Toast. As the bread sits in the custard, it absorbs the liquid, allowing the flavors to meld together beautifully. This not only enhances the taste but also ensures that the bread becomes sufficiently moist, resulting in a rich and creamy center.
Additionally, the chilling process helps to firm up the custard, making it easier to slice and serve once baked. It also allows the flavors to develop, creating a more harmonious and satisfying dish that will have everyone asking for seconds.
With the preparation steps complete and the bread soaking overnight, you are well on your way to creating a delectable breakfast experience. In the next part of this article, we will dive into the baking process, provide tips for achieving the perfect caramelized topping, and explore various variations to customize your Overnight Crème Brûlée French Toast. Stay tuned as we continue this culinary journey into breakfast bliss!
How Long to Chill: Recommended Timeframes for Best Results
To ensure that your Overnight Crème Brûlée French Toast achieves the best possible flavor and texture, chilling time is crucial. Ideally, you should allow the bread to soak in the custard mixture for at least 8 hours. This gives the bread ample time to absorb the rich custard, infusing it with the flavors of vanilla and sugar. However, if you’re in a hurry, a minimum of 4 hours is acceptable, though the results may not be as luxurious.
If you have the luxury of time, consider letting it soak overnight. This will enhance the flavor profile and create a more cohesive texture, resulting in a heavenly breakfast that melts in your mouth.
Baking to Perfection
Preheating the Oven: Why Temperature Matters
Preheating your oven is a critical step that should never be overlooked. Set your oven to 350°F (175°C) at least 15-20 minutes before you are ready to bake. Proper preheating ensures that your Overnight Crème Brûlée French Toast cooks evenly, providing a tender interior while allowing the top to develop that beautifully caramelized finish.
Recognizing When Your French Toast is Done: Visual Cues
As your French toast bakes, keep an eye on it. You’ll want to look for a golden-brown top that has a slight puff. The edges should appear set, while the center remains soft but not overly wobbly. An internal temperature of 160°F (71°C) is a good indicator that your dish is fully cooked. You can use an instant-read thermometer to check if you’re uncertain.
Ideal Texture and Color: What to Look For
The perfect Overnight Crème Brûlée French Toast should have a rich, custardy interior and a crisp, golden-brown exterior. The top should be slightly firm to the touch, while the inside should feel soft and airy. Once it comes out of the oven, let it rest for a few minutes before you begin the next step, as this will help set the custard further.
Creating the Brûlée Topping
Understanding the Caramelization Process
The magic of crème brûlée lies in its sugar topping, which transforms into a delightful, crunchy layer through caramelization. This process occurs when sugar is exposed to high heat, melting and then browning to form a crispy crust. For the best results, use granulated sugar, as it caramelizes evenly and creates a satisfying texture.
Using a Kitchen Torch vs. Broiling: Pros and Cons
You have two main options for achieving that coveted brûlée topping: using a kitchen torch or broiling in the oven.
– Kitchen Torch: This method gives you precise control over the caramelization process. You can focus on specific areas and achieve a consistent texture without affecting the warmth of the French toast underneath. However, it requires a bit of practice to master the technique.
– Broiling: This method is straightforward and can cover a larger surface area at once. Place your French toast under the broiler for 2-4 minutes, keeping a close eye to avoid burning. The downside is that it can heat the dish more than desired, making the interior slightly warmer than perfect.
Achieving the Perfect Crunch: Tips for Successful Brûlée
Whether you choose to use a kitchen torch or broil, there are a few tips to ensure a successful brûlée topping:
1. Even Sugar Layer: Sprinkle an even layer of sugar over the top of your French toast. Too much sugar will lead to a burnt topping, while too little will not give you the desired crunch.
2. Distance from Heat: If using a torch, maintain a consistent distance (about 2-3 inches) from the sugar to ensure even caramelization without scorching. When broiling, keep the dish at least a few inches from the heating element.
3. Rotate as Needed: If using a torch, rotate the dish slowly as you caramelize to ensure an even finish. For broiling, rotate the pan halfway through cooking.
Serving Suggestions and Presentation
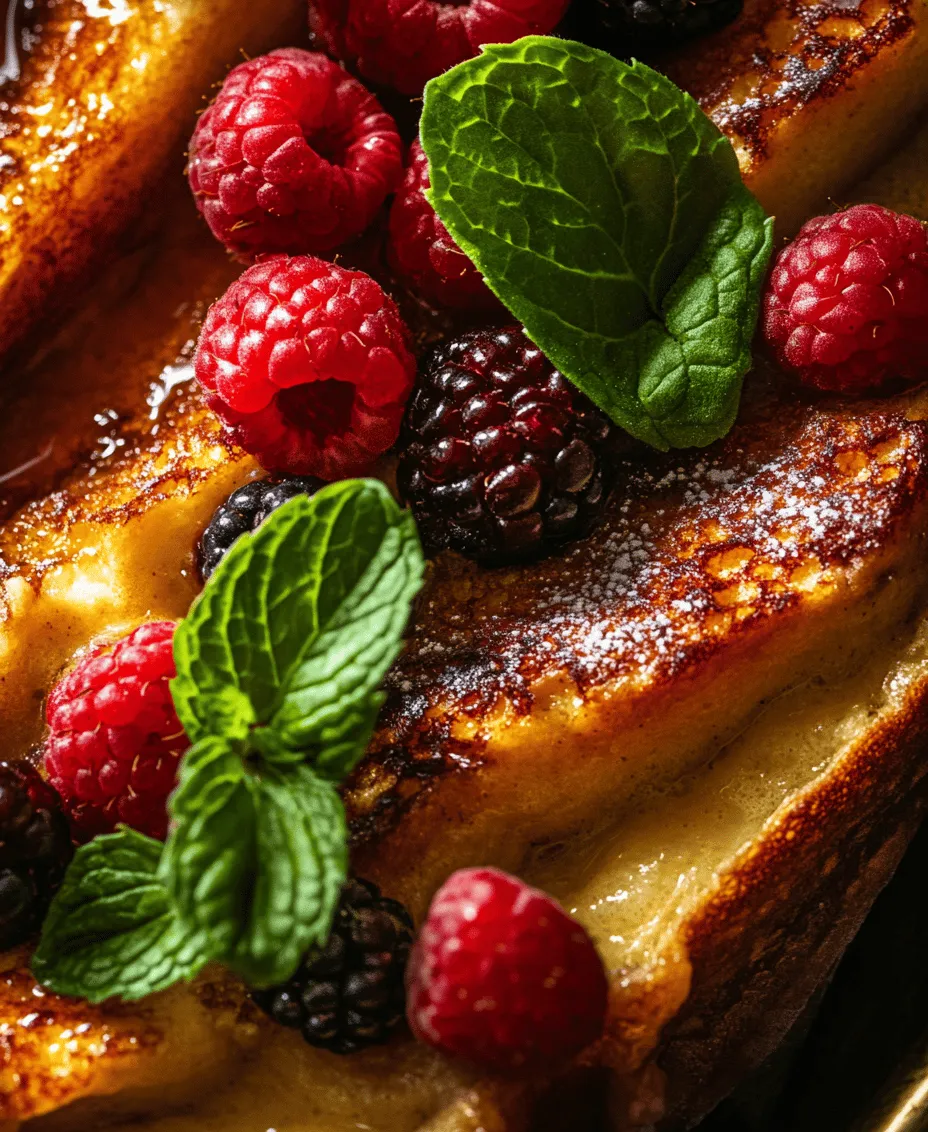
Garnishing with Fresh Berries: Choosing the Right Fruits
To elevate the visual appeal and flavor profile of your Overnight Crème Brûlée French Toast, consider garnishing with fresh berries. Berries such as strawberries, blueberries, or raspberries add a bright, refreshing contrast to the rich custard and caramelized topping. Their acidity helps to balance the sweetness, enhancing the overall dish.
When selecting berries, choose those that are ripe and vibrant in color. Rinse them gently and pat them dry before garnishing. You can place them around the plate or on top of the French toast for an eye-catching presentation.
Adding Fresh Mint: Enhancing Flavor and Visual Appeal
Fresh mint is another excellent addition to your presentation. The bright green leaves not only add a pop of color but also provide a refreshing aroma and flavor that pairs beautifully with the richness of the French toast. Simply take a few sprigs of fresh mint, rinse them, and arrange them alongside or on top of the dish for a final touch.
Serving Style: Plating Ideas for a Stunning Presentation
When it comes to plating your Overnight Crème Brûlée French Toast, aesthetics matter. Consider the following ideas for a stunning presentation:
– Stacking: For a visual impact, stack two or three pieces of French toast on top of each other. Drizzle with maple syrup or a dusting of powdered sugar for an added touch of sweetness.
– Side Accents: Place a handful of fresh berries and mint leaves beside the stacked French toast. This not only enhances the look but also offers a burst of flavor with each bite.
– Plate Choice: Use a wide, shallow plate or a rustic wooden board for a homey feel. The choice of dish can significantly influence the overall presentation.
Variations on the Classic Recipe
Exploring Flavor Additions: Chocolate, Nuts, and Spices
While the classic Overnight Crème Brûlée French Toast is undeniably delicious, there are numerous ways to customize this recipe to suit your taste preferences. Consider adding chocolate chips or cocoa powder to the custard mixture for a rich chocolate flavor. Nuts such as chopped pecans or walnuts can add a delightful crunch and earthy flavor.
Incorporating spices like cinnamon or nutmeg can elevate the dish, providing warmth and complexity. Simply mix in a teaspoon of your chosen spice into the custard before soaking the bread.
Seasonal Twists: Incorporating Fall or Summer Fruits
Another fantastic way to vary the recipe is by introducing seasonal fruits. In the fall, try adding slices of caramelized apples or pears, which pair wonderfully with the creamy custard. For summer, opt for peaches or nectarines, adding a juicy sweetness. The addition of seasonal fruits not only enhances flavor but also introduces different textures that complement the French toast beautifully.
Gluten-Free and Dairy-Free Alternatives: Adapting the Recipe
For those with dietary restrictions, adapting the Overnight Crème Brûlée French Toast is possible. Use gluten-free bread varieties, such as almond or coconut flour bread, to maintain the integrity of the dish. For a dairy-free version, substitute whole milk and cream with almond milk, oat milk, or coconut milk. Ensure that your sugar is free from any additives that may contain gluten.
By making these substitutions, you can create a version of this decadent dish that everyone can enjoy, without compromising on flavor or texture.
Conclusion: A Decadent Breakfast Experience
Overnight Crème Brûlée French Toast is not just a dish; it is an experience that combines comfort and elegance. By allowing the bread to soak overnight in a rich custard mixture and following up with a delightful brûlée topping, you create a breakfast that is sure to impress family and friends alike.
With the detailed steps and variations provided, you can confidently prepare this indulgent treat that transforms any morning into a special occasion. Embrace the decadence, enjoy the intricate flavors, and savor every bite of this exquisite breakfast creation. The combination of creamy custard, crispy caramelized sugar, and fresh fruit garnishes makes for a memorable dish that you will want to recreate time and again.