Introduction
In recent years, the trend of making homemade pizza has taken kitchens by storm, transforming a once-simple meal into an artistic culinary adventure. Families and food enthusiasts alike are embracing the joy of crafting their own pizzas from scratch, allowing for creativity and customization that store-bought options simply cannot provide. At the heart of every exceptional pizza lies a crucial element: the dough. A well-crafted dough serves as the foundation upon which all other flavors are built, impacting not just the taste but also the texture and overall experience of the finished product.
Enter the Artisan Pizza Dough recipe—a perfect blend of simplicity and flavor that elevates your pizza-making game. This recipe is designed for both novice home cooks and seasoned chefs, offering an approachable method to achieve a crust that is crispy on the outside, chewy on the inside, and bursting with flavor. By understanding the science behind the ingredients and mastering a few key techniques, you’ll be well on your way to creating your own pizza masterpiece.
Understanding Pizza Dough
The Science Behind Pizza Dough
To fully appreciate the craft of artisan pizza dough, it’s essential to understand the science that goes into its creation. The ingredients used in pizza dough each play a critical role in determining the final product’s flavor, texture, and structure.
– Flour is the primary ingredient, providing the necessary structure through gluten formation. The type of flour chosen can significantly affect the dough’s outcome. High-protein bread flour, for instance, yields a chewier crust, while all-purpose flour produces a more tender result.
– Yeast acts as the leavening agent, responsible for making the dough rise. It ferments the sugars present in the flour, producing carbon dioxide and alcohol, which contribute to the dough’s texture and flavor. Choosing the right type of yeast—whether instant or active dry—will influence how quickly your dough rises.
– Salt is more than just a flavor enhancer; it also strengthens gluten and helps to control fermentation. The right amount of salt can enhance the overall flavor profile of the dough, providing a balanced taste that complements the toppings.
– Water is vital for hydrating the flour and activating the yeast. The amount of water used can affect the dough’s hydration level, which in turn impacts the texture of the finished crust. Higher hydration doughs tend to be more open and airy, while lower hydration results in a denser crust.
– Olive oil not only adds flavor but also contributes to the dough’s tenderness and helps improve its extensibility. It creates a barrier that can prevent the dough from becoming too tough during the kneading process.
Understanding how these ingredients interact allows you to manipulate the dough to suit your preferences, ensuring that each pizza you create is uniquely your own.
Different Types of Pizza Dough
With an array of pizza styles around the world, it’s important to recognize the different types of dough that can be produced. Each style has its own characteristics, influenced by regional traditions, baking methods, and of course, the ingredients used.
– Neapolitan Pizza Dough is known for its simplicity and is traditionally made with just flour, water, salt, and yeast. It’s characterized by a soft, pliable crust that is cooked at high temperatures in a wood-fired oven, resulting in a slightly charred exterior and a chewy texture.
– New York-Style Pizza Dough typically incorporates a higher protein flour and is often made with a bit of sugar for added flavor. This style yields a thicker crust that is crisp on the outside yet soft and foldable on the inside, making it perfect for a quick bite on the go.
– Sicilian Pizza Dough is known for its thicker and fluffier crust, often baked in a rectangular pan. This dough usually has a higher hydration level and is allowed to rise longer, creating a light and airy texture.
Artisan pizza dough falls somewhere between these classic styles, combining the best elements of each to create a versatile base that can adapt to a variety of toppings and baking methods. This dough is designed to be both flavorful and easy to work with, making it the ideal choice for home pizza enthusiasts.
Ingredients Breakdown
Flour: The Base of Your Dough
The foundation of any great pizza dough is flour. When it comes to choosing the right flour, you have two main options: all-purpose flour and bread flour.
– All-Purpose Flour is a versatile option that works well for a variety of baking projects, including pizza dough. It has a moderate protein content, typically around 10-12%, which allows for a decent rise while providing a tender texture.
– Bread Flour, on the other hand, has a higher protein content, usually around 12-14%. This makes it ideal for pizza dough, as the additional protein helps create more gluten, resulting in a chewier and more resilient crust. If you’re aiming for that classic artisan-style pizza, bread flour is the recommended choice.
Yeast: The Leavening Agent
Yeast is essential for creating the lightness and rise in your pizza dough. You can choose between two main types of yeast:
– Instant Yeast is a popular choice for home bakers due to its convenience. It can be mixed directly into the dry ingredients without needing to be activated in water beforehand. This type of yeast works quickly and is reliable for achieving a good rise.
– Active Dry Yeast requires activation in warm water before being added to the dough. While it takes a bit longer to rise compared to instant yeast, many bakers prefer it for its traditional appeal and slightly different flavor profile.
Both types of yeast will yield delicious results, so feel free to use whichever you have on hand or prefer.
Salt and Sugar: Flavor Enhancers
Salt is a critical component in pizza dough, not just for flavor but also for its role in strengthening gluten. Salt helps to control the fermentation process, slowing it down and allowing for more complex flavors to develop in the dough.
Sugar, while not always necessary, can be added to enhance the flavor and assist in the fermentation process. It provides an additional food source for the yeast, leading to a more robust rise and a slightly sweeter flavor in the finished crust.
Olive Oil: Flavor and Texture
Olive oil is an optional ingredient in artisan pizza dough, but it can significantly enhance the flavor and texture of your crust. By adding a bit of olive oil to the dough, you can create a richer taste and a more tender crumb. The oil helps to lubricate the gluten strands, making the dough easier to stretch and shape without tearing.
Cornmeal: The Finishing Touch
Cornmeal is often used for dusting the pizza peel or baking surface before placing the dough on it. This provides a non-stick surface that helps the pizza slide off easily when transferring to the oven. Additionally, cornmeal adds a subtle crunch to the bottom of the crust, enhancing the overall texture of your pizza.
Step-by-Step Guide to Making Artisan Pizza Dough
Preparation of Ingredients
Before diving into the dough-making process, it’s important to gather all the necessary ingredients and tools. You’ll need:
– Bread flour (or all-purpose flour)
– Instant yeast (or active dry yeast)
– Salt
– Sugar (optional)
– Olive oil (optional)
– Water (warm, about 110°F)
– A mixing bowl
– A wooden spoon or spatula
– A clean surface for kneading
– A kitchen scale (for precise measurements)
Having everything prepared will streamline the process and ensure a successful outcome.
Mixing the Dough
Once you have all your ingredients ready, it’s time to start mixing the dough. Begin by combining the flour, salt, and sugar (if using) in a mixing bowl. If you’re using active dry yeast, activate it by dissolving it in warm water and letting it sit for about 5-10 minutes until frothy. If using instant yeast, simply whisk it into the dry ingredients.
Gradually add the warm water to the flour mixture, stirring with a wooden spoon or spatula until the ingredients come together. If you’re using olive oil, add it at this stage as well. The goal is to achieve a shaggy dough that is neither too dry nor too sticky. If the dough feels too dry, add a little more water, a tablespoon at a time, until the right consistency is reached.
Kneading Techniques
Kneading is a crucial step in developing the dough’s gluten structure, which gives it the elasticity needed for stretching. Transfer the dough onto a lightly floured surface and begin kneading by pushing the dough away from you with the heel of your hand, then folding it back over itself. Rotate the dough a quarter turn and repeat this process for about 8-10 minutes.
You’ll know the dough is ready when it feels smooth and elastic, and it springs back when gently pressed. If you’re using a stand mixer with a dough hook, knead on low speed for about 5-7 minutes until the dough is smooth and elastic.
Fermentation Process
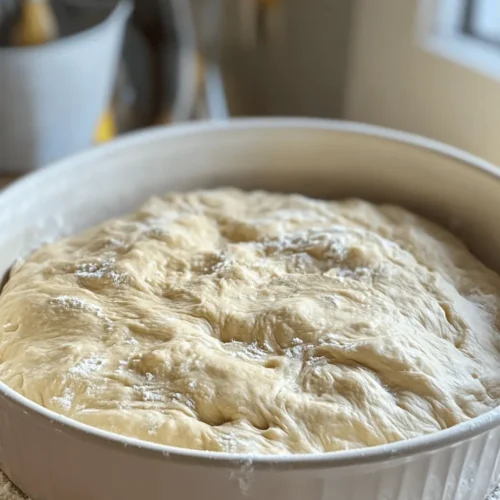
After kneading, it’s time for the dough to rise. Place the dough in a lightly greased bowl and cover it with a damp cloth or plastic wrap. Find a warm, draft-free area for the dough to ferment. Allow it to rise for about 1 to 2 hours, or until it has doubled in size. The fermentation process is crucial for developing flavor and texture, so be patient and give the dough the time it needs.
During this time, you can prepare your favorite toppings or sauces, ensuring everything is ready for when the dough is ready to be shaped into your artisan pizza masterpiece.
With the initial steps of making artisan pizza dough complete, you are well on your way to creating a delicious and satisfying homemade pizza experience. In the next part of this article, we will dive deeper into shaping the dough, baking techniques, and tips for achieving the perfect pizza every time. Stay tuned for more culinary inspiration!
Signs That Your Dough Has Risen Adequately
Knowing when your pizza dough has risen adequately is crucial for achieving that perfect texture. After allowing your dough to rest in a warm, draft-free location, look for the following signs:
1. Doubling in Size: The most reliable indicator is that your dough has approximately doubled in size. This means the yeast has been active and has created the necessary gases to expand the dough.
2. Poke Test: Gently poke the dough with a finger. If the indentation remains, your dough is ready to be shaped. If it springs back quickly, it needs more time to rise.
3. Smooth Surface: The surface of the dough should appear smooth and slightly domed. If it is still sticky or feels dense, allow it some additional time to rise.
Dividing and Shaping
Techniques for Dividing Dough Portions and Shaping Them into Balls
Once your dough has risen adequately, it’s time to divide and shape it into portions for individual pizzas. Here’s how to do it effectively:
1. Flour Your Work Surface: Begin by lightly dusting your work surface with flour to prevent sticking. This will also make it easier to manipulate the dough.
2. Divide the Dough: Using a bench scraper or a sharp knife, divide the dough into equal portions based on the size of the pizzas you want (typically 8-12 ounces per pizza).
3. Shape into Balls: Take each portion and gently stretch the edges towards the center, pinching them together to create a tight ball. Rotate the ball as you pinch to maintain its round shape.
4. Rest the Dough: Place each ball seam-side down on a floured surface or a baking sheet. Cover them with a clean kitchen towel or plastic wrap to prevent drying out. Let them rest for at least 30 minutes to allow the gluten to relax, making them easier to stretch later.
Resting the Dough
Importance of Resting and How It Affects the Final Crust
Resting your pizza dough is a vital step that should not be overlooked. Here’s why:
– Gluten Relaxation: During the resting period, the gluten structure relaxes, making it easier to shape the dough without it springing back.
– Improved Texture: Allowing the dough to rest results in a lighter, airier crust. This is particularly essential for artisan pizzas, where a chewy yet tender crust is desired.
– Flavor Development: A longer resting period also allows for better flavor development, as the yeast continues to ferment and develop complex flavors in the dough. For the best results, consider refrigerating the dough overnight for an even deeper flavor.
Baking Your Artisan Pizza
Preheating the Oven
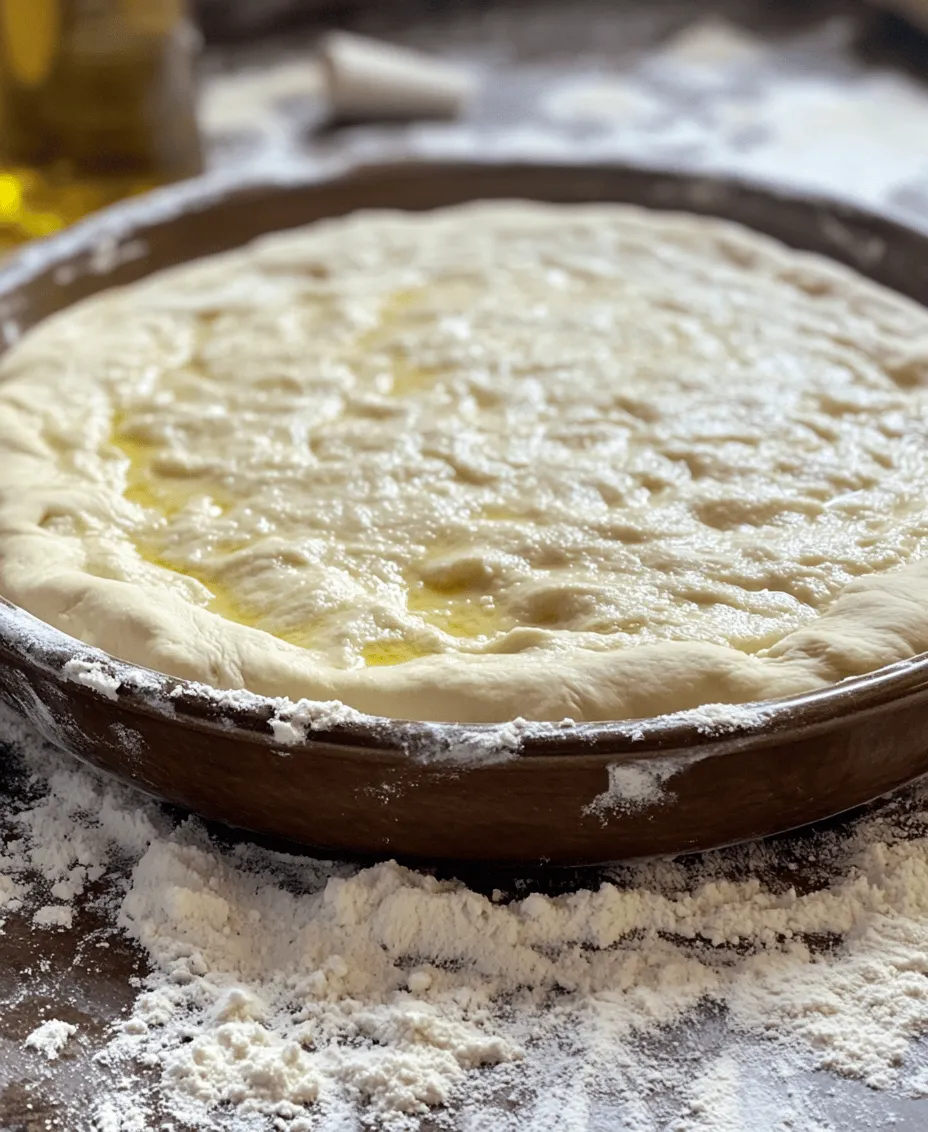
Before you start stretching your dough, preheat your oven to the highest setting, typically 475°F to 500°F (245°C to 260°C).
– Importance of Using a Pizza Stone: If you have one, place a pizza stone in the oven while it preheats. The stone retains heat and helps achieve that crispy crust reminiscent of a traditional wood-fired pizza. If you don’t have a stone, an inverted baking sheet can also work.
Stretching the Dough
Stretching the dough is an art. Here are techniques to do it without tearing:
1. Use Your Hands: Start by pressing down on the dough ball to flatten it slightly. Then, using your fingers, gently push from the center outwards, allowing gravity to assist in stretching.
2. Turn and Stretch: As you stretch, rotate the dough 90 degrees to maintain a round shape. Don’t pull too hard; instead, let the dough relax and stretch naturally.
3. Avoid the Rolling Pin: While it may be tempting to use a rolling pin, avoid it if possible. This method can deflate the dough and remove the air bubbles that contribute to the crust’s texture.
Topping Your Pizza
The beauty of artisan pizza lies in its versatility. Consider these classic and creative topping ideas:
– Classic Margherita: Fresh mozzarella, fresh basil, and a drizzle of olive oil. Keep it simple to allow the dough’s flavor to shine.
– Pepperoni and Mushroom: A traditional favorite that balances spice and earthiness.
– Mediterranean Delight: Feta cheese, olives, artichokes, and a sprinkle of oregano for a flavorful twist.
– BBQ Chicken: Shredded chicken with barbecue sauce, red onions, and cilantro for a sweet and tangy flavor profile.
– Veggie Supreme: Bell peppers, onions, mushrooms, and spinach for a colorful and hearty option.
Baking Process
Once your pizza is topped, it’s time to bake:
1. Transfer to the Oven: Use a pizza peel or the back of a baking sheet to transfer the pizza onto the preheated pizza stone or baking sheet.
2. Baking Time: Bake for about 10-12 minutes, or until the crust is golden brown and the cheese is bubbly. Keep an eye on it, as baking times may vary based on your oven and the thickness of the crust.
3. Achieving the Perfect Crust: For a crispier crust, you can bake the pizza for an additional minute or two, but be cautious not to burn it.
Cooling and Serving
Once your pizza is baked to perfection, it’s essential to let it cool slightly before slicing.
– Cooling: Allow the pizza to sit for about 5 minutes on a wire rack to prevent the crust from becoming soggy.
– Slicing: Use a sharp pizza cutter or a chef’s knife to slice the pizza into wedges. Serve it hot and enjoy the fruits of your labor!
Troubleshooting Common Issues
Dough Not Rising
If your dough fails to rise, consider these possible reasons and solutions:
– Inactive Yeast: Ensure your yeast is fresh. If it’s too old, it won’t activate properly.
– Incorrect Temperature: If your environment is too cold, the yeast may not activate. Try placing the dough in a warmer spot or using a proofing box.
Crust Too Tough or Chewy
If you find your crust is too tough, consider these factors:
– Overworking the Dough: Kneading too much can develop excess gluten, leading to a chewy texture. Be gentle and knead just until smooth.
– Using High-Protein Flour: While this can create a chewier crust, you may want to use a lower protein flour for a lighter texture.
Toppings Sogging the Dough
To avoid a soggy bottom pizza, keep these tips in mind:
– Pre-cook Wet Ingredients: If using toppings like mushrooms or tomatoes, consider pre-cooking them to reduce moisture.
– Limit Sauce: Don’t overload your pizza with sauce. A thin layer will keep your crust crispy.
The Joy of Homemade Pizza
Versatility of Pizza Dough
One of the most delightful aspects of this artisan pizza dough recipe is its versatility. Beyond pizzas, you can use this dough for:
– Calzones: Fill with ricotta, mozzarella, and your favorite toppings, then fold and bake.
– Breadsticks: Roll into thin strips, brush with garlic butter, and bake for a delicious side.
Creating a Pizza Night Tradition
Homemade pizza can be a wonderful way to bring family and friends together. Consider establishing a weekly pizza night where everyone can participate in the topping selection and dough shaping. This not only makes meal preparation a fun experience but also creates lasting memories around the dinner table.
Conclusion
Mastering the art of pizza dough is a rewarding endeavor that opens the door to countless delicious homemade pizzas. From the initial mixing of ingredients to the final baking and serving, each step is an opportunity to learn and create.
As you become more comfortable with the process, don’t hesitate to experiment with various toppings and styles. The joy of making pizza from scratch is not just about the food; it’s about the experiences and memories created with loved ones.
So roll up your sleeves, gather your ingredients, and embark on your artisan pizza-making journey. With practice, you’ll be able to create mouthwatering pizzas that are sure to impress, all while enjoying the simple pleasure of cooking at home.