

Introduction
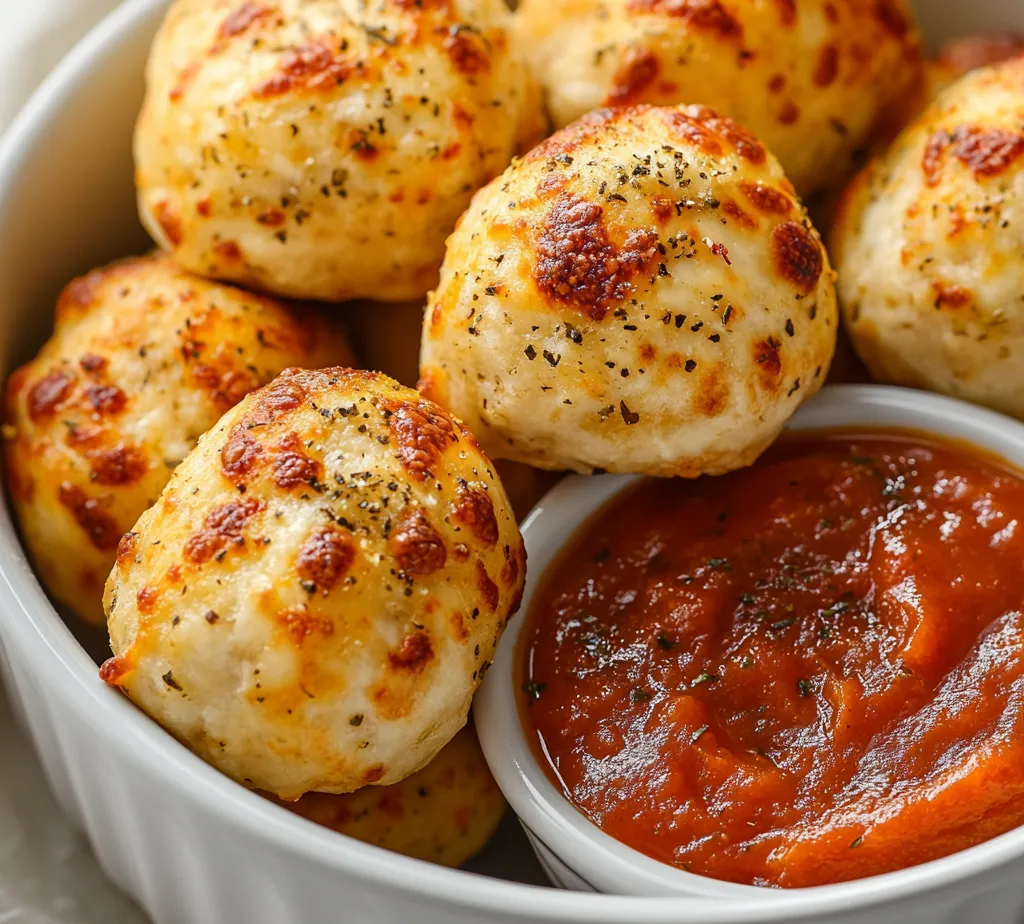
This recipe for Cheesy Pizza Balls Delight encapsulates the joy of pizza in a fun, bite-sized form. These delightful treats are perfect for gatherings, game nights, or simply indulging in a cheesy snack. Imagine the excitement as you pop one of these cheesy balls into your mouth, surrounded by crispy dough and the comforting flavors of pepperoni and bell pepper. Whether you’re hosting friends or enjoying a cozy family evening, these pizza balls are sure to be a hit.
The process of making these Cheesy Pizza Balls is straightforward, making it a perfect recipe for both seasoned cooks and novice bakers alike. With a combination of basic ingredients, you can craft a memorable appetizer or snack that is as fun to prepare as it is to eat. The delightful contrast of the crunchy dough and the gooey, cheesy interior makes these treats an unforgettable experience.
Perfectly paired with warm pizza sauce, these Cheesy Pizza Balls can also be customized with your favorite fillings to create a multitude of flavor combinations. Whether you prefer a classic pepperoni and cheese filling or wish to experiment with other toppings, this recipe serves as a solid foundation for your culinary creativity.
Recipe Overview
– Total Time: 1 hour
– Yield/Servings: 12
– Difficulty: Not specified in the recipe
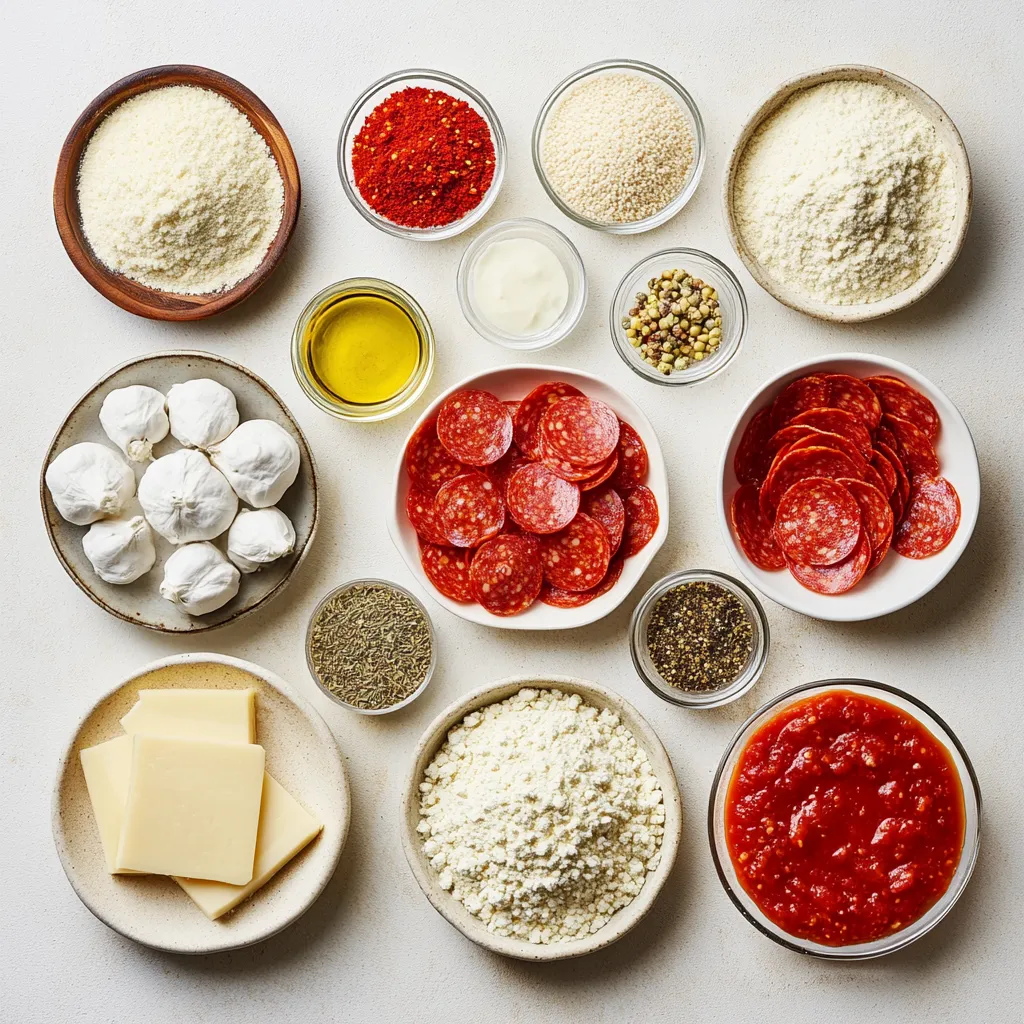
Ingredients
– 1 cup all-purpose flour
– 1 teaspoon instant yeast
– 1/2 teaspoon granulated sugar
– 1/2 teaspoon salt
– 1/2 cup warm water (about 110°F/43°C)
– 1 tablespoon extra virgin olive oil
– 1/2 cup shredded mozzarella cheese
– 1/4 cup diced pepperoni
– 1/4 cup finely chopped bell pepper (any color)
– 1/4 cup pizza sauce (for dipping)
– 1 teaspoon dried Italian seasoning
– Cooking spray or additional olive oil for greasing
Instructions
1. In a large mixing bowl, whisk together the all-purpose flour, instant yeast, sugar, and salt until well combined.
2. Gradually add the warm water and olive oil to the dry mixture. Stir with a wooden spoon or spatula until a cohesive dough begins to form.
3. Transfer the dough onto a lightly floured surface. Knead the dough for about 5-7 minutes, or until it becomes smooth and elastic to the touch.
4. Place the kneaded dough in a greased bowl, cover it with a damp kitchen towel, and let it rise in a warm area for approximately 30 minutes, or until it has doubled in size.
5. Preheat your oven to 400°F (200°C) and prepare a baking sheet by lining it with parchment paper for easy cleanup.
6. Once the dough has risen, gently punch it down to release the air and divide it into 12 equal portions.
7. Take each piece of dough and flatten it into a small circle, about 3 inches in diameter. In the center of each circle, place a teaspoon of shredded mozzarella cheese, a few pieces of diced pepperoni, and a sprinkle of chopped bell pepper.
8. Carefully fold the edges of the dough over the filling and pinch them together to form a sealed ball. Ensure that the filling is completely enclosed to prevent it from leaking during baking.
9. Arrange the pizza balls on the prepared baking sheet, placing them seam side down. Lightly spray the tops with cooking spray or brush them with a little olive oil for a golden finish.
10. Sprinkle the Italian seasoning evenly over each ball to enhance the flavor profile.
11. Bake in the preheated oven for 15-20 minutes, or until the pizza balls are puffed and golden brown.
12. After baking, remove the pizza balls from the oven and allow them to cool slightly before serving. Pair with warm pizza sauce for dipping.
Understanding the Role of Each Ingredient
All-Purpose Flour
All-purpose flour serves as the foundation for the dough in these Cheesy Pizza Balls. It provides the necessary structure and stability needed to form a cohesive dough. The flour contributes gluten, which is crucial for elasticity and allows the balls to hold their shape during baking. In this recipe, the flour works in tandem with the other ingredients to create a tender yet sturdy exterior.
Instant Yeast
Instant yeast is a quick-acting ingredient that plays a vital role in the dough’s rise and texture. When combined with warm water, it activates rapidly, allowing the dough to rise faster than traditional yeast. This means that your Cheesy Pizza Balls can come together in under an hour, making them a quick snack option. The instant yeast ensures a light and airy interior, encapsulating the cheesy goodness and toppings perfectly.
Granulated Sugar
In this recipe, granulated sugar serves multiple purposes. Firstly, it adds a hint of sweetness that balances the savory flavors of pepperoni and cheese. Secondly, sugar aids the yeast in fermentation by providing food for its growth. This not only helps the dough rise but also contributes to a browner crust when baked. The touch of sweetness enhances the overall flavor, making these pizza balls a delightful treat.
Salt
Salt is an essential ingredient that enhances the overall flavor and balances the richness of the cheese and pepperoni. Additionally, salt strengthens the gluten structure in the dough, helping it achieve the desired texture. The right amount of salt also prevents the yeast from over-expanding, ensuring that the dough rises at a controlled rate. In a savory recipe such as this, salt plays a pivotal role in bringing out the best flavors.
Preparing the Dough
Mixing Dry Ingredients
To create a strong and flavorful dough, start by whisking together all-purpose flour, instant yeast, granulated sugar, and salt in a large mixing bowl. Combining these dry ingredients ensures that the yeast and sugar are evenly distributed throughout the flour. Mix thoroughly until the material is completely blended, which sets the foundation for a uniform dough that will rise beautifully.
Adding Liquids
Once the dry ingredients are well combined, the next step involves incorporating warm water and olive oil. Gradually adding these liquids to the dry mixture helps to prevent clumping and ensures an even texture. Stir with a wooden spoon or spatula to bring the ingredients together. The goal here is to achieve a cohesive dough that holds together without being sticky, setting the stage for the kneading process.
Kneading the Dough
Kneading is a crucial step in developing the perfect dough for your Cheesy Pizza Balls. After transferring the dough to a lightly floured surface, begin folding and pressing it with the heels of your hands. This process should last about 5-7 minutes and should result in a smooth, elastic dough that springs back when pulled. Proper kneading helps strengthen the gluten network, providing the necessary structure and chewiness for the final baked product.
The Rising Process
Importance of Proofing
Proofing, or allowing the dough to rise, is essential for creating fluffy pizza balls. During this time, the yeast ferments and produces carbon dioxide, which causes the dough to expand. This gradual rise not only increases the size of the dough but also enhances the flavor, creating a more complex taste profile. Proofing gives the dough the lightness it needs to develop a pleasing texture when baked.
Ideal Conditions for Rising
For optimal dough rising, place it in a warm location, free from drafts. An ideal environment is around 75-80°F (24-27°C), as this temperature range promotes yeast activity. Covering the bowl with a damp kitchen towel helps to retain moisture, preventing the surface of the dough from drying out. Finding such a cozy spot allows your dough to double in size, which is crucial for the success of your Cheesy Pizza Balls.
Time Management During Rising
While the dough is rising, it’s important to effectively manage your time, especially if you have other preparations to complete. Use this rising period to prepare any fillings or accompaniments, such as chopping vegetables or prepping pizza sauce for dipping. This not only keeps you organized but also ensures that you are ready for the next steps as soon as the dough has finished proofing, leading to a more streamlined baking experience.
Preparing the Filling
Choosing the Right Cheese
Shredded mozzarella cheese is a classic and preferred choice for pizza balls due to its unparalleled meltability and stretching characteristic. This cheese complements the savory filling and holds everything together in a delicious, gooey texture. A blend of mozzarella with other cheeses like provolone or cheddar can also be used if you’re looking for a more complex flavor profile. However, it’s crucial to ensure that the cheeses melt well together to maintain the delightful gooeyness.
Selecting Pepperoni
Diced pepperoni is a staple in these pizza balls for a reason: its rich, savory flavor adds a necessary punch to each bite. The fat rendered from the pepperoni during baking enriches the dough and filling, creating a delightful lip-smacking experience. For those who prefer a leaner option, turkey or chicken pepperoni can serve as a healthier alternative without sacrificing too much flavor.
Bell Pepper Variations
Using colorful bell peppers not only enhances the visual appeal of the pizza balls but also introduces different flavor notes. Red, yellow, and orange bell peppers are typically sweeter, while green bell peppers provide a slight bitterness that can balance the richness of the cheese and pepperoni. Feel free to experiment with varying proportions or a mix of these peppers to find a combination that suits your palate.
Shaping the Pizza Balls
Portioning the Dough
Once the dough has risen successfully, it’s time to start shaping the pizza balls. You will need to divide the risen dough into 12 equal portions. A bench scraper or a sharp knife can assist in achieving clean cuts. This uniformity in size is heavily crucial to ensure even cooking, providing a consistent texture for each pizza ball.
Forming the Dough Circle
Flattening the dough can be done by using the palms of your hands or a rolling pin. Aim for a thickness of about a quarter of an inch, ensuring that the outer edges are slightly thicker than the center. This technique will provide better support for the filling while allowing the cheese to melt and ooze through the center.
Sealing the Balls
Sealing the dough is one of the most crucial steps to preventing leakage during baking. After placing the filling in the center of the dough circle, carefully fold over the edges and pinch them together. You can twist the dough slightly as you seal to ensure a tight closure. This will help in avoiding any messy fillings escaping during the baking process, securing the delightful surprise awaiting inside.
Arranging and Baking
Preparing the Baking Sheet
Lining a baking sheet with parchment paper will not only facilitate a whole lot easier cleanup but also promote even baking. Additionally, a light spray of cooking spray or brushing with olive oil helps prevent sticking and fosters a golden finish on the bottom of each pizza ball.
Preheating the Oven
Preheating the oven to 400°F (200°C) is a key step for achieving perfectly baked cheesy pizza balls. This process ensures the dough rises properly in the heat, contributing to a fluffy texture while cooking the filling thoroughly. While waiting for the oven to preheat, finishing up setting the pizza balls into position can make things smoother.
Baking Time and Temperature
The perfect baking duration of 15-20 minutes often results in that sought-after golden brown color. It’s advisable to check closely towards the end of the baking time to avoid over-baking, as a dry texture will overshadow the intended fluffy goodness of these delightful treats.
Flavor Enhancements
Sprinkling Italian Seasoning
Dried Italian seasoning is a fantastic way to elevate the flavor of your pizza balls. Sprinkling it on top before baking not only adds aroma but enhances the overall taste. A good balance of herbs like oregano, basil, thyme, and rosemary can deepen the flavor profile, creating an authentic Italian feel.
Serving Suggestions
Presentation can significantly enhance the dining experience. Arranging the pizza balls on a stylish serving platter with a small bowl of warm pizza sauce at the center is a great way to serve. Topping the dish with freshly chopped basil or a sprinkle of parsley further elevates the aesthetic, inviting guests to dig in.
Tips for Serving
Ideal Temperature for Serving
Serving pizza balls when they’re warm, but not too hot, is ideal. Allow them to cool for a few minutes after baking to avoid burning tongues; about 5-10 minutes will sufficiently cool them while still keeping them comforting warm and gooey inside.
Accompanying Dips
Beyond the classic pizza sauce, consider offering other dips such as marinara sauce, garlic butter, or ranch dressing. These alternatives allow your diners to customize their experience while adding even more flavor to the pizza balls.
Storing and Reheating
Cooling the Pizza Balls
Before storing your pizza balls, allow them to cool completely on a wire rack. This prevents steam from making them soggy and ensures they maintain their delightful texture. Once cooled, transfer them to an airtight container to maintain freshness.
Refrigeration Tips
When storing in the refrigerator, ensure that the pizza balls are in a single layer to avoid squishing them. They can be stored for up to three days. For longer storage, consider placing them in an airtight container in the freezer where they can last up to a month.
Reheating Instructions
To reheat, preheat your oven to 350°F (175°C) and arrange the pizza balls on a baking sheet. Bake for approximately 10-15 minutes, or until they reach the desired warmth. This method preserves the crispness of the outer dough while revitalizing the gooey interior.
Conclusion
Cheesy Pizza Balls Delight offers a scrumptious combination of flavors and textures, featuring a fluffy exterior and a gooey, savory center. With a total preparation time of just one hour, these bite-sized delights are perfect for sharing during any occasion. Their adaptability in flavors and ease of serving makes them a great choice for gatherings or family snacks.

Cheesy Pizza Balls Delight Recipe for Bite-Sized Goodness
Ingredients
- 1 cup all-purpose flour
- 1 teaspoon instant yeast
- ½ teaspoon granulated sugar
- ½ teaspoon salt
- ½ cup warm water
- 1 tablespoon extra virgin olive oil
- ½ cup shredded mozzarella cheese
- ¼ cup diced pepperoni
- ¼ cup finely chopped bell pepper
- ¼ cup pizza sauce
- 1 teaspoon dried Italian seasoning
- cooking spray or olive oil for greasing
Instructions
- In a large mixing bowl, whisk together flour, yeast, sugar, and salt.
- Gradually add warm water and olive oil, stirring until a dough forms.
- Knead the dough on a floured surface for 5-7 minutes until smooth.
- Place the dough in a greased bowl, cover, and let rise for 30 minutes.
- Preheat oven to 400°F (200°C) and line a baking sheet with parchment paper.
- Punch down the risen dough and divide it into 12 portions.
- Flatten each piece into a circle, add cheese, pepperoni, and bell pepper in the center.
- Fold the edges over the filling and pinch to seal each ball.
- Arrange on the baking sheet, seam side down, and spray or brush with oil.
- Sprinkle with Italian seasoning and bake for 15-20 minutes until golden.
- Cool slightly before serving with pizza sauce.