
Introduction
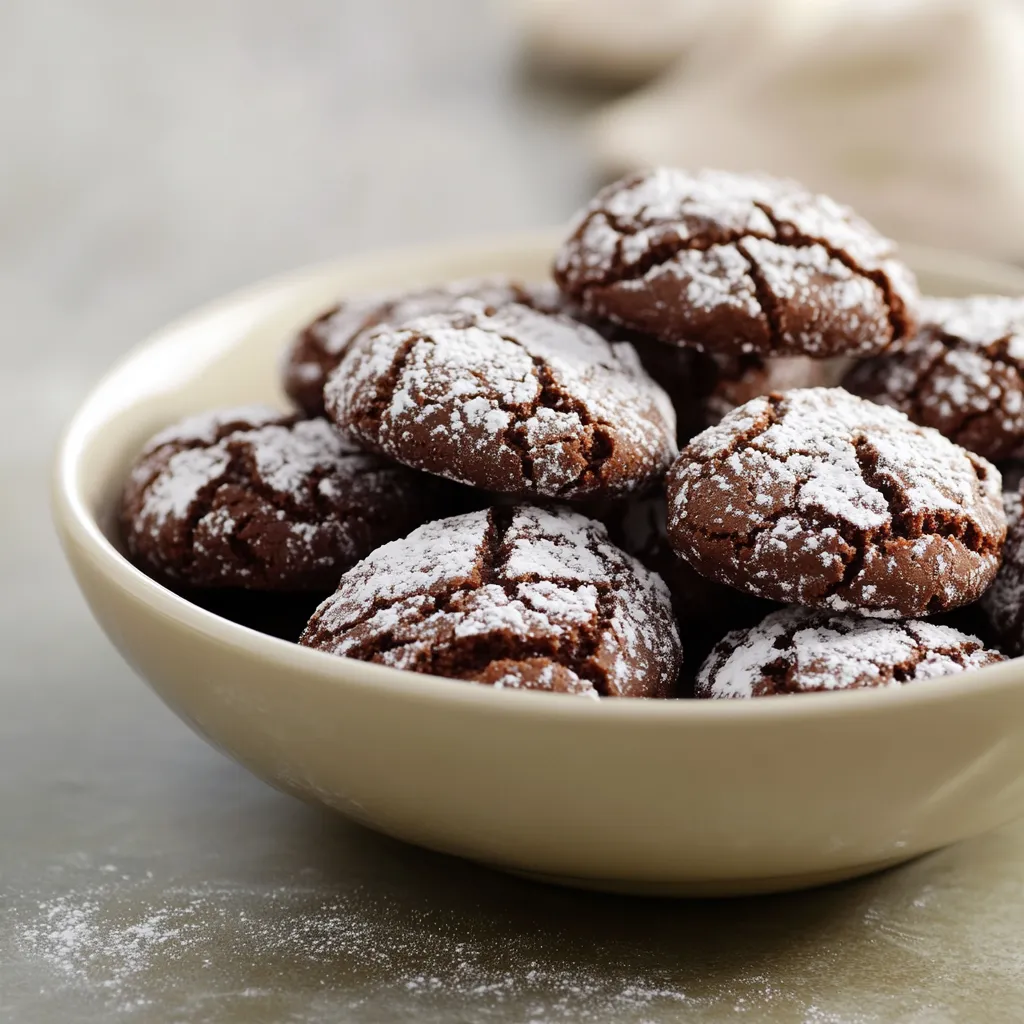
Exploring the perfect blend of chocolate and peppermint, this recipe for Chocolate Peppermint Crinkle Cookies captures the spirit of the holiday season. These delightful cookies are not only packed with rich chocolate flavor but also infused with refreshing peppermint, making them a favorite treat during festive times. The crinkle effect delivers a visually appealing contrast against the classic snowy powdered sugar coating, making these cookies an eye-catching addition to any holiday spread.
Their soft, chewy centers paired with delightfully crisp edges create a textural experience that’s both satisfying and indulgent. Chocolate Peppermint Crinkle Cookies are ideal for gatherings, gifting, or enjoying a cozy night in during chilly winter months. Share them at cookie exchanges, add them to your holiday dessert table, or delight your family and friends with a batch of these irresistible treats.
Recipe Overview
This section provides a concise summary of the Chocolate Peppermint Crinkle Cookies, detailing their flavor profile, texture, and appeal for various occasions.
Flavor Profile
– Rich chocolate intensity: The unsweetened cocoa powder creates a deep chocolate flavor that is both bold and satisfying.
– Invigorating peppermint notes: The addition of peppermint extract offers a refreshing twist that perfectly complements the richness of the chocolate.
– Sweetness balanced with a hint of salt: The combination of granulated sugar and brown sugar provides a balanced sweetness, while salt enhances the overall flavor.
Texture
– Soft and chewy centers: The cookies maintain a luscious texture inside, creating a delightful contrast with the exterior.
– Crisp edges upon baking: The edges become slightly firm, providing a satisfying textural boundary while allowing the center to remain deliciously moist.
– Powdered sugar coating adds a delightful contrast: The snowy layer of powdered sugar not only enhances the aesthetic but adds a light sweetness with each bite.
Ideal Occasions
– Holiday gatherings: These cookies are a welcome addition to any festive gathering, effortlessly spreading holiday cheer.
– Cookie exchanges: Perfect for sharing, they are sure to impress fellow cookie enthusiasts.
– Festive celebrations at home: Ideal for enjoying with family or friends during special celebrations and cozy nights in.
Ingredients
A comprehensive list of ingredients necessary to create delicious Chocolate Peppermint Crinkle Cookies, with notes on any optional additions.
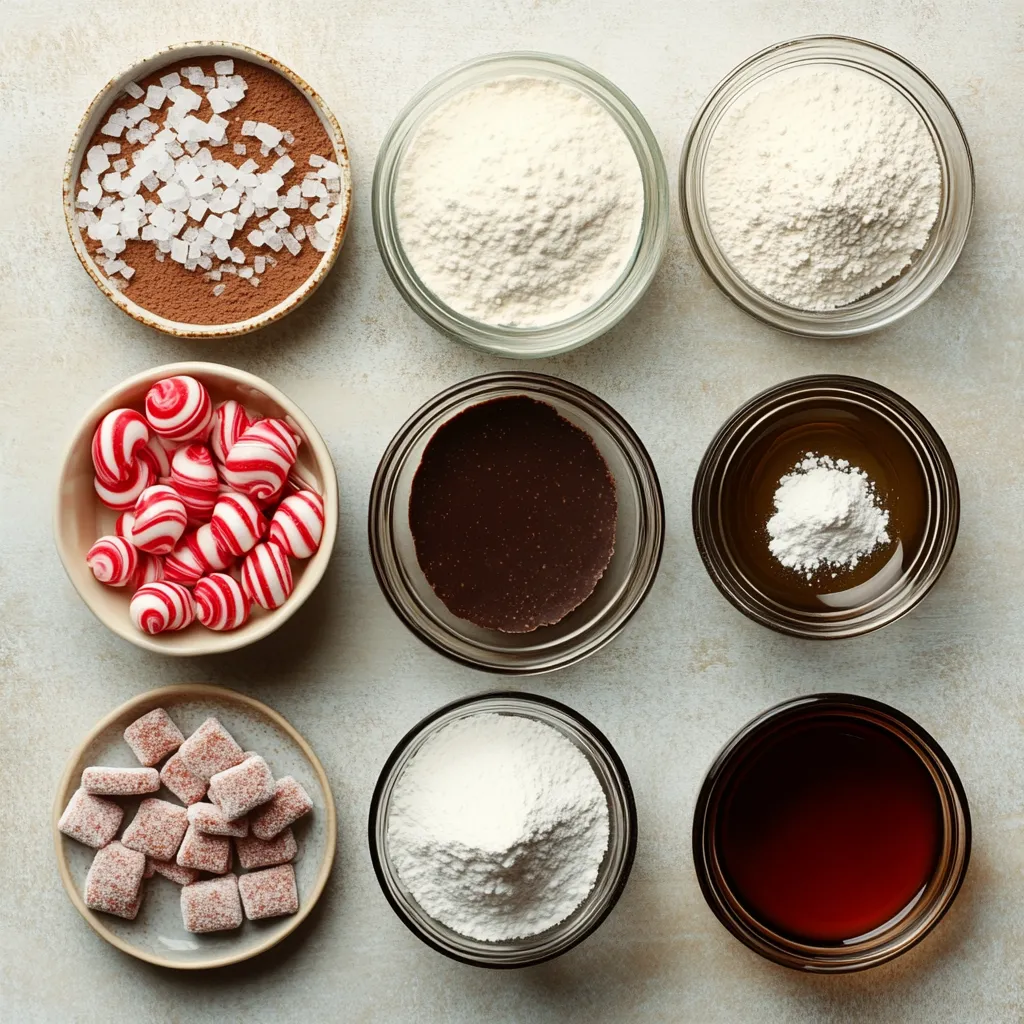
Essential Ingredients
– All-purpose flour
– Unsweetened cocoa powder
– Baking powder
– Salt
Sweeteners
– Granulated sugar
– Packed brown sugar
Wet Ingredients
– Vegetable oil
– Large eggs
– Vanilla extract
– Peppermint extract
Coating and Garnish
– Powdered sugar
– Optional: crushed peppermint candies
Baking Equipment Needed
An overview of the essential baking tools and equipment required to prepare the cookies smoothly.
Mixing Bowls
Utilizing a medium-sized bowl for the dry ingredients and a large mixing bowl for the wet ingredients will streamline the cookie-making process. Stainless steel or glass bowls are recommended as they are durable and easy to clean. Having two bowls allows for efficient mixing without risk of cross-contamination of flavors until the final dough is formed.
Baking Sheet and Lining
A standard baking sheet is essential for baking these cookies. Lining the sheet with parchment paper is highly recommended as it prevents sticking and facilitates easy cleanup. The parchment allows the cookies to bake evenly while also ensuring that they retain their crinkle characteristic without the risk of being damaged when removed.
Cooling Rack
After baking, a wire cooling rack is crucial for achieving the optimal texture of your cookies. It allows air to circulate around the cookies, ensuring that they cool evenly without becoming soggy from moisture. Proper cooling also helps the centers firm up while maintaining that perfect chewy interior.
Preparation Steps
Detailed step-by-step guide to creating the Chocolate Peppermint Crinkle Cookies, highlighting key techniques and timing for optimal results.
Preheating the Oven
Begin by preheating your oven to 350°F (175°C). This temperature is important as it allows the cookies to bake evenly. Preheating ensures that the cookies start baking as soon as they enter the oven, which is critical for achieving that delightful crinkle texture. An adequately heated oven also helps set the edges quickly, leaving a soft center.
Following preheating, prepare a baking sheet by lining it with parchment paper to prevent cookies from sticking and ensure an easy release once baked. This preparation step sets the stage for a successful baking experience, allowing you to focus on creating the cookie dough.
As you work through the subsequent steps of mixing and chilling the dough, your oven will be ready for baking by the time you finish shaping the cookies.
Mixing Dry Ingredients
In creating these Chocolate Peppermint Crinkle Cookies, starting with a solid foundation of dry ingredients is essential. Technique plays a vital role here. Whisking together the all-purpose flour, unsweetened cocoa powder, baking powder, and salt in a medium-sized bowl ensures that the leavening agent is evenly distributed. This is crucial for achieving the desired texture throughout the cookies. Use a balloon whisk or a sifter to aerate the powders, which helps prevent clumping and supports a light, tender cookie.
Preparing the Wet Mixture
Once the dry ingredients are well combined, the focus shifts to the wet mixture. In a large mixing bowl, combine granulated sugar, packed brown sugar, and vegetable oil. Begin mixing on low speed or by hand to avoid a sugar cloud. Gradually increase the speed once the ingredients start integrating. A smooth, homogenous mixture indicates that the sugars have dissolved adequately into the oil, which leads to a cookie that has a rich taste and a moist texture post-baking.
Integrating Eggs and Extracts
With the sugar and oil mixture ready, it’s time to add the eggs and flavor extracts. Crack the eggs one at a time into the bowl, mixing thoroughly after each addition until fully incorporated. This allows for even distribution of moisture and contributes to the binding properties of the dough. Following the eggs, carefully add the vanilla extract and peppermint extract. This addition is essential for ensuring that each cookie has a consistent flavor throughout. The peppermint extract lends a refreshing quality that complements the richness of the cocoa.
Merging Wet and Dry Ingredients
The next step, merging the wet and dry ingredients, requires caution. Gently fold the dry mixture into the wet ingredients rather than stirring aggressively. Overmixing can develop gluten, resulting in tougher cookies. The dough should remain slightly thick and sticky, which helps create the signature soft center of the crinkle cookie. Aim to combine the ingredients until just blended for the best texture.
Chilling the Dough
Chilling the dough is a critical step that should not be overlooked. The refrigerated dough will be more manageable, allowing you to shape it into well-defined balls, which is integral to the crinkle effect.
Benefits of Chilling
Chilling offers several benefits: it prevents the dough from becoming overly soft or sticky, and it also improves the texture of the cookies once baked. Cookies made from chilled dough spread less in the oven, thus preserving their shape and enhancing the overall visual appeal through well-defined crinkles.
Recommended Chill Time
The ideal duration for chilling is about 30 minutes, as specified in the recipe. This timeframe allows the fats to firm up without making the dough too rigid. If dough is left in the refrigerator for too long, it may become too hard to shape, so aim to adhere to this recommended chill time.
Shaping the Cookies
Once the dough is sufficiently chilled, it’s time to shape the cookies. This stage is crucial for achieving the desired crinkled appearance.
Portioning the Dough
Using a tablespoon, scoop out even amounts of dough before forming them into balls with your hands. A cookie scoop can be beneficial for ensuring uniformity in size, resulting in evenly baked cookies. This method also helps maintain a consistent thickness, which aids in achieving the ideal texture across all cookies.
Rolling in Powdered Sugar
To achieve the classic crinkle effect, roll each ball in powdered sugar after shaping. Make sure that each ball is generously coated; this coating not only provides a beautiful visual contrast but also contributes to the distinct texture on the surface of the finished cookie. Carefully place the sugar-coated balls on the baking sheet to maintain the decorative finish.
Baking the Cookies
Baking is where the magic truly happens. Understanding how to navigate this process will ensure perfectly baked cookies.
Arranging on the Baking Sheet
Arranging the dough balls on a prepared baking sheet requires attention to space; leaving about 2 inches between each cookie ensures they have adequate room to spread without merging into one another.
Baking Time and Signs of Doneness
Bake the cookies for 10-12 minutes, keeping a close eye on their appearance as baking progresses. The edges should appear set and firm, while the centers remain soft. It’s crucial not to overbake, as the cookies will continue to firm up during the cooling process. The contrast between the soft middle and slightly crisp edges is fundamental to creating the perfect Chocolate Peppermint Crinkle Cookies.
Cooling and Presentation
Proper cooling and presentation of the cookies can enhance their visual and textural appeal.
Cooling Process
After removing the cookies from the oven, let them cool on the baking sheet for about 5 minutes. This intermediate cooling time allows the cookies to set adequately. Afterward, carefully transfer them to a wire rack to cool completely. This step is essential for ensuring they retain their structure and don’t become soggy.
Presentation Tips
For an attractive presentation, consider dusting the cooled cookies with additional powdered sugar, resembling a light winter snowfall. You can also adorn the platter with crushed peppermint candies or fresh mint sprigs to add a vibrant touch for festive occasions.
Tips for Storing Cookies
To keep your Chocolate Peppermint Crinkle Cookies fresh, proper storage is necessary.
Room Temperature Storage
Cookies can be stored at room temperature in an airtight container for up to 1 week. This method maintains their soft texture while preventing them from drying out. For longer freshness, consider layering parchment paper between cookies to prevent them from sticking.
Long-Term Storage Options
For long-term storage, these cookies can be frozen. Place them in a freezer-safe container or zip-top bag, separating layers with parchment paper. They can last for up to three months in the freezer. To enjoy later, simply thaw them at room temperature before serving, retaining their delightful taste and texture.
Customize Your Cookies
If you’re keen on personalizing your cookies, various modifications can be considered.
Alternative Flavor Extracts
Experimenting with different extracts can yield unique flavor profiles. For instance, almond extract can provide a warm, nutty undertone that complements the cocoa, while orange extract could add a refreshing citrus note.
Add-Ins and Variations
Additionally, incorporating mix-ins such as chocolate chips or nuts can elevate the basic cookie recipe. A sprinkle of sea salt on top before baking could also create an intriguing sweet-salty balance.
Conclusion
The Chocolate Peppermint Crinkle Cookies encapsulate the delightful fusion of chocolate and mint flavors, offering a soft and chewy texture balanced with crisp edges. The preparation time of just one hour makes this recipe an approachable choice for both festive gatherings and casual get-togethers. With their unique appearance and festive presentation, these cookies are sure to bring joy to any occasion.

Chocolate Peppermint Crinkle Cookies Recipe
Ingredients
- 1 cup all-purpose flour
- ½ cup unsweetened cocoa powder
- ½ teaspoon baking powder
- ¼ teaspoon salt
- ½ cup granulated sugar
- ½ cup packed brown sugar
- ⅓ cup vegetable oil
- 2 large eggs
- 1 teaspoon vanilla extract
- ½ teaspoon peppermint extract
- ½ cup powdered sugar
- optional crushed peppermint candies for garnish
Instructions
- Preheat your oven to 350°F (175°C) and line a baking sheet with parchment paper.
- In a bowl, whisk together flour, cocoa powder, baking powder, and salt; set aside.
- In a large bowl, mix granulated sugar, brown sugar, and vegetable oil until smooth.
- Add eggs one at a time, mixing well after each, then stir in vanilla and peppermint extracts.
- Gradually mix in the dry ingredients until just combined; the dough will be thick.
- Cover the bowl with plastic wrap and refrigerate for about 30 minutes.
- Scoop tablespoon-sized portions of dough, roll into balls, and coat in powdered sugar.
- Place the dough balls on the baking sheet, leaving space between each.
- Bake for 10-12 minutes until edges are set and centers are soft.
- Cool on the baking sheet for 5 minutes before transferring to a wire rack.