

Introduction
Chocolate chip cookies hold a special place in many hearts and homes, cherished for their rich flavor and comforting aroma. These seemingly simple cookies have become an iconic dessert, loved by both children and adults alike. The delightful combination of sweet, melt-in-your-mouth chocolate chips with a soft, chewy texture creates an irresistible treat, perfect for any occasion.
Homemade chocolate chip cookies offer a nostalgic charm that store-bought versions can’t replicate. They are often synonymous with gatherings, family reunions, and cozy moments at home. Whether served at a holiday party or enjoyed as an afternoon snack, these cookies bring joy and warmth to every bite. The featured recipe promises to deliver just that—a batch of soft and chewy chocolate chip cookies that embodies the essence of homemade bliss.
With a texture that perfectly balances chewiness with melt-in-your-mouth softness, these cookies are a delight to enjoy. They are easy to make and require minimal ingredients, making them an appealing option for both seasoned bakers and novice individuals in the kitchen. As you take a bite, the flavor of semi-sweet chocolate mingles with buttery goodness, while the optional walnuts add a lovely crunch for those who desire a little extra texture.
Recipe Overview
– Total Time: 30 minutes
– Yield/Servings: 24 cookies
– Difficulty: Not specified in the recipe
This recipe results in a generous yield of 24 chocolate chip cookies, making it perfect for sharing with loved ones or indulging on your own. The preparation time is swift, allowing you to whip up a batch without taking too much time away from your day. The optional addition of chopped walnuts enhances the texture, adding a pleasing crunch that beautifully contrasts with the chewy cookie base.
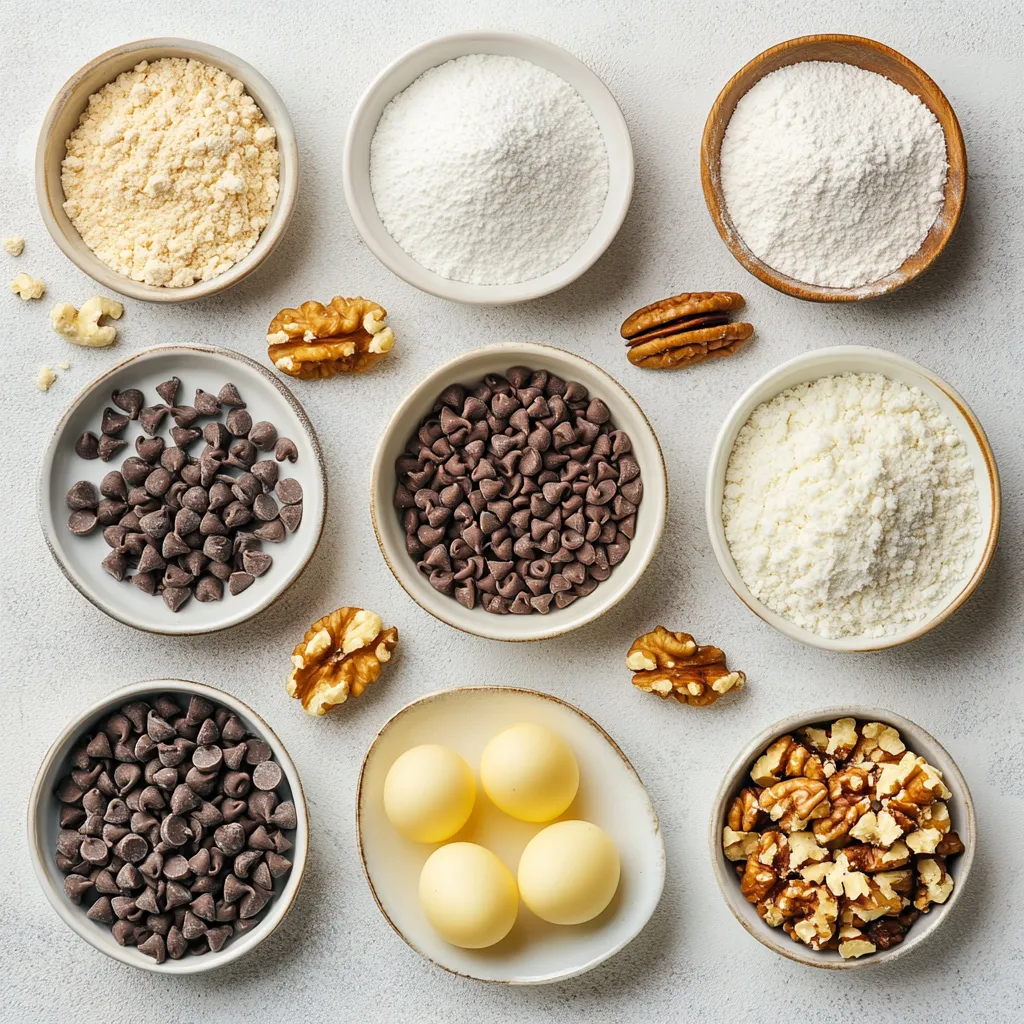
Ingredients
– 2 1/4 cups all-purpose flour
– 1/2 teaspoon baking soda
– 1 cup unsalted butter, softened (equivalent to 2 sticks)
– 3/4 cup granulated sugar
– 3/4 cup packed light brown sugar
– 1 teaspoon fine sea salt
– 2 teaspoons pure vanilla extract
– 2 large eggs, at room temperature
– 2 cups semi-sweet chocolate chips
– 1 cup chopped walnuts (optional, for added crunch)
The ingredients for this cookie recipe are straightforward yet effective in creating the signature flavors and textures. The all-purpose flour serves as the foundation of the dough, while the baking soda acts as a leavening agent that helps the cookies rise and achieve a fluffy texture. Unsalted butter is crucial for richness and flavor, while both granulated and brown sugars work in harmony to create sweetness and enhance the cookie’s moisture and chewiness.
Fine sea salt is pivotal for balancing the sweetness, bringing forward the flavors of the other ingredients. Pure vanilla extract adds an aromatic quality that elevates the taste profile of the cookies, while the eggs provide the necessary structure and moisture. The semi-sweet chocolate chips are undoubtedly the star of the show, providing pockets of chocolatey goodness in each bite, and the optional walnuts cater to those who enjoy a delightful crunch.
Instructions
1. Begin by preheating your oven to 350°F (175°C). Prepare your baking sheets by lining them with parchment paper to prevent sticking.
2. In a medium mixing bowl, combine the all-purpose flour and baking soda. Whisk them together until evenly mixed, then set the bowl aside.
3. In a large mixing bowl, use an electric mixer to beat the softened unsalted butter, granulated sugar, packed brown sugar, and fine sea salt together. Mix on medium speed for about 2-3 minutes until the mixture is creamy and smooth.
4. Add the pure vanilla extract and the eggs, one at a time, mixing well after each addition until fully incorporated into the batter.
5. Gradually introduce the flour mixture to the wet ingredients, mixing on low speed until just combined. Take care not to overmix, as this can affect the texture of your cookies.
6. Gently fold in the semi-sweet chocolate chips and the chopped walnuts (if you choose to use them) with a spatula or wooden spoon, ensuring they are evenly distributed throughout the cookie dough.
7. Using a cookie scoop or a tablespoon, drop rounded balls of dough onto the lined baking sheets, spacing them about 2 inches apart to allow for spreading during baking.
8. Place the baking sheets in the preheated oven and bake for 10-12 minutes. Look for lightly golden edges, while the centers should appear slightly underbaked, as they will continue to firm up once removed from the oven.
9. After baking, take the cookies out of the oven and allow them to cool on the baking sheet for about 5 minutes. Then, transfer them carefully to a wire rack to cool completely.
The preparation of these chocolate chip cookies is simple yet provides an opportunity to master basic baking techniques. Beginning with the preheating of the oven ensures that cookies bake evenly and achieve the perfect texture. Lining the baking sheets with parchment paper is an essential step that prevents sticking and facilitates easy transfer of the cookies after baking.
Mixing the dry ingredients separately allows them to be evenly distributed, preventing clumping when combined with the wet ingredients. A key tip in this recipe is to avoid overmixing the dough once the flour is added, which helps maintain the soft and chewy texture that we all crave. By folding in chocolate chips (and walnuts if desired) with a spatula or wooden spoon, you keep the airiness of the dough intact. Finally, spacing the dough balls on the baking sheets is crucial for allowing the cookies to spread without merging during baking, ultimately achieving those perfectly shaped treats.
Equipment Needed
Not specified in the recipe.

Creaming Butter and Sugars: The Importance of Texture
The creaming process is a fundamental step in cookie baking that greatly influences the final texture of your chocolate chip cookies. When you beat softened unsalted butter with granulated sugar and brown sugar, you incorporate air into the mixture, which helps create a light, tender structure in the cookies. This aeration allows the cookies to rise slightly during baking, resulting in a soft and chewy center surrounded by a slightly crisp exterior.
Achieving the right texture during this step is crucial. Aim for a light and fluffy consistency, mixing for about 2-3 minutes until the butter and sugars appear pale and creamy. The sugars granulate against the butter, creating small pockets of air; this not only contributes to a pleasant final texture but also ensures that the cookies hold their shape as they bake.
Incorporating Eggs and Vanilla: Ensuring Uniformity in the Batter
The addition of eggs and vanilla extract plays a key role in unifying the dough and enhancing the flavor profile of the cookies. Beating in the eggs one at a time allows for proper emulsification, which helps the batter achieve a smooth and cohesive texture. The egg proteins also aid in the structure formation, contributing to the chewier texture that is characteristic of classic chocolate chip cookies.
When adding the pure vanilla extract, you not only infuse the cookies with warmth and sweetness but also further contribute to the binding of the ingredients. Mixing until just combined after each addition ensures that all components are fully integrated, while careful monitoring here will help you avoid overmixing, which could result in tougher cookies.
Combining Dry and Wet Ingredients: Tips to Avoid Overmixing
While combining the dry ingredients (all-purpose flour and baking soda) with the wet mixture is essential, it’s crucial to handle this step delicately. Overmixing can develop the gluten in the flour excessively, leading to cookies that are dense and chewy rather than soft and tender.
To properly combine the dry and wet ingredients without overmixing, use a spatula or wooden spoon to fold the flour mixture into the wet ingredients. Gently stir just until you see the last bits of flour disappear. This technique helps maintain the tender crumb structure, giving you the ideal chocolate chip cookie consistency.
Folding in Chocolate Chips and Nuts
Technique for Gently Folding Ingredients to Maintain Texture
Gently folding in the chocolate chips and walnuts (if used) is critical to maintaining the soft and chewy texture of the cookies. Utilize a spatula or a large wooden spoon, and use a careful folding motion to incorporate these ingredients into the batter. This technique avoids overworking the dough while allowing for even distribution of chocolate and nuts.
Importance of Even Distribution for Consistency in Flavor
Even distribution of chocolate chips and nuts ensures that every cookie carries an equal balance of flavors. By folding gently, you can ensure each scoop of dough has a generous amount of chocolate within, making for a more satisfying cookie with each bite.
Shaping the Cookies
Optimal Sizes for Dough Balls
When shaping your cookies, aim for rounded balls of dough approximately 1.5 inches in diameter. This size is typically optimal for achieving the right mouthfeel and ensures that the cookies bake uniformly. A cookie scoop is an excellent tool for ensuring consistent sizes, which will lead to even baking and a uniform appearance.
Spacing Considerations for Even Baking
Place the cookie dough balls approximately 2 inches apart on the lined baking sheet. This spacing accounts for spreading during the baking process, preventing the cookies from merging into one another while still allowing them to expand to their ideal shape.
Visual Cues for When Cookies Are Ready to Be Baked
Keep an eye out for lightly golden edges when determining if your cookies are ready to be baked. The centers should still appear slightly underbaked. This contrast in coloration indicates that you will achieve that desirable soft center texture once they are cooled.
Baking the Cookies
Detailed Description of Baking Time and Temperature
Preheat your oven to 350°F (175°C) before placing the cookies in to ensure a consistent baking environment. The suggested baking time is 10-12 minutes, but it’s vital to monitor them, as ovens can vary in temperature accuracy.
Understanding Doneness: Golden Edges vs. Underbaked Centers
A perfected chocolate chip cookie comes out of the oven with golden edges and a soft, slightly underbaked center. This means the cookies will continue to bake on the pan after being removed from the oven due to residual heat, affording them a chewy consistency without being raw in the middle.
Role of Residual Heat in Finishing the Cooking Process
Allowing the cookies to sit for a few minutes on the baking sheet before transferring them to a wire rack utilizes residual heat to finish the baking process gently. This step is crucial for achieving a consistent bake throughout the cookie.
Cooling the Cookies
Importance of Cooling Time on the Baking Sheet
After baking, it’s crucial to let the cookies cool on the baking sheet for about 5 minutes. This brief resting period allows them to firm up, making it easier to transfer them without breaking apart.
Transferring to Wire Racks for Complete Cooling
After the initial cooling period, carefully transfer the cookies to a wire rack for complete cooling. This allows air to circulate around the cookies, preventing them from becoming soggy on the bottom.
The Impact of Cooling on Cookie Texture and Flavor
Cooling impacts the texture and flavor in several ways. As the cookies cool, they firm up internally and develop a more concentrated flavor profile due to the stabilizing sugars and fats.
Presentation Tips
Creative Ideas for Serving Cookies Attractively
For an appealing presentation, consider arranging the cookies on a decorative platter. You could opt for a colorful serving plate or a rustic wooden board to enhance their visual appeal further.
Suggestions for Garnishing with Additional Chocolate Chips
A sprinkle of chocolate chips on top of the cookies right after they come out of the oven can create an inviting look. This simple addition enhances the visual appeal and showcases the chocolatey goodness within.
Pairing with Drinks for an Enhanced Tasting Experience
Pair your chocolate chip cookies with a glass of cold milk for a classic treat, or try serving alongside coffee or a scoop of vanilla ice cream for an indulgent dessert experience.
Storage Recommendations
Best Practices for Storing Cookies to Maintain Freshness
To retain the soft and chewy texture of your cookies, store them in an airtight container at room temperature. This prevents them from drying out and preserves their deliciousness.
Discussing Storage Containers and Methods
Use a glass or plastic container with a tight-fitting lid. You can also place a slice of bread in the container to help maintain moisture, as it will absorb any extra air.
Duration of Keeping Cookies Fresh
Properly stored cookies can stay fresh for up to a week. To extend their lifespan, consider freezing them, allowing you to enjoy them at a later date without sacrificing quality.
Variations and Customizations
Exploring Alternative Ingredients for Dietary Preferences
If you have dietary restrictions, the recipe can be adapted to accommodate various needs. For instance, you could substitute dairy butter with a plant-based alternative to create a dairy-free version.
Gluten-Free Options Using Almond or Coconut Flour
For gluten-free chocolate chip cookies, consider replacing all-purpose flour with almond or coconut flour. It’s essential to follow specific guidelines for adapting measurements and consistency if you choose this route, as gluten-free flours behave differently from wheat flour.
Suggestions for Dairy-Free Alternatives
For those avoiding dairy, replace the unsalted butter with dairy-free margarine or coconut oil. Ensure your chocolate chips are also dairy-free to keep the cookies entirely vegan.
Flavor Variations: Incorporating Different Types of Chips or Spices
You can customize the flavor profile by incorporating chocolate chips of different varieties, such as dark chocolate or white chocolate. Adding spices like cinnamon or nutmeg can also introduce a unique twist to the traditional cookie flavor.
Conclusion
The chocolate chip cookies created by this recipe embody a deliciously soft and chewy texture, making them the perfect comforting treat. With a preparation time of just 15 minutes and a total of 30 minutes to completion, they are ideal for any occasion. Enjoy the mixture of rich chocolate and optional nutty crunch in every bite, ensuring a delightful experience for all cookie lovers.

Deliciously Soft and Chewy Chocolate Chip Cookies
Ingredients
- 2 ¼ cups all-purpose flour
- ½ teaspoon baking soda
- 1 cup unsalted butter softened
- ¾ cup granulated sugar
- ¾ cup packed light brown sugar
- 1 teaspoon fine sea salt
- 2 teaspoons pure vanilla extract
- 2 large eggs
- 2 cups semi-sweet chocolate chips
- 1 cup chopped walnuts optional
Instructions
- Preheat your oven to 350°F (175°C) and line baking sheets with parchment paper.
- In a medium bowl, whisk together the flour and baking soda, then set aside.
- In a large bowl, beat the softened butter, granulated sugar, brown sugar, and salt until creamy.
- Add the vanilla extract and eggs one at a time, mixing well after each addition.
- Gradually mix in the flour mixture on low speed until just combined.
- Fold in the chocolate chips and walnuts with a spatula.
- Drop rounded balls of dough onto the baking sheets, spacing them 2 inches apart.
- Bake for 10-12 minutes until edges are lightly golden and centers are slightly underbaked.
- Cool on the baking sheet for 5 minutes, then transfer to a wire rack to cool completely.