
Introduction
The irresistible aroma wafting through the kitchen while baking Heavenly Homemade Cinnamon Rolls creates an unparalleled excitement. These rolls promise to envelop your home in a warm, comforting scent that draws everyone in like moths to a flame. Light, fluffy, and full of flavor, they are much more than just a favorite breakfast option; they also serve as a delectable dessert that can sweeten any gathering or weekend brunch.
Imagine pulling a fresh batch of cinnamon rolls out of the oven, the golden tops glistening and warm. These sumptuous treats awaken the senses, making them an ideal choice for holiday celebrations or casual family breakfasts. Although they taste like a bakery specialty, they can be made effortlessly in the comfort of your own kitchen, allowing you to enjoy their delightful hand-crafted appeal without the need for expert skills or complicated techniques.
Recipe Overview
– Prep Time: 20 minutes
– Cook Time: 30 minutes
– Total Time: 1 hour 50 minutes
– Course: Breakfast/Dessert
– Cuisine: American
– Servings: 12
– Calories: ~250 per roll
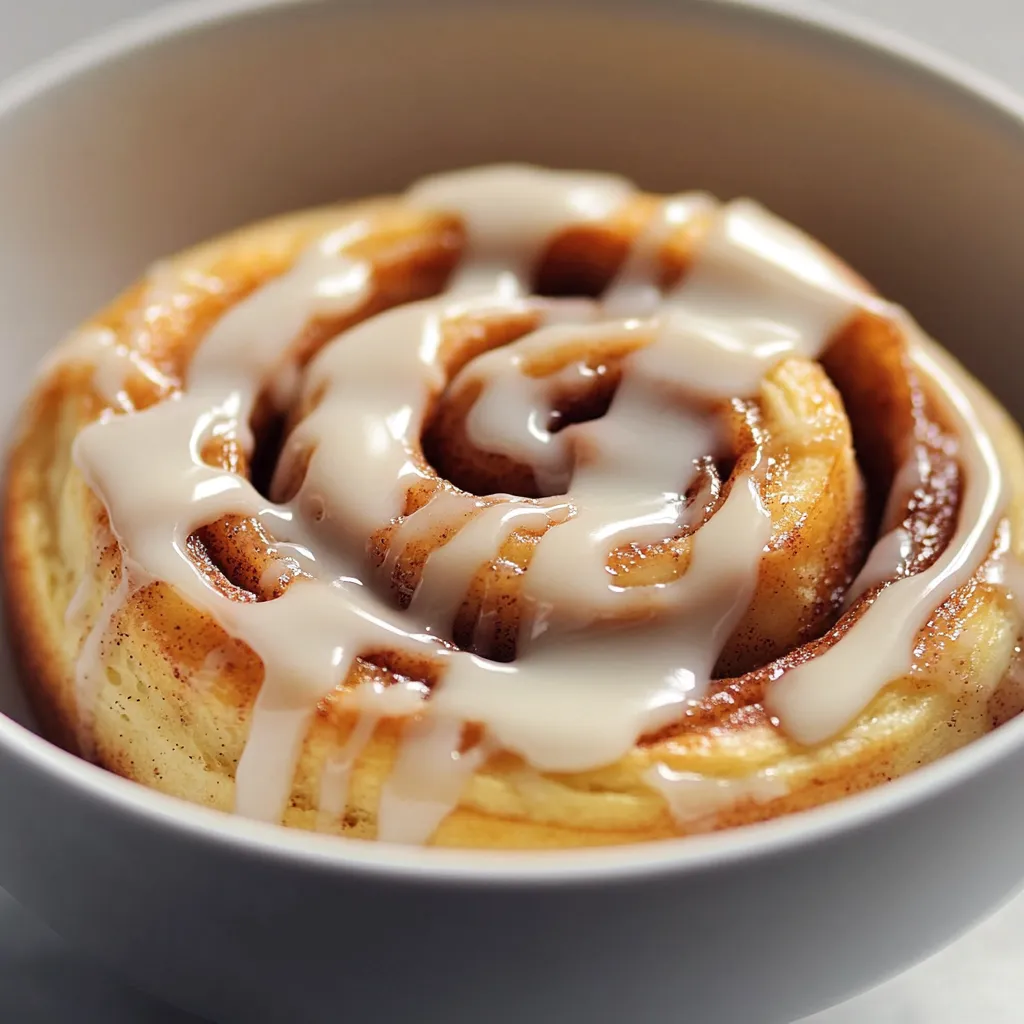
Heavenly Homemade Cinnamon Rolls embody the perfect balance of sweetness and spice, making them a delightful treat for any occasion. With each layer intricately rolled and softly tender, these cinnamon rolls are filled with a rich mixture of cinnamon and brown sugar, all crowned with a creamy icing that adds a touch of decadence. Whether enjoyed at breakfast with a steaming cup of coffee or as a sweet afternoon pick-me-up, these cinnamon rolls have bewitched palates across kitchens far and wide.
Ingredients
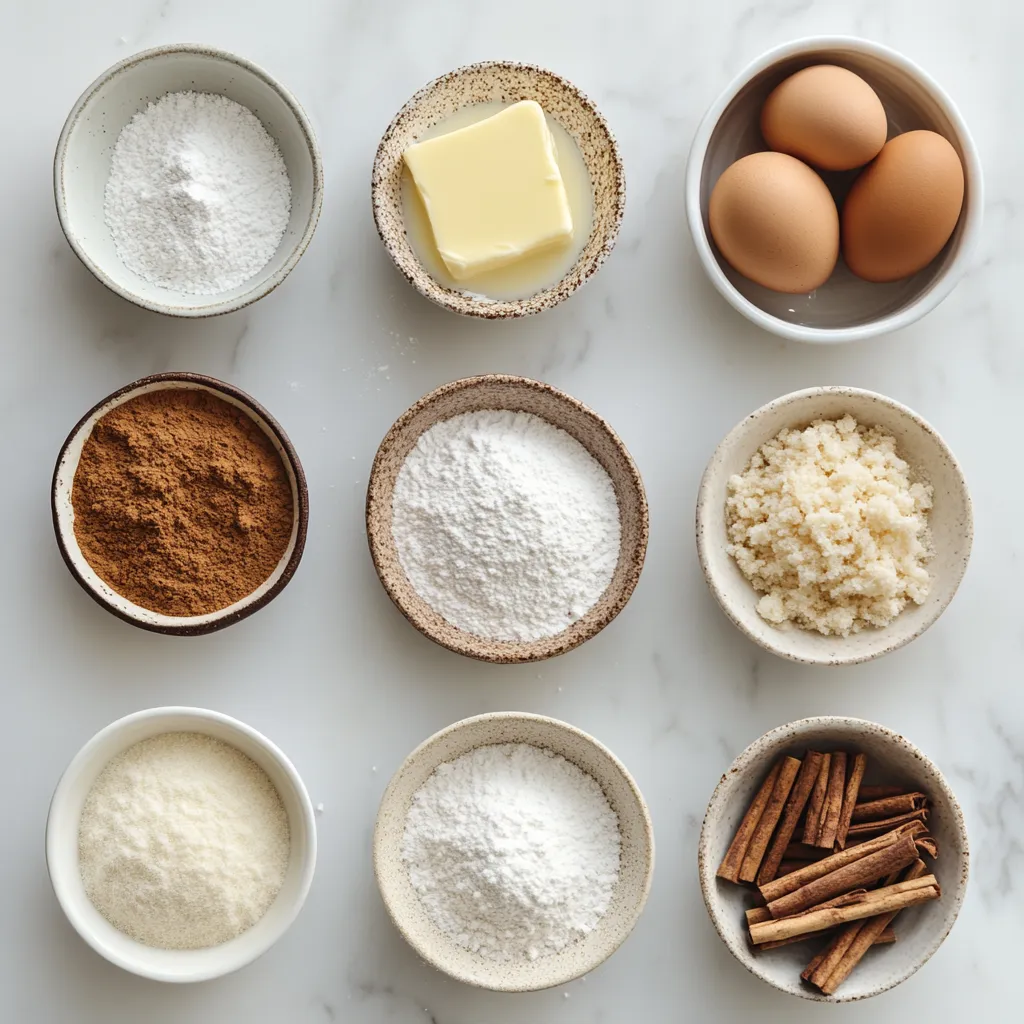
– 4 cups all-purpose flour
– 1 cup milk, warmed to about 110°F (43°C)
– 1/2 cup granulated sugar
– 1/4 cup unsalted butter, melted and cooled slightly
– 2 large eggs, at room temperature
– 2 1/4 teaspoons active dry yeast (1 packet)
– 1 teaspoon salt
– 1 tablespoon ground cinnamon
– 1/2 cup packed brown sugar
– 1/4 cup unsalted butter, softened (for filling)
– 1 cup powdered sugar (for icing)
– 2 tablespoons milk (for icing)
This well-rounded list of ingredients creates a deliciously tender dough, bursting with flavor that pairs perfectly with the rich filling and creamy icing. Starting with all-purpose flour provides the gluten structure for these rolls, while the yeast brings about that desired rise and airy texture. The combination of granulated and brown sugars introduces sweetness at two levels, ensuring each bite is a delightful confection.
Milk is not only a hydration source for the dough but also brings a bit of richness to the overall flavor profile. The unsalted butter complements both the dough and filling, enhancing the pastry with its creamy texture. Eggs act as a binding agent, contributing to the roll’s fluffy character. Finally, the mixture of ground cinnamon and butter forms a heavenly filling that truly makes these cinnamon rolls unforgettable. The icing, composed of powdered sugar and milk, offers the finishing touch, bringing everything together in delightful harmony.
Instructions
1. In a small bowl, mix the warm milk with the active dry yeast. Allow it to sit for about 5 minutes, or until it becomes frothy and bubbly, indicating the yeast is active.
2. In a large mixing bowl, combine the all-purpose flour, granulated sugar, and salt. Whisk together until well blended.
3. Pour the melted butter, room temperature eggs, and the frothy yeast mixture into the bowl with the dry ingredients. Stir together until a cohesive dough begins to form.
4. Transfer the dough onto a lightly floured surface and knead for approximately 5 to 7 minutes, or until it becomes smooth and elastic to the touch.
5. Place the kneaded dough into a greased bowl, cover it with a clean kitchen towel, and let it rise in a warm area for about 1 hour, or until it has doubled in size.
6. Once risen, roll the dough out into a rectangle about 1/4 inch thick. Evenly spread the softened butter for the filling across the surface of the dough.
7. Generously sprinkle the brown sugar and ground cinnamon over the buttered dough, ensuring an even distribution, then tightly roll it up from the long side to create a log.
8. Using a sharp knife or dental floss, slice the rolled dough into 12 equal pieces. Arrange these rolls in a greased baking dish with a bit of space between each one.
9. Cover the dish and let the rolls rise again for an additional 30 minutes, allowing them to puff up.
10. Preheat your oven to 350°F (175°C). Bake the rolls for 25 to 30 minutes, or until they are golden brown and cooked through.
11. To prepare the icing, whisk together the powdered sugar and milk in a small bowl until smooth. Drizzle this mixture over the warm cinnamon rolls just before serving.
Crafting these rolls is a journey in itself, beginning with the activation of the yeast, which sets the stage for the dough’s delightful rise. Following the precise steps outlined helps achieve that perfect texture and flavor, bringing joy to your breakfast table or dessert spread.
Preparing the Dough
Activating the yeast is crucial, as it blooms in warm milk, providing the necessary leavening. This warm environment, approximately 110°F, is essential for coaxing the yeast from its dormant state, ensuring it can work its magic in the dough. After the yeast is activated, combine the dry ingredients thoroughly. Whisking them together will allow for even mixing and prevent any clumps, ensuring a uniform flavor throughout.
Once the dry ingredients are evenly blended, pour in the melted butter, room temperature eggs, and the frothy yeast mixture. This combination creates the base of the dough, and incorporating them properly means your rolls will have a perfectly cohesive texture without the chance of any dry pockets.
Kneading the Dough
Kneading the dough cannot be overstated; it’s essential for developing gluten, which contributes to the dough’s structure. This process also ensures that the ingredients meld perfectly. To knead effectively, push the dough away from you with the heel of your palm, fold it over, and rotate it a quarter turn. Repeat this for about 5 to 7 minutes until the dough is smooth and elastic, indicating it has reached the right consistency.
First Rise
The first rise is a magical moment in bread-making. This is when the activated yeast goes to work, producing gases that cause the dough to expand and become airy. For optimal yeast activity, a warm environment is preferred; a cozy kitchen corner or even a turned-off oven can serve as the perfect spot. In about an hour, you will witness your dough double in size, a sure sign of success as you move closer to baking those delightful cinnamon rolls.
As you prepare this delightful treat, get ready to fill your kitchen with warmth and comfort. The process of baking these Heavenly Homemade Cinnamon Rolls is as joyous as the flavors themselves, crafting a homemade experience that everyone will cherish. Stay tuned for Part 2, where we will dive deeper into the remaining stages of this delicious journey!
Temperature and Time Considerations
When making cinnamon rolls, accurate temperature control and timing play a crucial role in achieving the perfect texture and flavor. The warm environment is essential when proofing yeast; it activates the yeast, allowing it to ferment and create gas bubbles that make the dough rise. The ideal temperature for rising the dough is around 75°F to 80°F (24°C to 27°C). If your kitchen is cool, consider placing the dough in an oven that has been heated to a low temperature, then turned off, or near a warm appliance. This simple adjustment can make a noticeable difference.
While baking, preheating your oven to 350°F (175°C) is essential. This temperature ensures that the rolls cook evenly, helping them to achieve a beautiful golden brown color on the outside while remaining soft and fluffy on the inside. Pay attention to the baking time as well; while the recipe suggests 25 to 30 minutes, start checking at around the 25-minute mark for doneness.
Rolling Out the Dough
Techniques for Rolling to the Correct Thickness
When rolling out the dough, aim for a thickness of about 1/4 inch. This is thick enough to maintain the structural integrity of the rolls but thin enough to allow for proper rising during baking. Use a rolling pin lightly dusted with flour to prevent sticking. If the dough resists rolling, let it rest for a few minutes to relax the gluten, making it easier to roll.
Achieving a Uniform Surface
A uniformly rolled-out dough is key to ensure that every bite of your cinnamon roll is equally delicious. After rolling, check that the edges match the desired dimensions; if necessary, trim any uneven edges with a sharp knife. This will help generate evenly shaped rolls and contribute to a pleasing appearance.
Importance of Spreading Softened Butter
Spreading softened butter evenly across the surface of the rolled-out dough not only imparts flavor but also contributes to the texture of the rolls. Ensure that the butter is spread from edge to edge, creating a solid foundation for the filling. This step creates those delightful layers known for making cinnamon rolls irresistible.
Creating Layers for Texture
The layers created by the butter and the filling are vital for the overall experience of the cinnamon roll. When rolled correctly, these layers will separate during baking, resulting in an airy and fluffy interior. Take your time in this process to ensure every layer is accounted for.
Filling the Dough
Mixing Brown Sugar and Cinnamon
Creating the filling is the heart of what makes a cinnamon roll so exciting. In a small bowl, combine the packed brown sugar with the ground cinnamon before spreading it over the butter-coated dough. Mixing these two ingredients evenly beforehand ensures that every bite carries that signature flavor combination.
Ensuring an Even Distribution of Flavor
Even distribution of the cinnamon-sugar mixture is essential. Use your hands or a spoon to sprinkle the mixture over the butter, ensuring that it covers the entire surface. This attention to detail enhances the flavor profile of your finished rolls.
Correct Methods for Rolling the Dough
Begin rolling the dough tightly from one long side to the other, maintaining an even pressure throughout to prevent squashing the filling out. Start from one end and carefully work your way to the other, creating a compact log. This rolling method sets you up for success as it will directly influence the texture and fluffiness of the rolls.
Achieving a Tight Log for the Rolls
When you’ve rolled the dough into a log, make sure it is tight without stretching the dough too much. A well-formed log will help your rolls maintain shape during the second rise and baking stages, ensuring they puff up beautifully.
Slicing the Rolls
Tools for Cutting the Dough
Use a sharp knife or, for a less messy method, dental floss to slice your rolls. Each method has its benefits; a knife allows for a straight cut while dental floss hugs the roll, preventing squishing. Choose based on your personal preference or available kitchen tools.
Using Dental Floss vs. a Knife
If using dental floss, slide it under the log and cross the ends over the top to cut through, which prevents flattening the rolls. If using a knife, ensure it is sharp and coated lightly in flour to reduce sticking. Whichever method you choose, make sure to use a gentle sawing motion to maintain the integrity of the rolls.
Techniques for Even Slices
Aim to cut the rolls into equal pieces, ideally about 1-1.5 inches each. This uniformity ensures even baking and consistency in size and texture, which enhances the overall appeal of your cinnamon rolls.
Ensuring Uniform Roll Sizes for Even Baking
Arranging the rolls with a little space between them in the baking dish allows them to rise properly and bake evenly. Proper spacing gives the rolls enough room to expand and achieve that fluffy, ideal texture we all strive for.
Second Rise
Purpose and Benefits of the Second Rise
The second rise is a critical step that can’t be skipped. This additional proofing allows the flavors to deepen and the rolls to become even more airy. It’s during this time that the yeast continues to ferment, leading to a more complex taste.
Enhancing Texture and Fluffiness
During the second rise, the gluten structure has time to relax, and the yeast has an opportunity to produce gas bubbles that contribute to lift. This results in the signature light and fluffy texture of a perfect cinnamon roll.
How to Create the Right Environment for Rising
To ensure a successful second rise, cover the rolls with a clean kitchen towel or plastic wrap to retain moisture, preventing the dough from drying out. Placing them in a warm, draft-free location can help speed up the rising process, ensuring they achieve maximum height.
Baking the Rolls
Preheating the Oven Correctly
Prior to placing your cinnamon rolls in the oven, make sure to preheat it to 350°F (175°C). This ensures that when the rolls are introduced, they encounter the necessary heat for baking immediately, contributing to rise and color.
Why Temperature Precision Is Important
Baking at the correct temperature facilitates the Maillard reaction, causing the sugars and proteins in the rolls to caramelize and develop that beautiful golden hue. Temperatures that are too low will produce undercooked rolls, while extremely high temperatures may burn the outer layer without cooking the inside.
Signs of Doneness
Watch for rolls turning golden brown, as this is a good indicator of doneness. You can also gently press the top of the rolls; if they spring back, they are likely finished baking.
Visual and Tactile Cues for Perfect Baking
Once baked, the rolls should feel soft to the touch but not overly dense. Additionally, you can insert a toothpick into the center of one of the rolls to ensure it comes out clean, indicating that they are fully cooked.
Preparing the Icing
Ingredients for a Smooth Glaze
To prepare the icing, combine the powdered sugar and milk in a small bowl for that perfect drizzling consistency. The simplicity of these two ingredients is all you need for a delightful topping.
Ratios of Powdered Sugar to Milk
A good starting ratio is typically 1 cup of powdered sugar for every 2 tablespoons of milk, but this can be adjusted based on how thick or thin you want your icing to be. If it’s too thick, add a little more milk; if it’s too thin, add more powdered sugar until the desired consistency is achieved.
Techniques for Perfect Consistency
To avoid any lumps in the icing, sift the powdered sugar before mixing it with the milk, ensuring a smooth texture. Whisk thoroughly until fully combined, aiming for a pourable consistency that will easily drizzle over the warm rolls.
Avoiding Lumps and Achieving Drizzle
If you encounter lumps in the icing, continue whisking, or consider using an immersion blender for a completely smooth glaze. The aim is to create a drizzle that beautifully coats each roll without being overly heavy.
Serving Suggestions
Creative Presentation Tips
To serve your cinnamon rolls beautifully, consider using a large, decorative platter that highlights their golden-brown hue. Arrange the rolls neatly for maximum effect.
Garnishes That Enhance Visual Appeal
For an extra touch, add a sprinkle of ground cinnamon or some finely chopped nuts over the icing. Fresh mint leaves can also brighten the presentation, making your cinnamon rolls look even more appealing.
Pairing Options
These heavenly homemade cinnamon rolls pair well with a variety of accompaniments. For a classic breakfast vibe, consider serving them alongside fresh fruit or a side of crispy bacon. If serving as dessert, a scoop of vanilla ice cream offers a delicious contrast to the warm rolls.
Complementary Beverages and Side Dishes
A freshly brewed cup of coffee or a warm chai latte enhances the comforting nature of the rolls, making them an ideal treat for any time of day.
Conclusion
The Heavenly Homemade Cinnamon Rolls are a satisfying blend of soft and fluffy textures, complemented by a rich icing. With a total time of 1 hour and 50 minutes and perfect for breakfast or dessert, these rolls cater to any time of day. Indulge in the heavenly combination of flavors that make these rolls a cherished recipe in any home.

Heavenly Homemade Cinnamon Rolls Recipe for Breakfast or Dessert
Ingredients
- 4 cups all-purpose flour
- 1 cup milk warmed
- ½ cup granulated sugar
- ¼ cup unsalted butter melted
- 2 large eggs
- 2 ¼ teaspoons active dry yeast
- 1 teaspoon salt
- 1 tablespoon ground cinnamon
- ½ cup packed brown sugar
- ¼ cup unsalted butter softened
- 1 cup powdered sugar
- 2 tablespoons milk
Instructions
- Mix warm milk with active dry yeast and let sit for 5 minutes until frothy.
- Combine flour, granulated sugar, and salt in a large bowl.
- Add melted butter, eggs, and yeast mixture to dry ingredients and stir until a dough forms.
- Knead the dough on a floured surface for 5 to 7 minutes until smooth.
- Place dough in a greased bowl, cover, and let rise for 1 hour until doubled.
- Roll out dough into a rectangle and spread softened butter for filling.
- Sprinkle brown sugar and cinnamon over the buttered dough and roll tightly.
- Slice the rolled dough into 12 pieces and arrange in a greased baking dish.
- Cover and let rolls rise for 30 minutes.
- Preheat oven to 350°F and bake for 25 to 30 minutes until golden brown.
- Whisk powdered sugar and milk for icing and drizzle over warm rolls.