
Introduction
Oreo Delight Balls have taken the dessert world by storm, emerging as a popular no-bake treat that is as delightful to make as it is to eat. These bite-sized morsels combine the iconic flavor of Oreo cookies with a rich, creamy filling that is simply irresistible. Their simplicity and versatility make them the perfect addition to any occasion—be it parties, holidays, or even casual gatherings with friends and family. With just a handful of ingredients and minimal effort, you can whip up a batch of these delicious treats that will have everyone coming back for seconds.
What’s more, the appeal of Oreo Delight Balls goes beyond their taste. They offer a unique opportunity for creativity, allowing you to experiment with different flavor combinations and presentations. If you’re looking to impress your guests or just satisfy your own sweet tooth, this recipe is a must-try. In the following sections, we’ll dive into the detailed recipe, the origins of these delightful treats, and insights that will ensure your Oreo Delight Balls turn out perfect every time.
Understanding Oreo Delight Balls
No-bake desserts have gained immense popularity over the years, especially among home bakers who appreciate the convenience and ease they offer. Oreo Delight Balls fall into this category, characterized by their creamy filling and chocolate coating. The combination of crushed Oreo cookies and cream cheese creates a flavor profile that is rich, decadent, and utterly satisfying. This delectable treat has become a staple in dessert tables, with variations popping up across the internet and in cookbooks alike.
The origins of no-bake desserts can be traced back to the need for quick and easy recipes that require minimal equipment and time. In the case of Oreo Delight Balls, the classic Oreo cookie serves as the foundation, providing a familiar taste that resonates with many. The rise of these creamy, chocolate-coated treats can be attributed to their ability to satisfy cravings without the need for an oven, making them ideal for hot summer days or last-minute gatherings.
As you prepare to make your own Oreo Delight Balls, it’s essential to understand the key ingredients that contribute to their irresistible charm.
Ingredients Breakdown
Oreo Cookies
At the heart of every Oreo Delight Ball are the beloved Oreo cookies. Their rich, chocolatey flavor and crisp texture set the stage for the delectable filling. When crushed, Oreos provide both flavor and structure to the dessert, allowing for a perfect balance of creaminess and crunch. While classic Oreos are the most popular choice, there are numerous alternatives available, including Golden Oreos, mint-flavored Oreos, and even seasonal varieties like pumpkin spice. Each option brings a unique twist to the recipe, allowing you to customize your Oreo Delight Balls to suit your taste preferences.
Cream Cheese
Cream cheese plays a pivotal role in this recipe, serving as the binding agent that brings the crushed Oreos together. Its creamy texture creates a luscious filling that complements the crunch of the cookies, resulting in a harmonious blend of flavors. For those with dietary restrictions, alternatives such as vegan cream cheese or dairy-free options are readily available. These substitutes will retain the creamy consistency needed for the filling while accommodating various dietary needs.
Chocolate Chips
When it comes to coating the Oreo Delight Balls, semi-sweet chocolate chips are the go-to choice. Their balanced sweetness pairs perfectly with the rich filling, ensuring that the overall flavor is not overly sweet. The melting chocolate serves as a delectable outer layer, providing a satisfying snap when bitten into. If you prefer milk chocolate or dark chocolate, feel free to experiment with those varieties as well. Each option will yield a slightly different taste experience, allowing you to tailor the treat to your liking.
Vegetable Oil
While optional, a small amount of vegetable oil can be added to the melted chocolate to enhance its consistency. This addition makes the chocolate smoother and easier to work with, resulting in a more even coating on the Oreo Delight Balls. If you prefer a thicker chocolate coating, you may choose to omit the oil. However, for those seeking a glossy finish and a more manageable melting chocolate, including vegetable oil is a great option.
Garnishes
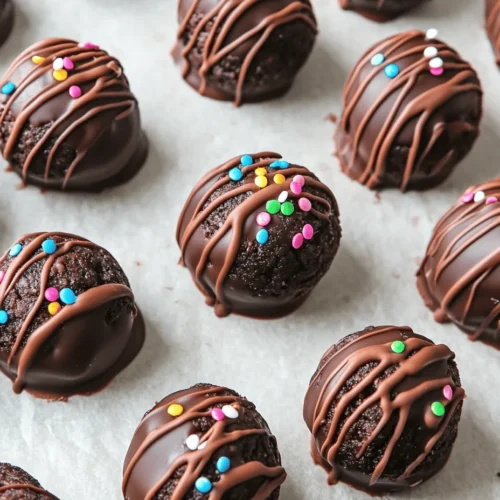
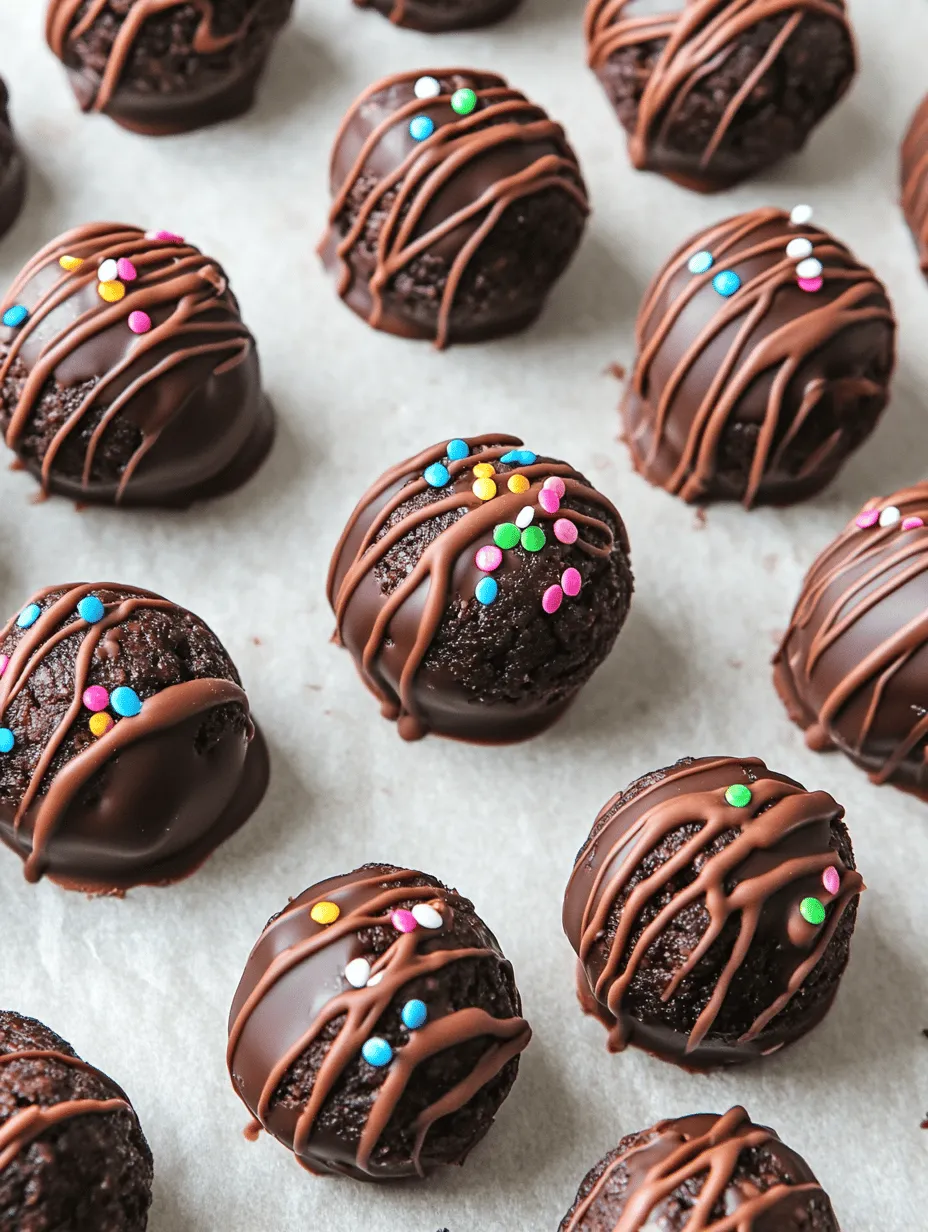
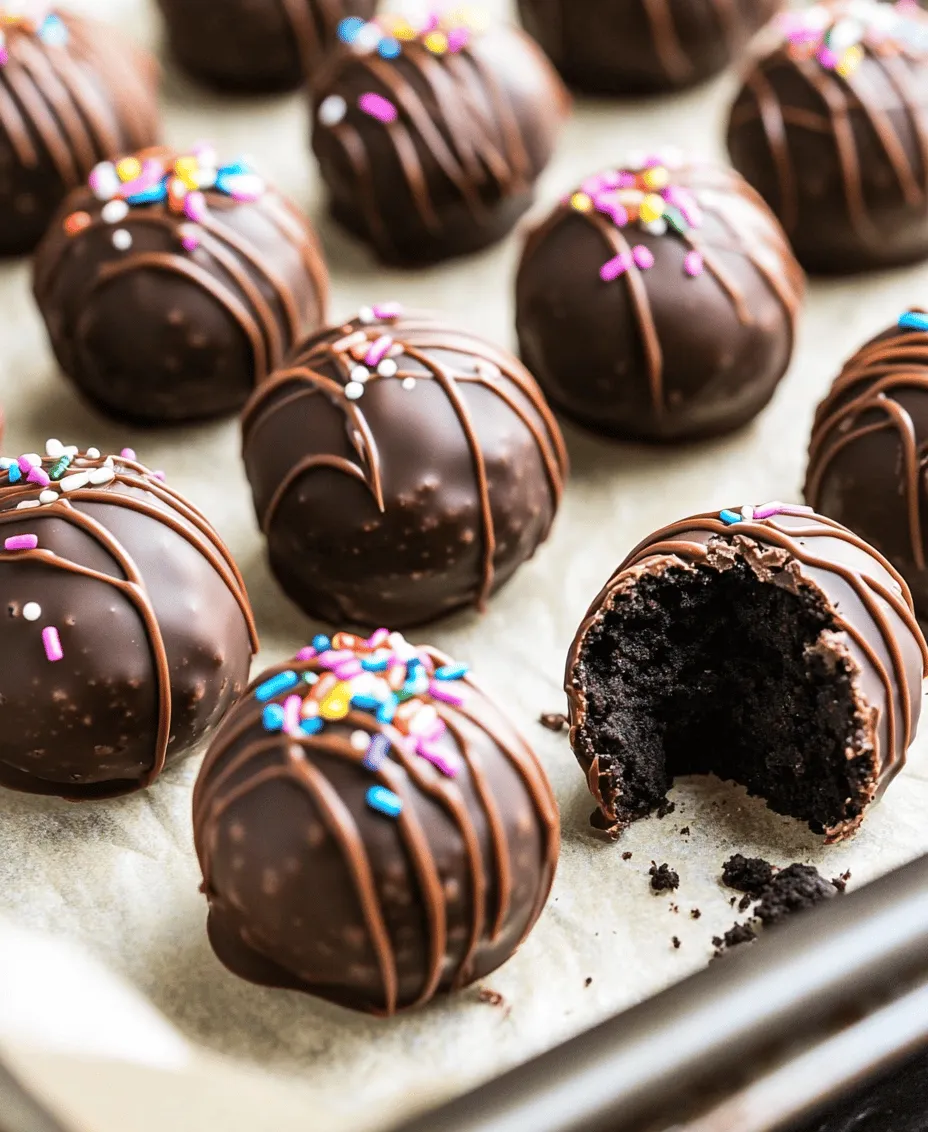
Garnishing your Oreo Delight Balls can elevate their presentation and add an extra layer of flavor. Consider options such as crushed Oreos, sprinkles, or even a drizzle of white chocolate for added visual appeal. These garnishes not only enhance the look of the treats but can also introduce new textures and flavors, making each bite a delightful surprise. The possibilities are endless, and it’s an excellent opportunity to let your creativity shine.
Detailed Step-by-Step Instructions
Making Oreo Delight Balls is a straightforward process that allows for creativity at each step. Here’s a comprehensive guide to ensure your treats turn out perfectly every time.
Crushing the Oreos
The first step in creating these delightful treats is to crush the Oreo cookies. Achieving the right consistency is crucial, as it will determine the texture of your filling. There are several methods to crush Oreos effectively:
1. Food Processor: The easiest and most efficient way to crush Oreos is by using a food processor. Simply add the cookies to the bowl and pulse until they reach a fine crumb consistency. This method ensures uniformity and saves time.
2. Rolling Pin Method: If you don’t have a food processor, you can use a rolling pin. Place the Oreos in a sealed plastic bag, ensuring the bag is airtight, and roll over them with the pin until they are crushed to your desired consistency. This method might require a bit more effort, but it works well if you prefer to avoid using electrical appliances.
3. Mortar and Pestle: For a more traditional approach, you can use a mortar and pestle. This method is less common for larger batches but can be effective for small quantities.
Regardless of the method you choose, aim for a crumb texture that resembles sand. You want the crumbs to be fine enough to mix easily with the cream cheese but still maintain some integrity for a pleasant crunch in the final product.
Once you have your crushed Oreos, you’ll be well on your way to creating these delicious Oreo Delight Balls. In the upcoming sections, we will dive deeper into the mixing process, coating techniques, and additional tips to ensure your treats are a hit at any gathering. Stay tuned for the continuation of this delightful recipe!
Combining Ingredients
To create the perfect Oreo Delight Balls, start by effectively mixing the crushed Oreos with cream cheese. The key to achieving a smooth and cohesive mixture lies in the method of combining these two ingredients. Begin by placing the crushed Oreos in a large mixing bowl. Using a food processor can help you achieve fine crumbs, which will blend more seamlessly with the cream cheese. If you prefer a more hands-on approach, you can use a rolling pin or even your hands to crush the cookies into crumbs.
Once the Oreos are crushed, add softened cream cheese to the bowl. It’s crucial to ensure that the cream cheese is at room temperature; this allows for easier mixing and results in a smoother texture. Using an electric mixer on medium speed, combine the ingredients until they form a thick, cookie dough-like consistency. Scrape down the sides of the bowl periodically to ensure that all the Oreo crumbs are evenly incorporated. The mixture should be moist enough to hold together when shaped into balls but not overly sticky.
Shaping the Balls
After achieving the desired consistency, it’s time to shape the mixture into uniform balls. For consistency, consider using a small cookie scoop or tablespoon to portion the mixture. This ensures that all your Oreo Delight Balls are roughly the same size, making for a more appealing presentation and uniform bite.
Take a portion of the mixture and roll it between your palms to form a smooth ball, about 1 inch in diameter. Be sure to apply gentle pressure, as this will help the balls maintain their shape while chilling. Place the shaped balls on a parchment-lined baking sheet, leaving some space between each one to prevent sticking. Once all the mixture has been shaped, you can proceed to the next step.
Chilling the Balls
Chilling is a crucial step in the process of making Oreo Delight Balls. It helps the balls firm up and retain their shape during the coating phase. Once you have shaped all the balls, place the baking sheet in the refrigerator for at least 30 minutes. This allows the cream cheese mixture to solidify, making it easier to handle when you’re ready to dip them in chocolate.
Alternatively, if you are short on time, you can place the baking sheet in the freezer for about 10-15 minutes. Just be cautious not to leave them for too long, as you want them to be firm but not frozen solid.
Melting the Chocolate
The next step involves melting the chocolate, which will serve as the delicious outer coating for your Oreo Delight Balls. You can use either chocolate chips or chocolate bars for this purpose. For the best results, opt for high-quality chocolate as it will enhance the flavor of your dessert.
To melt the chocolate, you have two primary options: the microwave or a double boiler. If using the microwave, place the chocolate in a microwave-safe bowl and heat it in 30-second intervals, stirring in between until it’s smooth and fully melted. Be cautious to avoid overheating the chocolate, as it can seize and become unusable.
If you prefer the double boiler method, fill a saucepan with water and bring it to a simmer. Place a heatproof bowl on top of the saucepan, ensuring it doesn’t touch the water. Add the chocolate to the bowl and stir occasionally until it melts completely. This method gives you more control over the temperature and is less likely to cause the chocolate to seize.
Coating the Balls
Once the chocolate is melted and smooth, it’s time to coat your chilled Oreo Delight Balls. Using a fork or a toothpick, dip each ball into the melted chocolate, ensuring it is fully covered. Allow any excess chocolate to drip off before placing the coated ball back onto the parchment-lined baking sheet. For a smoother finish, gently tap the fork against the edge of the bowl to remove excess chocolate.
If you want to add a little flair, you can drizzle some contrasting chocolate over the top of the coated balls for a decorative touch. This not only enhances the visual appeal but also adds an extra layer of chocolate flavor.
Garnishing
Garnishing is an important step that should be done while the chocolate is still wet. This ensures that your garnishes will adhere properly to the coated Oreo Delight Balls. Consider using crushed Oreos, sprinkles, or even a light dusting of cocoa powder for a sophisticated touch. If you prefer a more festive look, you can use colored sprinkles that match the occasion.
Timing is key here; add your garnishes immediately after coating the balls. Once the chocolate hardens, the garnishes won’t stick as effectively. After garnishing, allow the chocolate to set completely at room temperature or in the refrigerator for a faster setting process.
Setting and Storing
To set the chocolate coating, let the Oreo Delight Balls sit at room temperature for about 30 minutes, or until the chocolate has fully hardened. If you’ve opted for the refrigerator, keep them there for about 15-20 minutes.
Once set, store your Oreo Delight Balls in an airtight container. If you’re stacking them, place parchment paper between layers to prevent sticking. They can be kept in the refrigerator for up to two weeks, making them perfect for preparing ahead of time for parties or gatherings. For longer storage, consider freezing them; they can last for up to three months in the freezer. Just be sure to thaw them in the refrigerator before serving for the best texture.
Visual Appeal and Presentation
The visual appeal of Oreo Delight Balls can significantly enhance the overall enjoyment of the dessert. To create an eye-catching presentation, consider serving them in a decorative bowl or on a stylish platter. You can place them in cupcake liners for an elegant touch, or arrange them on a tiered dessert stand for a stunning display that’s perfect for parties or celebrations.
For themed occasions, customize the decorations to match the event. For example, use red and green sprinkles for Christmas, or pastel-colored toppings for Easter. You can even create a dessert table featuring these balls alongside other treats to create a cohesive look. Remember, the more visually appealing your dessert, the more enticing it will be for guests.
Nutritional Insights
When it comes to enjoying treats like Oreo Delight Balls, it’s important to consider their nutritional content. Each ball primarily consists of crushed Oreos and cream cheese, which contribute to their rich flavor and creamy texture. A typical serving of Oreo Delight Balls contains a fair amount of sugar due to the Oreos and melted chocolate.
For those mindful of their sugar intake, consider making a few adjustments. You can use reduced-fat cream cheese to lower the calorie count and sugar-free Oreo cookies if you want to cut down on sugar. Dark chocolate can also be a healthier alternative to milk chocolate, providing a richer flavor and potential health benefits. Additionally, keep portion sizes in check to enjoy these delights guilt-free.
Culinary Tips and Tricks
Making Oreo Delight Balls is relatively straightforward, but here are some expert tips to ensure success:
1. Achieving the Right Consistency: If your mixture feels too dry, add a bit more cream cheese. Conversely, if it’s too wet, you can mix in additional crushed Oreos until you reach the right texture.
2. Avoiding Chocolate Seizing: When melting chocolate, make sure no water gets into the bowl, as this can cause the chocolate to seize. If it does seize, you can try stirring in a small amount of vegetable oil to bring it back to a smooth consistency.
3. Uniform Sizing: If you want your Oreo Delight Balls to look professional, weigh each portion before rolling it out. This helps achieve uniformity and ensures even cooking.
4. Experimenting with Flavors: Don’t hesitate to experiment with different flavors. Consider adding a splash of vanilla extract or almond extract to the cream cheese mixture for an extra layer of flavor.
5. Serving at the Right Temperature: These treats are best served chilled. If they sit out too long, they can become too soft, so keep them refrigerated until ready to serve.
Conclusion
Oreo Delight Balls are a joy to make and an absolute delight to eat. Their simplicity and versatility make them perfect for any occasion, whether it’s a festive gathering, a birthday party, or simply a sweet treat to share with loved ones. With a few easy steps, you can embrace your creativity in the kitchen and craft these delicious bites that everyone will love.
Encourage your friends and family to join in the fun of making these treats, and don’t hesitate to try your own variations. From different coatings to unique garnishes, the possibilities are endless. By following this recipe, you’ll not only create a memorable dessert but also bring smiles and joy to those you share it with. So gather your ingredients, roll up your sleeves, and get ready to indulge in the delightful world of Oreo Delight Balls!