

Introduction
Delve into the world of delightful baking with these Peanut Butter Blossom Bliss cookies. Combining the rich flavor of creamy peanut butter with the irresistible sweetness of chocolate kisses, this recipe captures the essence of a comforting and nostalgic treat. Each bite offers a perfect balance of flavors, leaving your taste buds satisfied and your heart warmed. Ideal for gatherings, celebrations, or even quiet afternoons at home, these cookies promise to enchant every palate. Discover the joy of baking with this detailed guide to crafting perfect peanut butter blossoms.
These cookies shine not only for their taste but also for their incredible texture. The outer layer boasts a crispy sugar coating, while the centers remain soft and chewy, enhanced by the gooey chocolate kiss nestled in the middle. Their effortless charm makes them a favorite for cookie enthusiasts and newcomers alike. Whether you’re enjoying them with a glass of milk, serving them at a party, or giving them as gifts, Peanut Butter Blossom Bliss cookies are sure to bring smiles all around.
Recipe Overview
Explore the simple yet satisfying process of creating Peanut Butter Blossom Bliss cookies. This section offers a quick snapshot of what you will achieve, highlighting the flavors and textures that make this treat appealing.
Key Features
– Unique combination of peanut butter and chocolate provides a rich flavor.
– Soft centers contrast beautifully with a crunchy sugar coating for varied texture.
– Quick preparation and baking ensure that homemade cookies are never far away.
Yield and Timing
– Total Yield: 36 cookies
– Prep Time: 15 minutes
– Baking Time: 10-12 minutes
– Total Time: 30 minutes
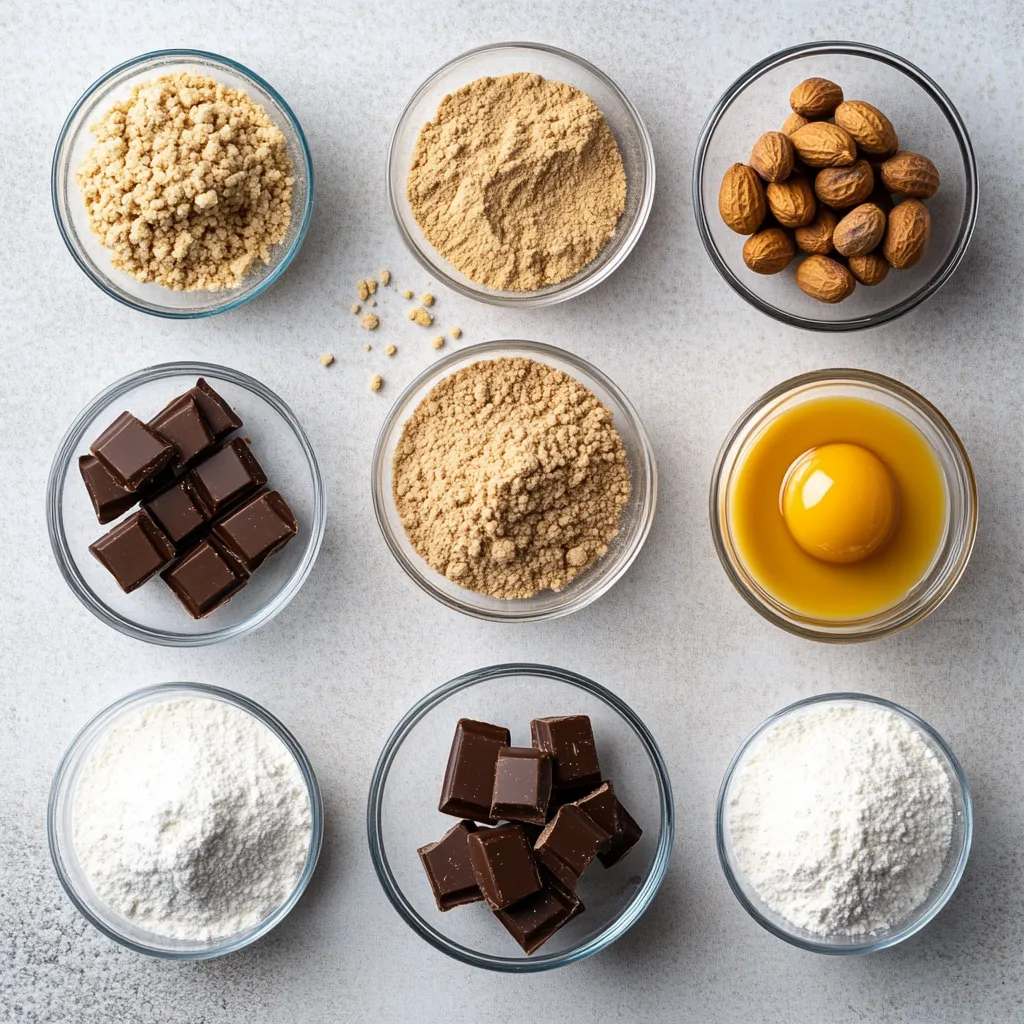
Ingredients
All the essential components you’ll need to make these delectable cookies. Each ingredient contributes to the irresistible flavor and texture that characterize Peanut Butter Blossom Bliss.
Primary Ingredients
– 1 cup creamy peanut butter
– 1 cup granulated sugar
– 1 cup packed light brown sugar
– 1 teaspoon pure vanilla extract
– 1 large egg
Dry Ingredients
– 2 cups all-purpose flour
– 1 teaspoon baking soda
– 1/2 teaspoon fine sea salt
Toppings
– 36 unwrapped chocolate kisses
– Extra granulated sugar for rolling
Instructions
1. Begin by preheating your oven to 350°F (175°C). Prepare a baking sheet by lining it with parchment paper to prevent sticking.
2. In a large mixing bowl, combine the creamy peanut butter, granulated sugar, brown sugar, and vanilla extract. Use a mixer or a sturdy spoon to blend these ingredients until the mixture is smooth and well incorporated.
3. Crack the egg into the bowl and beat it into the mixture until fully combined and silky.
4. In a separate bowl, whisk together the all-purpose flour, baking soda, and fine sea salt. This will ensure that the leavening agent is evenly distributed.
5. Gradually add the dry mixture to the wet ingredients, stirring gently until just combined. Be careful not to overmix; a few flour streaks are perfectly fine.
6. Using your hands, roll the dough into 1-inch balls. Then, roll each ball in granulated sugar until fully coated for a sweet, crunchy exterior.
7. Arrange the sugar-coated dough balls on your prepared baking sheet, leaving about 2 inches of space between each to allow for spreading during baking.
8. Bake in the preheated oven for 10-12 minutes, or until the edges of the cookies are lightly golden while the centers remain soft.
9. As soon as you take the baking sheet out of the oven, gently press a chocolate kiss into the center of each warm cookie, allowing it to melt slightly.
10. Let the cookies cool on the baking sheet for about 5 minutes. After that, transfer them to a wire rack to cool completely, enhancing their texture.
Preparing the Baking Sheet
Attention to detail begins with the baking setup. Learn how to prepare your baking surface for the best results.
Preheating the Oven
Preheating your oven to 350°F (175°C) is vital for achieving the right texture and bake for your cookies. The even heat helps to create a lovely spread and a consistent bake throughout the cookies. Temperature regulation is key in baking, as too hot of an oven may cause the cookies to spread too quickly, while a cooler oven can result in undercooked centers.
Lining the Baking Sheet
For optimal results, lining your baking sheet with parchment paper is highly recommended. This not only prevents sticking but also allows for easy removal of your cookies once baked. The parchment paper catches excess grease and moisture, contributing to a perfect bake. As a non-stick preparation, it ensures that each cookie maintains its integrity as you transfer them from the tray to a cooling rack.
Mixing the Wet Ingredients
Understanding the proper technique for creating a homogenous mixture of wet ingredients sets the foundation for delicious cookies.
Combining Peanut Butter and Sugars
Start by adding the creamy peanut butter, granulated sugar, and light brown sugar into a large mixing bowl. Using either a mixer or a sturdy spoon, combine these ingredients until smooth and well-blended. This step is crucial, as it enables the sugars to dissolve into the peanut butter, creating a unified mixture that enhances the overall sweetness and flavor of the cookies.
Adding Vanilla Extract
Incorporating pure vanilla extract enhances the flavor profile of your cookie dough. When you add vanilla to your mixture, it amplifies the sweetness and complexity of the peanut butter and sugars. Aim to mix this in thoroughly to ensure the aromatic undertones of vanilla are evenly distributed throughout your dough.
Incorporating the Egg
Discover the importance of the egg in the recipe and how to incorporate it correctly for the best texture.
Beating the Egg
Crack one large egg into the mixing bowl containing your wet ingredients. Beat the egg until it is well-blended into the mixture. This step is essential, as it not only adds moisture to your cookies but also contributes to their structure. The egg acts as a binder, ensuring that the ingredients hold together nicely throughout the baking process.
Impact on Texture
The egg plays a significant role in the overall texture of the cookies. It contributes moisture and richness, leading to a tender and chewy center. Additionally, the egg helps provide stability to the cookie, allowing it to maintain its shape as it bakes. Proper incorporation of the egg aids in achieving a silky consistency in your wet ingredients, ensuring a well-rounded dough ready for baking.
Preparing the Dry Ingredients
The proper preparation of dry ingredients is critical for the success of your cookie recipe. When creating cookie dough, it’s important to ensure that the leavening agents are evenly mixed into the flour.
In a separate bowl, whisk together the all-purpose flour, baking soda, and fine sea salt. Mixing these ingredients thoroughly beforehand guarantees that they are well-distributed before merging them with the wet mixture. When you incorporate these dry ingredients into the wet ingredients in later steps, it ensures a consistent rise and prevents any clumps of baking soda or salt from affecting the taste of your finished cookies. This methodical approach lays the groundwork for achieving perfectly baked Peanut Butter Blossom Bliss cookies.

Whisking the Flour Mixture
When preparing the dry components for your Peanut Butter Blossom Bliss cookies, whisking the flour mixture is a crucial step. This involves combining flour, baking soda, and salt into a cohesive mix.
Recommended techniques for effective whisking include using a balloon whisk or a fork and ensuring you incorporate air into the mixture. Whisk vigorously for about 30 seconds until you see no streaks of flour. This step not only helps in distributing the baking soda evenly, which is vital for leavening, but it also aids in breaking up any clumps in the flour.
The benefit of thorough mixing is multi-fold; it ensures that every bite of your cookie has a uniform texture and prevents uneven spreading during baking. An adequately whisked flour mixture contributes to the cookie’s overall structure, maintaining a delightful chewiness in the final product.
Importance of Baking Soda and Salt
Baking soda plays an essential role in the leavening of cookies. When baking soda activates with the wet ingredients and heat from the oven, it produces carbon dioxide gas, causing the dough to rise and gain a light texture. This reaction is what gives your Peanut Butter Blossom cookies that perfect, inviting puffiness.
Adding sea salt doesn’t only enhance the flavor but also balances the sweetness of the added sugars. Fine sea salt dissolves quickly, distributing its salty essence throughout the dough, which enhances the caramel notes of the brown sugar, making each cookie bite wonderfully complex and satisfying.
Combining Wet and Dry Ingredients
Combining the wet and dry components of your cookie batter is pivotal in creating a smooth and cohesive dough without compromising texture.
Gradual Mixing Technique
The key to melding these components is through a gradual mixing technique. Start by adding your dry flour mixture into your wet ingredients a little at a time, being careful to incorporate it without rushing. This prevents sudden clumps from forming and ensures that the leavening agents work effectively throughout the dough.
Look for signs of well-combined dough; it should be somewhat sticky and hold together without being overly wet. This will help retain the delicate flavors and textures your cookies are known for.
Avoiding Overmixing
Overmixing can lead to tough cookies due to the development of gluten, which is best avoided in cookie recipes that require a tender crumb. When your dough looks cohesive with just a few flour streaks remaining, it’s time to stop mixing. Perfect dough consistency will allow the cookies to spread slightly while maintaining a soft, chewy center that contrasts with the outer texture.
Forming the Cookie Balls
Shaping the dough into uniform balls is essential for achieving even cooking and a consistent texture.
Rolling the Dough
As you roll the dough, aim for a recommended size of about 1 inch in diameter for each ball. This allows for the cookies to bake through adequately without becoming overdone on the edges. To promote uniformity, use the palms of your hands, ensuring that each ball is smooth and free of cracks, which can create uneven baking.
Coating in Granulated Sugar
Coating each cookie ball in granulated sugar before baking serves not only to enhance flavor but also to create that classic signature crunchy exterior. To achieve ideal coverage, roll each dough ball thoroughly in the sugar, pressing gently to ensure a consistent layer sticks. This adds a delightful contrast in texture to the soft, chewy cookie underneath.
Arranging on the Baking Sheet
Proper placement of cookie balls before baking can affect how they cook and their final shape.
Spacing Guidelines
It is essential to leave enough space between the cookie balls on the baking sheet; a recommended distance of about 2 inches apart ensures that the cookies have adequate room to spread during baking. Visual cues for spacing can include the width of an average finger, which can serve as an approximate measure to keep everything well spaced.
Importance of Arrangement
How you arrange the cookies affects their baking outcomes. Maximizing cookie rise and shape is crucial for aesthetics and texture. Uneven spacing can lead to some cookies baking faster than others, resulting in a mismatch of textures and potential burnt edges.
Baking the Cookies
Understanding the baking process is key to successful cookies.
Perfect Baking Time
Baking in a preheated oven at 350°F (175°C) for the right duration is crucial for achieving that golden-brown edge. The ideal baking time for this cookie recipe is between 10-12 minutes. Keep an eye on the edges; they should be lightly golden while the centers remain soft and slightly puffed.
Managing Cookie Softness
To maintain a soft center while achieving those desirable golden edges, avoid opening the oven door too frequently. Check for doneness by gently touching the center; if it springs back slightly, they are ready to come out. The residual heat will continue cooking the cookies even after they are removed from the oven.
Adding Chocolate Kisses
The signature final touch of these cookies is the melting chocolate kiss that completes each cookie.
Positioning the Kisses
To achieve the perfect finish, press a chocolate kiss into the center of each warm cookie immediately after removing them from the oven. Positioning the kisses in the center allows them to rest comfortably as they melt into the cookie, creating a beautiful presentation.
Melting Effect
The ideal timing for adding the kisses is right out of the oven to leverage the warmth from the cookies, aiding in proper melting. This adds visual appeal and enhances the taste experience, blending the rich chocolate flavor with the nutty peanut butter background.
Cooling and Storing Cookies
Proper cooling and storage techniques are vital for maintaining the freshness and flavor of your cookies.
Cooling on Baking Sheet
Let the cookies cool on the baking sheet for about 5 minutes after removing them from the oven. This resting time is crucial as it allows the cookies to firm up slightly before transferring them to a wire rack. Cooling right on the baking sheet helps integrate the melted chocolate kiss into the cookie while preserving its moist structure.
Storage Practices
Once cooled, store the cookies in an airtight container at room temperature for up to a week. For longer storage, consider freezing them; layer cookies between parchment paper and store them in an airtight container or freezer bag for up to 3 months. This method can help retain the cookies’ soft texture and preserve their delicious flavor.
In conclusion, the Peanut Butter Blossom Bliss cookies present a delightful combination of textures, with their soft centers contrasting perfectly against the crunch of the sugar-coated exterior and the rich chocolate kiss on top. Following the timing and temperature guidelines is crucial for achieving the best results, leading to a batch of cookies that are both soft and chewy with a melt-in-your-mouth finish.

Peanut Butter Blossom Bliss Cookies Recipe
Ingredients
- 1 cup creamy peanut butter
- 1 cup granulated sugar
- 1 cup packed light brown sugar
- 1 teaspoon pure vanilla extract
- 1 large egg
- 2 cups all-purpose flour
- 1 teaspoon baking soda
- ½ teaspoon fine sea salt
- 36 unwrapped chocolate kisses
- extra granulated sugar for rolling
Instructions
- Preheat your oven to 350°F (175°C) and line a baking sheet with parchment paper.
- In a large bowl, combine peanut butter, granulated sugar, brown sugar, and vanilla extract until smooth.
- Add the egg and mix until fully combined.
- In a separate bowl, whisk together flour, baking soda, and salt.
- Gradually add the dry mixture to the wet ingredients, stirring gently until just combined.
- Roll the dough into 1-inch balls and coat in granulated sugar.
- Place the dough balls on the baking sheet, leaving space between each.
- Bake for 10-12 minutes until edges are golden and centers are soft.
- Press a chocolate kiss into the center of each cookie immediately after baking.
- Cool on the baking sheet for 5 minutes, then transfer to a wire rack to cool completely.