
Introduction
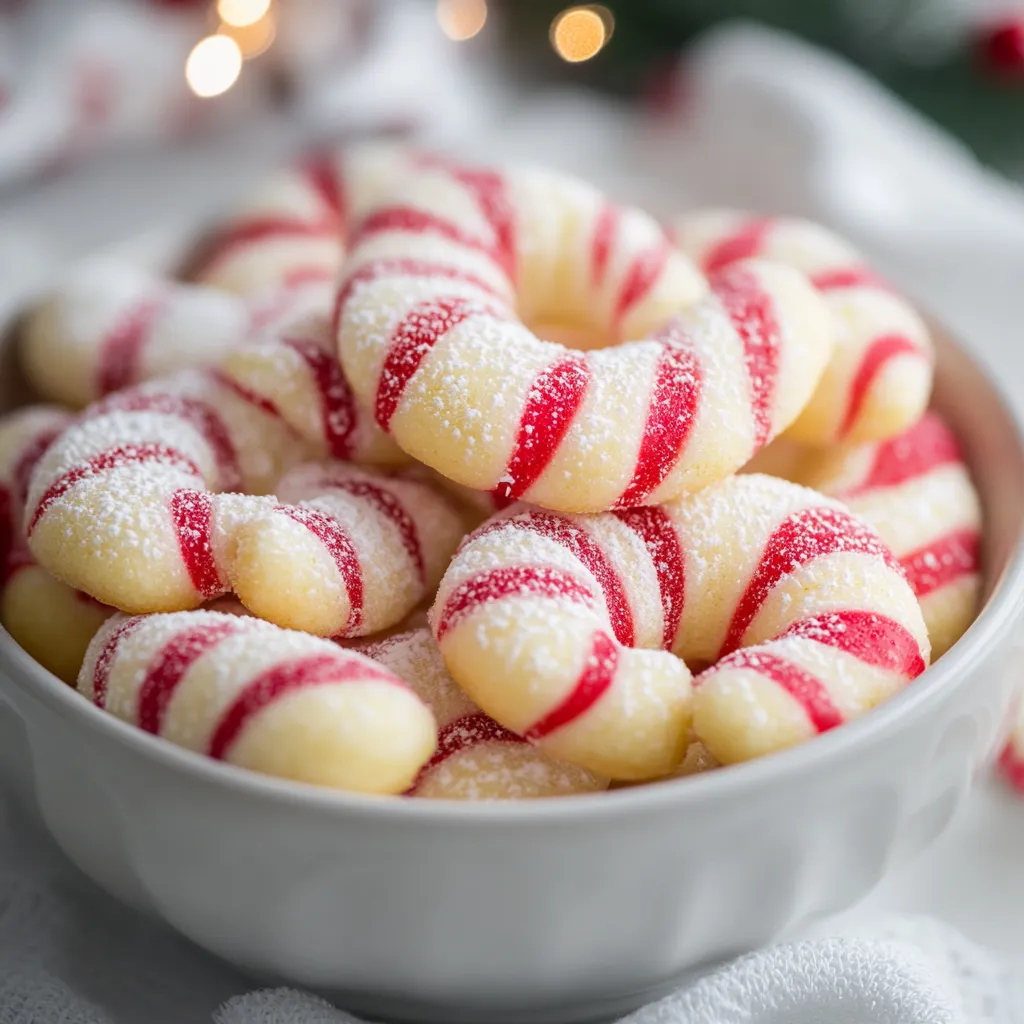
Explore the enchanting world of Christmas baking with our Perfect Candy Cane Cookies recipe! These charming cookies not only bring festive joy but also boast vibrant red and white stripes that are perfectly designed for the holiday season. With a delightful peppermint flavor and a soft, chewy texture, these cookies make for an ideal treat at gatherings or a sweet gift for loved ones.
As the holiday season approaches, many home bakers look for recipes that encapsulate the spirit of Christmas. These candy cane cookies not only deliver on taste but also serve as a wonderful canvas for showcasing your baking skills. The festive colors of red and white bring an aesthetic charm to any dessert table, ensuring that they not only taste great but also look the part. Perfect to share with family and friends, or to enjoy with a warm cup of cocoa, these cookies promise to be a holiday tradition.
Whether you’re gathering around the fireplace, sharing gifts with neighbors, or simply enjoying a cozy family evening, presenting these cookies will bring smiles and warmth to any occasion. Let’s embark on a journey to create these delightful treats that are sure to enhance your holiday celebrations.
Recipe Overview
Description
Learn how to make eye-catching Candy Cane Cookies that are as delightful to look at as they are to eat. This recipe balances the richness of butter with the festive flavors of peppermint and almond extracts, creating a seasonal favorite.
Serving Suggestions
Perfect for holiday gatherings, these cookies can also be packaged as gifts. Serve them on a decorative plate or alongside a warm cup of cocoa for a cozy experience.
Preparation and Cooking Time
The total time commitment for this recipe is 1 hour and 30 minutes, with a hands-on preparation time of just 20 minutes before chilling and baking.
Ingredients
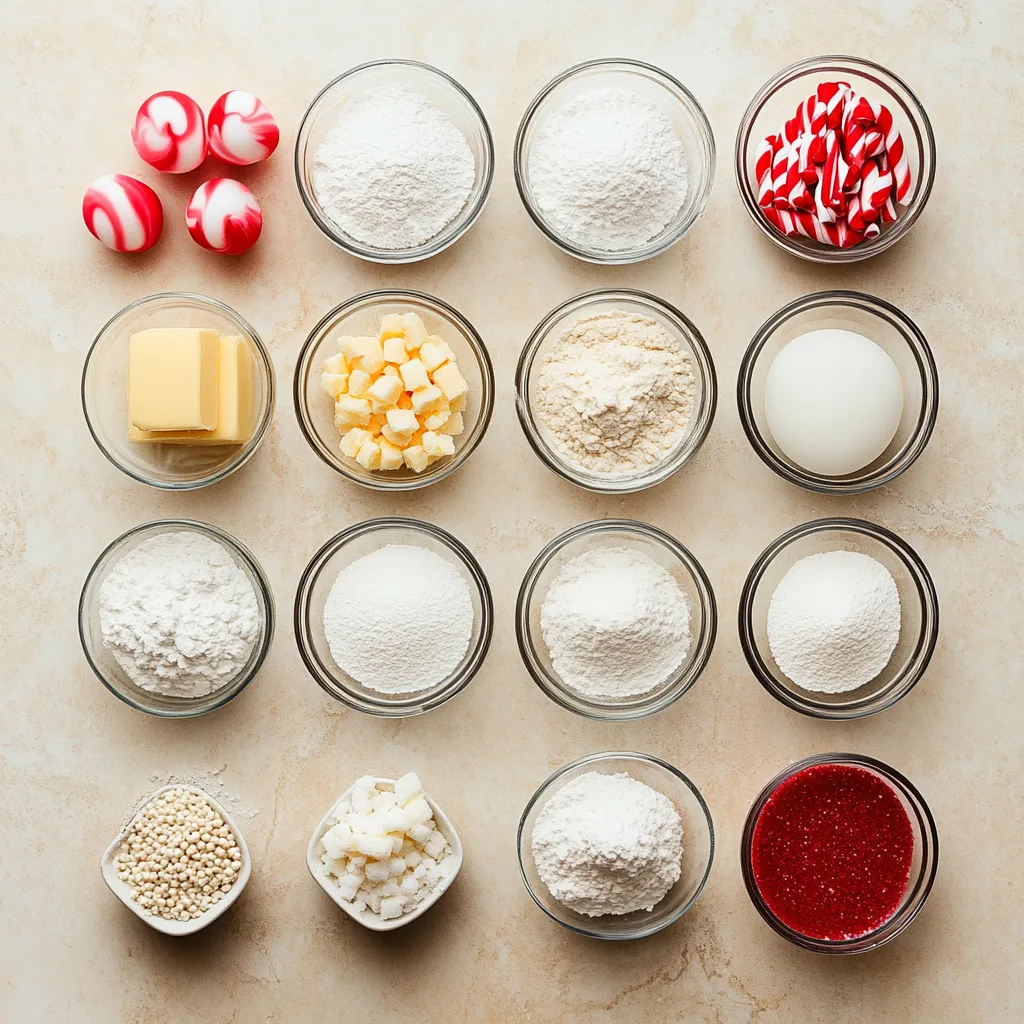
Essential Baking Components
– 2 ¾ cups All-Purpose Flour
– 1 teaspoon Baking Powder
– ½ teaspoon Salt
Wet Ingredients
– 1 cup Unsalted Butter (softened to room temperature)
– 1 cup Granulated Sugar
– 1 large Egg
Flavor Enhancers
– 1 teaspoon Vanilla Extract
– 1 teaspoon Almond Extract
– ½ teaspoon Peppermint Extract
– ½ teaspoon Red Food Coloring
Finishing Touch
– ½ cup Powdered Sugar (for dusting)
Instructions
1. Preheat the Oven: Begin by preheating your oven to 350°F (175°C). Prepare two baking sheets by lining them with parchment paper to ensure easy cookie removal.
2. Mix Dry Ingredients: In a medium-sized bowl, whisk together the all-purpose flour, baking powder, and salt until well combined. Set this mixture aside for later use.
3. Cream Butter and Sugar: In a large mixing bowl, use a hand mixer or stand mixer to beat the softened butter and granulated sugar together. Continue mixing until the mixture is light and fluffy, which should take about 2-3 minutes.
4. Incorporate Egg and Extracts: Add the egg, vanilla extract, and almond extract to the butter-sugar mixture. Beat well until all ingredients are thoroughly combined.
5. Combine Dry and Wet Ingredients: Gradually introduce the dry ingredient mixture to the wet mixture, stirring gently until just combined. Be careful not to overmix, as this can affect the texture of the cookies.
6. Divide the Dough: Split the dough into two equal portions. Leave one portion plain while adding the red food coloring and peppermint extract to the second portion. Mix until the color is evenly distributed throughout the dough.
7. Chill the Dough: Wrap both portions of dough in plastic wrap and place them in the refrigerator for at least 1 hour. This chilling step helps the dough firm up for easier handling.
8. Shape the Cookies: Once chilled, take a small piece (approximately 1 tablespoon) from each dough portion. Roll them into long ropes, about 6 inches in length, and twist the two ropes together to create a candy cane shape.
9. Arrange on Baking Sheets: Position the formed cookies on the prepared baking sheets, ensuring there is enough space between each cookie for spreading during baking.
10. Bake: Place the baking sheets in the preheated oven and bake for 10-12 minutes, or until the edges of the cookies are lightly golden.
11. Cool and Dust: After baking, let the cookies cool on the sheets for about 5 minutes before transferring them to a wire rack to cool completely. Once cooled, lightly dust the cookies with powdered sugar to add a festive touch.
12. Enjoy: Serve these delightful Candy Cane Cookies at your holiday gatherings or package them beautifully as gifts for loved ones!
Preparation Techniques
Preheating the Oven
Begin your baking adventure by preheating your oven to 350°F (175°C). This step is crucial for achieving just the right texture and color for the cookies. An oven that’s properly heated ensures that your cookies bake evenly, resulting in the perfect balance of a crispy edge and a soft, chewy center. If the oven is not preheated adequately, the cookie dough may spread too much, resulting in flat cookies rather than fluffy, beautiful shapes.
Preparing Baking Sheets
Line two baking sheets with parchment paper to ensure that the cookies can be easily removed after baking without sticking. This simple move will save you from the potential frustration of cookies clinging to the sheet and breaking apart upon removal. Parchment paper also aids in even cooking, which is critical for achieving the desired outcome of both the texture and appearance of the cookies.
Mixing Ingredients
Whisking Dry Ingredients
In a medium bowl, combine all-purpose flour, baking powder, and salt. Whisk until evenly mixed to create a uniform dry ingredient blend. Properly mixing the dry ingredients ensures that the baking powder and salt are evenly distributed throughout the flour, which is vital for achieving consistent rising and flavoring across all the cookies.
When whisking, it’s recommended to incorporate air into the mixture, which can help further with the overall texture of the baked cookies. This step is straightforward but should not be overlooked, as the foundations of a great cookie start here.
Creaming Butter and Sugar
Using a hand mixer or stand mixer, beat softened butter with granulated sugar until the mixture becomes light and fluffy. This process usually takes about 2-3 minutes and is essential for achieving the right cookie texture. Creaming the butter and sugar together adds air to the mixture, which helps to leaven the cookies and gives them a lighter, more tender crumb.
The key is to ensure that the butter is at room temperature so that it can cream properly; cold butter will not incorporate air effectively, leading to denser cookies. It’s also crucial not to rush this step, as a well-creamed mixture sets the stage for the other ingredients to blend seamlessly. Creaming until light and fluffy helps in creating those delightful textures that will please any cookie lover.
Adding Egg and Flavor Extracts
Incorporate one large egg, vanilla extract, and almond extract into the creamy mixture. Beat thoroughly until all elements are well combined. The addition of the egg not only enriches the mixture but also acts as a binding agent that holds the cookie dough together. Vanilla and almond extracts introduce complementary flavors, enhancing the overall taste profile of the cookies.
Ensure that these ingredients are mixed thoroughly, as this will create a uniform dough that ensures every bite is as flavorful as the last. A well-mixed batter is critical, especially when preparing visually appealing cookies like candy canes, as any inconsistency could result in portions of the cookie lacking flavor or texture.
In Part 2, we’ll cover the remaining steps, tips for storage, and suggestions for presentation, ensuring that your Perfect Candy Cane Cookies shine during this festive season.
Dough Formation
Combining Dry and Wet Ingredients
When combining the dry mixture into the wet mixture, it is crucial to do so gradually. Begin by adding about a third of the dry ingredients, and gently fold them in using a spatula or wooden spoon. The goal is to mix until you no longer see dry flour or lumps, which should only take a few strokes. It is essential to be cautious during this step; overmixing can lead to gluten development, resulting in dense cookies rather than the light and airy texture we desire. To determine if the dough is adequately combined, observe its smoothness. Small specks of flour may remain, but the mixture should hold together well.
Dividing the Dough
After achieving the desired consistency with minimal mixing, it’s time to divide the cookie dough into two equal parts. Using a kitchen scale can help ensure accuracy, providing consistency in your cookie sizes. With each half weighing about 340 grams (assuming the total dough weighs approximately 680 grams), one portion will remain uncolored, while you will enhance the festive spirit of the other with red food coloring and peppermint extract.
Ensuring Even Color Distribution
To color the second portion of dough, start by adding the red food coloring and peppermint extract one drop at a time, kneading the dough thoroughly. It’s essential to mix until the color is uniformly dispersed throughout the dough. You might find that deepening the red hue enhances the candy cane aesthetic, so feel free to adjust the amount of dye. The dough should appear vibrant, reflecting the traditional red and white theme associated with candy canes. The peppermint extract will also infuse the dough with that classic flavor, setting a strong foundation for your cookies.
Chilling the Dough
Wrapping and Refrigerating
After mixing both portions, wrap each half of the dough tightly in plastic wrap. This step not only keeps the dough hygienic but also prevents it from drying out in the refrigerator. Chilling time is crucial as it allows the butter to solidify, making the dough easier to handle. Basic chilling for at least 1 hour is sufficient for this recipe, but you may refrigerate the dough for up to 24 hours if you need to prepare it in advance. If opting for a longer chill, just make sure to let the dough sit at room temperature for about 10-15 minutes before rolling to soften slightly.
Shaping the Cookies
Rolling Dough into Ropes
With both halves of the dough adequately chilled, it’s time to shape the cookies. Begin by taking approximately 1 tablespoon from each dough portion. Roll each piece gently in your hands to form thin ropes around 6 inches long. If the dough feels sticky, lightly dust your hands with flour to make the process smoother. It’s essential to ensure the ropes are of equal thickness; this consistency will aid in baking them evenly.
Twisting to Form Candy Cane Shapes
Once the ropes are prepared, the fun begins! Take one white rope and one red rope and align them side by side. Twist them together, ensuring the candy cane shape is distinct and recognizable. Try to maintain a consistent twist as you work your way down the length of the ropes. The goal is to create a spiraled effect that accentuates the vibrant colors when baked. Keep an eye on the ends to ensure they don’t unravel, and press them lightly to seal the two colors together.
Baking Process
Arranging Cookies
After forming the candy cane shapes, arrange them on the lined baking sheets, spacing them appropriately, about 2 inches apart. This spacing allows sufficient room for the cookies to spread during baking. Crowding the baking sheet could result in them sticking together or uneven baking, so it’s advisable to use two sheets if necessary.
Baking Time
With the oven preheated, place the trays in the middle rack and set your timer for 10-12 minutes. Keep an eye on them, as cookie baking varies by oven. The cookies are ready when the edges turn lightly golden while the centers remain pale and slightly soft. If you prefer crisper edges, you can leave them in the oven for an additional minute or so, but be cautious, as overbaking can lead to a dry texture.
Cooling and Finishing Touches
Cooling Cookies
Once baked, remove the cookie sheets from the oven and let them rest for about 5 minutes. This brief period allows the cookies to set before transferring them to a wire rack. Transferring too quickly can result in broken cookies, so be patient during this step. Once on the cooling rack, give them another 10-15 minutes to cool completely. This cooling process is essential, as warm cookies can be overly fragile.
Dusting with Powdered Sugar
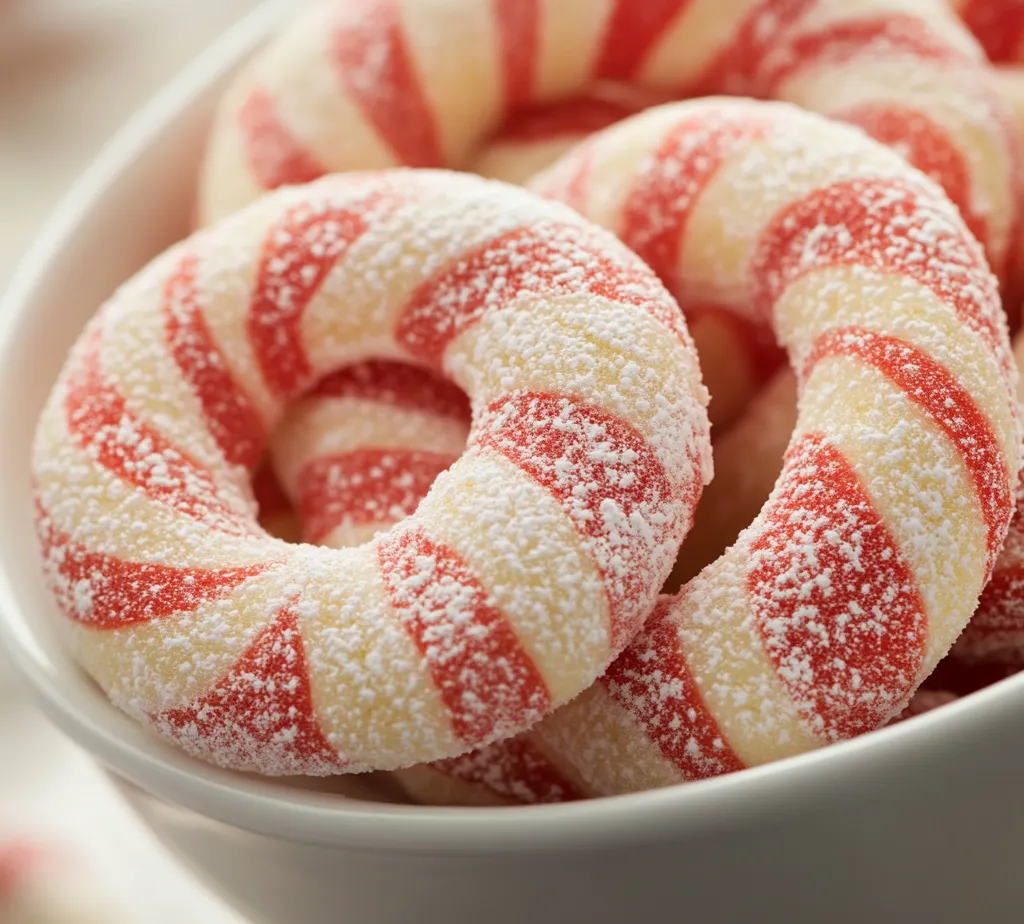
After cooling down, it’s time to add that festive touch of powdered sugar. Using a fine mesh sieve or a sifter, lightly dust the cookies with the sugar for a snow-like effect. This not only enhances their visual appeal but also adds a subtle sweetness that complements the peppermint and buttery flavors.
Presentation Ideas
Arranging for Festivity
For a striking presentation, consider arranging your Candy Cane Cookies on a decorative platter. A Christmas-themed tray or a simple white plate can enhance the festive nature of the cookies. Position them in a circular arrangement or a playful stack, providing an inviting display for your guests.
Garnishing Options
To elevate the presentation even further, you can add fresh mint leaves or sprigs of holly as a garnish. These elements not only tie into the candy cane aesthetic but also add an aromatic element when guests enjoy the cookies. Consider adding holiday-themed decorations around the platter, such as ornaments or candles, to create a warm holiday ambiance.
Storage Instructions
Optimal Storage Conditions
For proper storage, keep the cookies in an airtight container at room temperature. This preserves their moisture and maintains the chewy texture that characterizes these delightful treats. Alternatively, if you plan to keep them fresh for a longer period, freezing is an option, but be sure to layer the cookies between parchment paper to prevent sticking.
Shelf Life
These Candy Cane Cookies can generally be enjoyed for up to one week when stored correctly. Whether they’re shared with family and friends or saved for personal enjoyment, they are a delicious treat that captures the spirit of the holiday season.
Conclusion
These Perfect Candy Cane Cookies delight with their festive appearance and balance of flavors. Their soft, chewy texture paired with a hint of peppermint creates a memorable treat, ready to bring cheer to any holiday table. With simple preparation and a touch of creativity, you can make this treat a highlight of your Christmas celebrations.

Perfect Candy Cane Cookies for Christmas
Ingredients
- 2 ¾ cups Allzweckmehl
- 1 teaspoon Backpulver
- ½ teaspoon Salz
- 1 cup ungesalzene Butter weich
- 1 cup Zucker
- 1 large Ei
- 1 teaspoon Vanilleextrakt
- 1 teaspoon Mandelessenz
- ½ teaspoon rote Lebensmittelfarbe
- ½ teaspoon Pfefferminzextrakt
- ½ cup Puderzucker
Instructions
- Ofen auf 175°C vorheizen und Backbleche mit Backpapier auslegen.
- Mehl, Backpulver und Salz in einer Schüssel vermengen.
- Butter und Zucker in einer großen Schüssel cremig schlagen.
- Ei, Vanille- und Mandelessenz hinzufügen und gut vermischen.
- Trockene Zutaten nach und nach unterrühren, bis sie gerade kombiniert sind.
- Teig in zwei Portionen teilen, eine Portion unberührt lassen und der anderen rote Lebensmittelfarbe und Pfefferminzextrakt hinzufügen.
- Beide Teigportionen in Frischhaltefolie wickeln und mindestens 1 Stunde kühlen.
- Teigstücke zu langen Strängen rollen und zu Zuckerstangen formen.
- Kekse auf die Backbleche legen und 10-12 Minuten backen.
- Kekse abkühlen lassen und mit Puderzucker bestäuben.