
Introduction
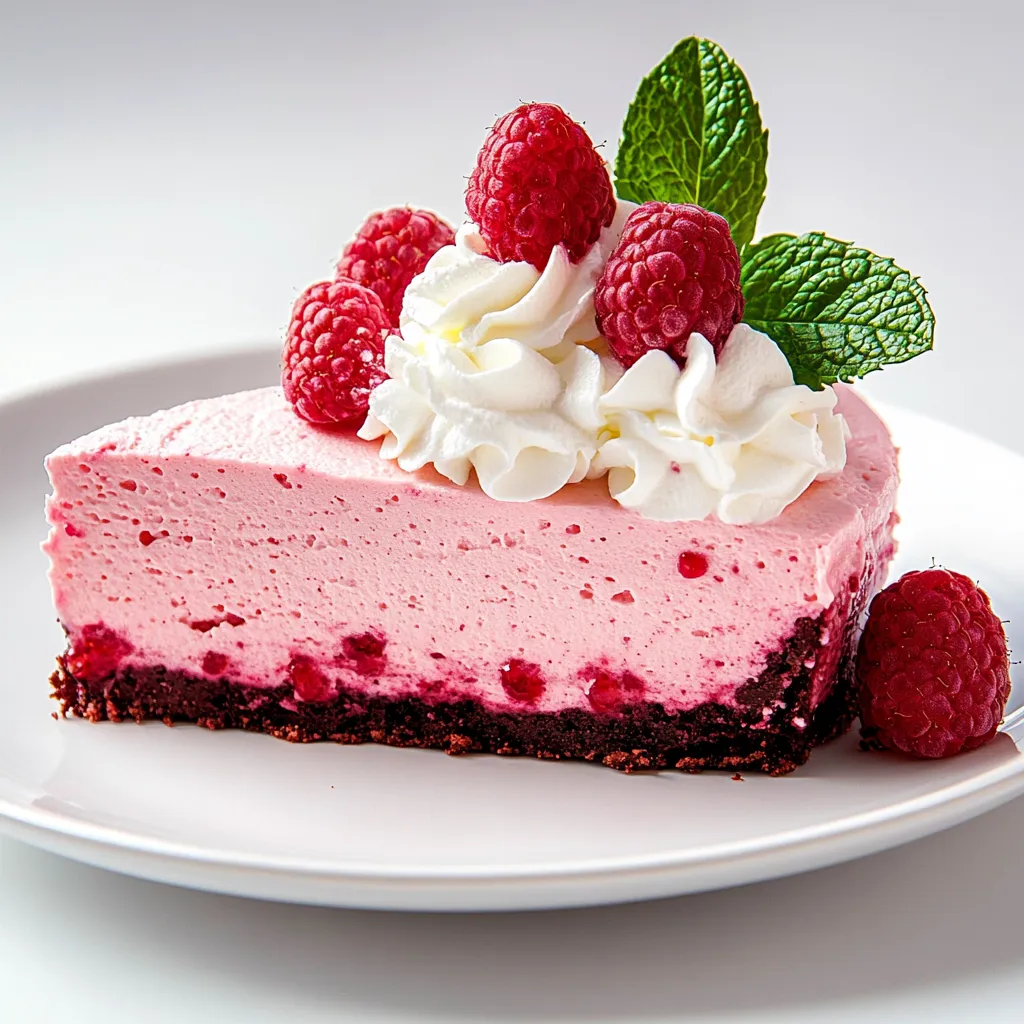
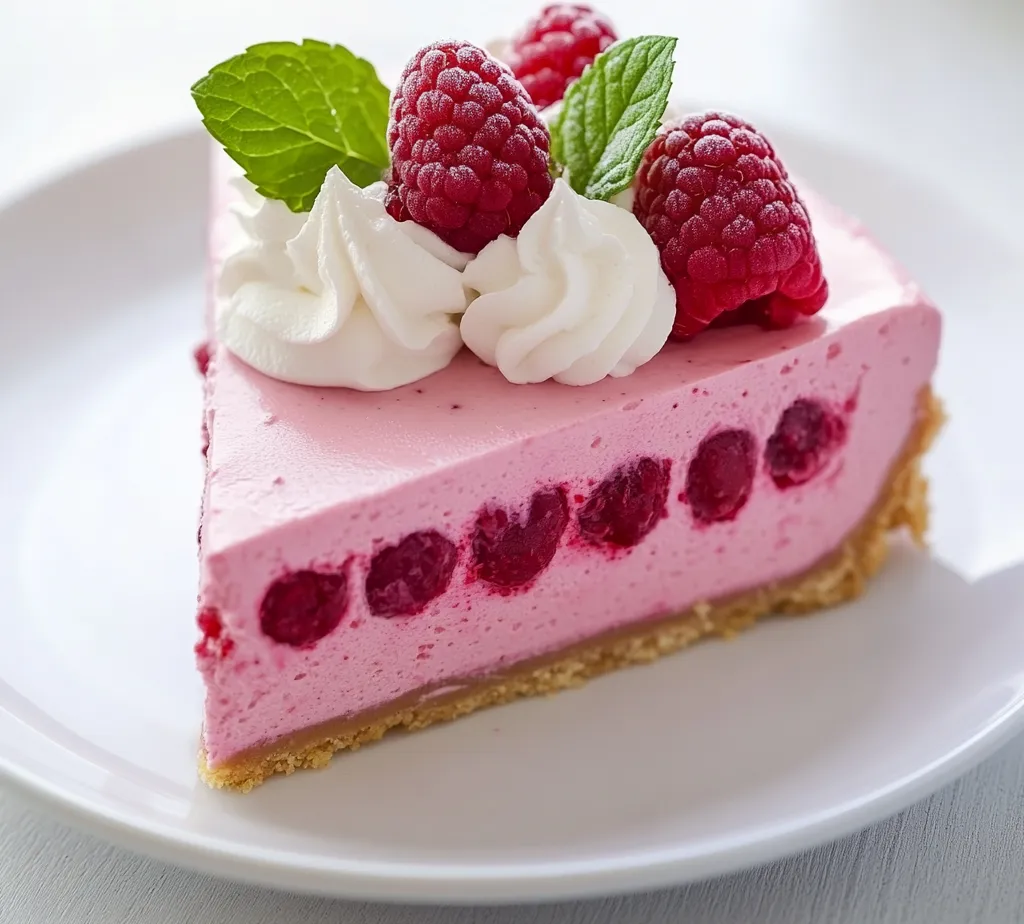
This deliciously vibrant pink velvet raspberry cheesecake combines the rich creaminess of cheesecake with the tartness of fresh raspberries, offering a delightful dessert experience. The cheesecake is a true celebration of flavors and aesthetics—its pink hue, soft texture, and the burst of raspberry sweetness make it an exceptional choice for any occasion. Whether you’re hosting a festive gathering, celebrating a birthday, or simply indulging yourself after a long week, this cheesecake will surely steal the show.
The combination of a buttery graham cracker crust, smooth raspberry cheesecake filling, and topped with fresh raspberries and whipped cream offers a multi-dimensional experience that is visually stunning and rich in flavor. Both the tangy and sweet elements harmonize beautifully, making each bite a memorable one. For those hot summer nights or rainy afternoons, serve it chilled for a refreshing dessert or an afternoon treat.
Recipe Overview
– Prep Time: 30 minutes
– Total Time: 6 hours
– Servings: 12
– Difficulty: Not specified in the recipe
This Ultimate Pink Velvet Raspberry Cheesecake features a buttery graham cracker crust, a smooth and creamy raspberry cheesecake filling, and a delightful topping of fresh raspberries and whipped cream. This article will guide you step-by-step through the preparation, baking, and garnishing of this exquisite dessert to ensure a successfully delicious result.
Ingredients
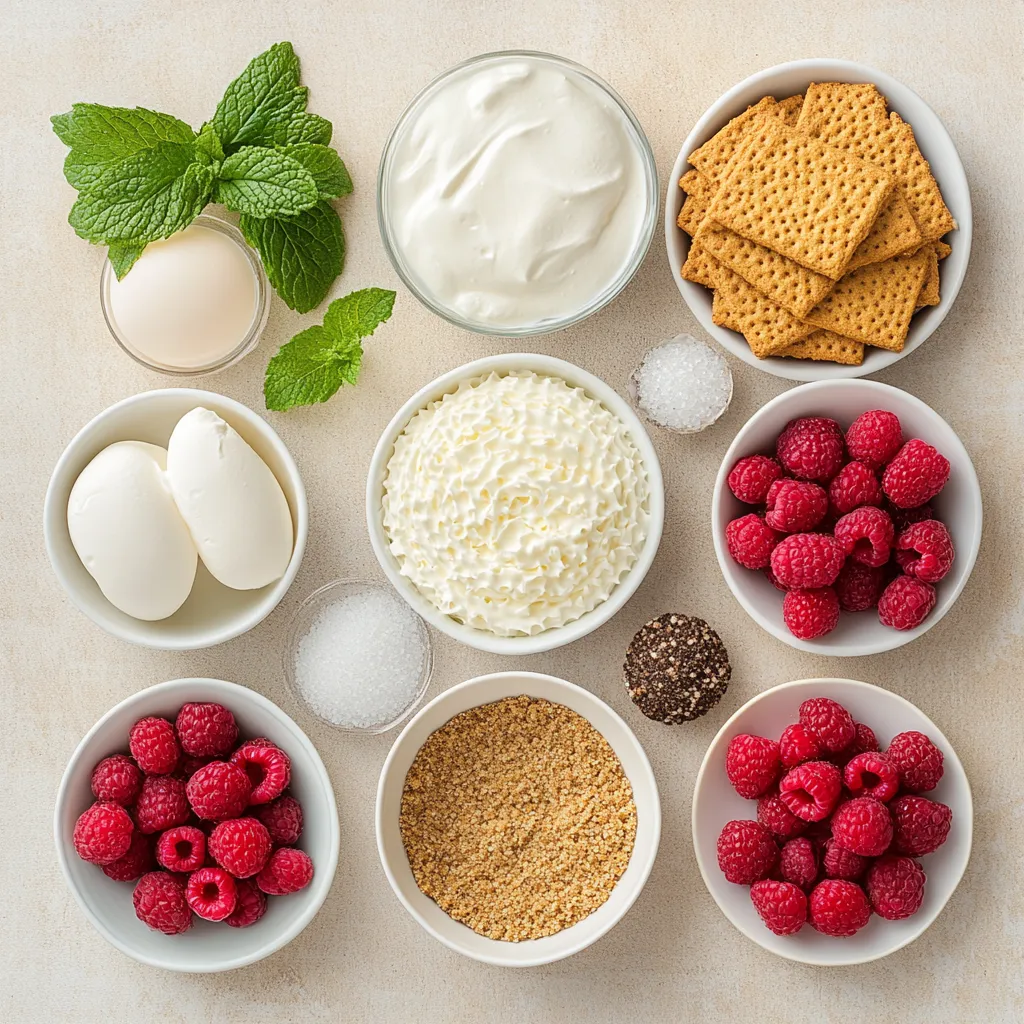
For the Crust
– 1 ½ cups graham cracker crumbs
– ½ cup unsalted butter, melted
– ¼ cup granulated sugar
– A pinch of salt
For the Raspberry Cheesecake Filling
– 16 oz (2 packages) cream cheese, softened to room temperature
– 1 cup granulated sugar
– 1 tsp vanilla extract
– 3 large eggs, at room temperature
– 1 cup sour cream
– ½ cup fresh raspberries, puréed until smooth
– 2-3 drops red food coloring (optional for color enhancement)
For the Topping
– 1 cup fresh raspberries
– ½ cup whipped cream, homemade or store-bought
– Fresh mint leaves for garnish
– Optional: Edible glitter
Instructions
**Prepare the Crust:**
– Begin by preheating your oven to 325°F (160°C).
– In a medium mixing bowl, combine the graham cracker crumbs, melted unsalted butter, granulated sugar, and a pinch of salt. Stir until the mixture resembles wet sand.
– Firmly press the crumb mixture into the bottom of a 9-inch springform pan, creating an even layer. Bake the crust in the preheated oven for 10 minutes, then remove it and set aside to cool while you prepare the filling.
**Make the Raspberry Cheesecake Filling:**
– In a large mixing bowl, use an electric mixer to beat the softened cream cheese until it is smooth and creamy, ensuring there are no lumps.
– Gradually add the granulated sugar and vanilla extract, mixing until well incorporated.
– Add the eggs one at a time, blending just until each egg is fully mixed in. Be careful not to overmix.
– Gently fold in the sour cream and raspberry purée using a spatula. If you desire a more vibrant pink color, add a few drops of red food coloring and mix until fully combined.
**Bake the Cheesecake:**
– Pour the raspberry cheesecake filling over the cooled crust in the springform pan, spreading it evenly.
– Bake in the preheated oven for approximately 50-60 minutes. The edges should be set while the center remains slightly jiggly.
– Once baked, turn off the oven and crack the oven door open slightly. Allow the cheesecake to cool in the oven for about 1 hour to prevent cracks from forming.
**Chill the Cheesecake:**
– After an hour of cooling in the oven, carefully remove the cheesecake and let it cool to room temperature. Once cooled, cover it with plastic wrap and refrigerate for at least 4 hours, or preferably overnight, to enhance its flavor and texture.
**Prepare the Topping:**
– Once the cheesecake has chilled thoroughly, carefully unclip and remove the sides of the springform pan.
– Decorate the top with fresh raspberries and generous dollops of whipped cream. Add a few fresh mint leaves for a pop of color and sprinkle with edible glitter for a festive flair, if desired.
**Serve:**
– When ready to serve, slice the cheesecake with a hot knife for clean cuts. Each slice should reveal the delightful creamy, tangy raspberry flavor that awaits!
Preparing the Crust
Preheating the Oven
The first step in creating the perfect graham cracker crust is preheating the oven to 325°F (160°C). This temperature is ideal for allowing the crust to bake evenly and achieve the perfect golden-brown color. It’s important to ensure that your oven is at the correct temperature before placing the crust inside, as this will significantly affect its texture and flavor.
Mixing the Ingredients
Combine 1 ½ cups of graham cracker crumbs, ½ cup of melted unsalted butter, ¼ cup of granulated sugar, and a pinch of salt in a medium mixing bowl. Stir these ingredients together until you achieve a texture that resembles wet sand. This consistency is crucial, as it will allow the crust to hold together once pressed into the springform pan. The butter acts as a binding agent to help each crumb stick, contrasting beautifully with the sweet sugar.
Pressing the Crust
After mixing, take the graham cracker mixture and firmly press it into the bottom of a 9-inch springform pan. Make sure to create an even layer across the pan, as this will form the foundation of your cheesecake. Properly showcasing your crust is key, as it provides a deliciously buttery base to complement the creamy filling above.
Baking the Crust
Bake the crust for 10 minutes in the preheated oven. This brief baking time helps set the crust and allows the sugars to caramelize slightly, enhancing its sweet and buttery flavor. Once baked, remove the crust from the oven and set it aside to cool. Allowing the crust to cool fully is essential for achieving the best texture when filling it with the raspberry cheesecake batter.
Adding Sugar and Vanilla
To achieve a balanced sweetness in your raspberry cheesecake, attention to detail when adding sugar and vanilla is crucial. Once your cream cheese is smooth, gradually incorporate the granulated sugar. This method allows the sugar to dissolve evenly, ensuring a consistent sweetness throughout the filling. Mixing until fully blended will also help avoid any granular texture. Then, add the vanilla extract, which not only enhances the flavor profile but also provides aromatic qualities that uplift the cheesecake. The combination of cream cheese with sugar and vanilla creates a rich, sweet foundation, perfect for complementing the tartness of fresh raspberries.
Incorporating the Eggs
When it comes to adding the eggs, the technique can significantly affect the cheesecake’s texture. Introduce the eggs one at a time, using a low to medium speed on your mixer. This step is crucial because it promotes proper emulsification, allowing each egg to fully incorporate before adding the next. Overmixing at this stage can introduce air into the batter, which may cause the cheesecake to rise and then fall, resulting in unwanted cracks. Thus, once all the eggs are combined, simply mix until you achieve a smooth consistency, signaling that it’s time to proceed to the next ingredient.
Folding in Sour Cream and Raspberries
Incorporating the sour cream is where texture dynamics begin to shine. Using a spatula, gently fold the sour cream into your mixture, creating a creamy filling that retains its airiness. Be careful not to overmix during this stage; the goal is to combine the ingredients without losing the fluffiness. Following this, introduce the raspberry purée. This step infuses your cheesecake with vibrant flavor and color. If you opted for food coloring, do this last by adding just a few drops and gently folding until you achieve your desired hue. This technique ensures the raspberry flavor is prominent while retaining a smooth, velvety texture.
Baking the Cheesecake
Pouring the Filling
After preparing your filling, it’s time to create the centerpiece of your dessert. Pour the raspberry cheesecake filling over the cooled graham cracker crust in your springform pan, ensuring an even distribution. It’s essential to tap the pan gently on the counter to settle the filling, which can reduce air pockets. This method helps create a uniform texture throughout the cheesecake and makes for a visually appealing slice when served.
Baking Time
When baking the cheesecake, keep a close eye on your timing. The suggested baking time is approximately 50 to 60 minutes; however, ovens can vary. Start checking at the 50-minute mark—the edges should look set, while the center remains slightly jiggly. This gentle wobble is an important indicator that your cheesecake is not overbaked. An overbaked cheesecake can lead to a dry texture, which is the opposite of what anyone desires for a cheesecake.
Cooling in the Oven
Once your cheesecake is finished baking, don’t rush the cooling process. Turn off the oven and crack the door open slightly, allowing heat to escape gradually. This method is critical for preventing surface cracks, as a sudden temperature change can cause the delicate cheesecake to contract. Let your cheesecake cool in this gentle environment for about an hour before moving on to the next step, providing it with the best chance to retain its smooth texture.
Chilling the Cheesecake
Cooling to Room Temperature
After the initial cooling in the oven, it’s time to let your cheesecake cool to room temperature before refrigerating. Remove it from the oven and place it on a wire rack, if possible. This process can take around 30-45 minutes, during which time you should resist the temptation to rush it. Allowing the cheesecake to reach room temperature minimizes condensation, which can affect its creaminess.
Refrigeration
Once your cheesecake has cooled down, it’s crucial to refrigerate it for at least 4 hours, ideally overnight. This chilling period allows the flavors to meld beautifully and gives the cheesecake time to firm up, resulting in a creamy, sliceable texture. The cold environment also enables the crust to maintain its integrity, balancing the cheesecake’s softness beautifully.
Preparing the Topping
Removing the Springform Pan
When it’s time to unveil your cheesecake, take caution as you remove the sides of the springform pan. Gently run a small knife around the edges to loosen the cheesecake from the sides before unclipping the pan. This careful process reduces the risk of damaging the cheesecake and helps maintain its pristine appearance.
Decorating the Top
Decorating your cheesecake is where you can truly express creativity. Top your cheesecake generously with fresh raspberries, allowing their vibrant color to contrast beautifully with the creamy pink of the cheesecake. Add dollops of whipped cream for texture and visual appeal, and don’t hesitate to garnish with fresh mint leaves for an extra touch of sophistication. If you’re feeling playful, sprinkle edible glitter to create a whimsical presentation that is sure to delight.
Serving Suggestions
Cutting the Cheesecake
To cut your cheesecake efficiently, it’s advisable to use a hot knife. Run a knife under hot water, and then dry it before slicing into your cheesecake. This technique ensures clean cuts, revealing the beautiful layers of filling and crust without dragging or tearing.
Pairing Ideas
Consider serving your cheesecake on a decorative cake stand to elevate its presentation. Pair it with a side of raspberry sauce or coulis for an extra burst of raspberry flavor, alongside a dusting of powdered sugar for an artistically refined finish. Such accompaniments can enhance the overall dessert experience, making it even more enjoyable for guests.
Optional Presentation Tips
Creative Plate Arrangements
Enhancing your cheesecake’s visual appeal can be achieved through thoughtful plate arrangements. Use colorful or patterned plates that complement the cake while showcasing its beauty. Layering plates with additional garnishes can create a stunning display that draws attention.
Additional Garnishes
For those looking to elevate the dessert even further, consider adding a mix of fresh fruits, such as sliced strawberries or blueberries, around the cheesecake. Drizzling a bit of chocolate or caramel sauce on the plate can also provide a delightful contrast to the tartness of the raspberries, creating a mouthwatering experience.
Conclusion
The Ultimate Pink Velvet Raspberry Cheesecake presents a harmonious blend of creamy cheesecake with the tartness of raspberries, enveloped within a crisp graham cracker crust. With a total preparation time of about 6 hours—including chilling—the cheesecake’s texture is creamy and satisfying, making it a delightful dessert for any occasion. The beautiful pink hue and elegant toppings enhance its visual appeal, ensuring it’s an impressive addition to your dessert table.

Ultimate Pink Velvet Raspberry Cheesecake Recipe
Ingredients
- 1 ½ cups graham cracker crumbs
- ½ cup unsalted butter melted
- ¼ cup granulated sugar
- a pinch salt
- 16 oz cream cheese softened
- 1 cup granulated sugar
- 1 tsp vanilla extract
- 3 large eggs at room temperature
- 1 cup sour cream
- ½ cup fresh raspberries puréed
- 2-3 drops red food coloring
- 1 cup fresh raspberries
- ½ cup whipped cream
- fresh mint leaves for garnish
- edible glitter optional
Instructions
- Preheat oven to 325°F (160°C).
- Combine graham cracker crumbs, melted butter, sugar, and salt in a bowl; press into a 9-inch springform pan.
- Bake crust for 10 minutes, then cool.
- Beat cream cheese until smooth, then add sugar and vanilla; mix well.
- Add eggs one at a time, mixing gently, then fold in sour cream and raspberry purée.
- Pour filling over cooled crust and bake for 50-60 minutes until edges are set.
- Cool cheesecake in the oven for 1 hour, then refrigerate for at least 4 hours.
- Remove from springform pan and top with raspberries and whipped cream.
- Garnish with mint leaves and edible glitter if desired.
- Slice with a hot knife and serve.