
Introduction
Berry pies have long held a cherished place in the hearts and kitchens of dessert lovers around the world. Their popularity can be attributed not only to their vibrant colors and inviting aromas but also to the delightful combination of sweet and tart flavors that fresh berries provide. Whether enjoyed at a summer picnic or served as a comforting dessert on a chilly evening, berry pies evoke feelings of nostalgia and warmth. The lattice-topped berry pie, in particular, stands out as an iconic version of this classic dessert. With a flaky, homemade crust cradling a medley of fresh berries, it’s a treat that is both visually stunning and deliciously satisfying.
The appeal of this lattice-topped berry pie lies in its ability to showcase the natural flavors of the fruit while providing a satisfying textural contrast. The sweet-tart filling, bursting with the essence of strawberries, blueberries, and raspberries, is perfectly complemented by the crisp, buttery lattice crust. Making this pie from scratch not only allows for complete control over the ingredients but also elevates the overall experience, ensuring that each bite is packed with fresh flavors and a homemade touch. Using high-quality, fresh ingredients is crucial, as they directly impact the taste and texture of the pie.
As we delve into this recipe, you’ll discover that creating a lattice-topped berry pie is not as daunting as it may seem. With a little patience and attention to detail, you can master the art of pie-making and impress your family and friends with this delightful dessert.
Understanding the Components of a Lattice-Topped Berry Pie
To appreciate the beauty of a lattice-topped berry pie, it’s essential to understand its key components: the pie crust, the berry filling, and the lattice topping. Each element plays a significant role in the overall success of the pie, contributing to its flavor, texture, and presentation.
The Pie Crust
The pie crust is the foundation of any great pie, and its significance cannot be overstated. A well-made crust provides a buttery, flaky texture that contrasts beautifully with the juicy fruit filling. The perfect pie crust should be tender yet sturdy enough to hold the filling without becoming soggy.
When making pie crust, the choice of flour and butter is paramount. All-purpose flour is commonly used for its balanced protein content, which helps achieve the desired flakiness. In terms of butter, using unsalted butter is recommended for better control over the flavor and salt content. The butter should be cold when incorporated into the dough, as this helps create those flaky layers that are characteristic of a perfect pie crust.
The Berry Filling
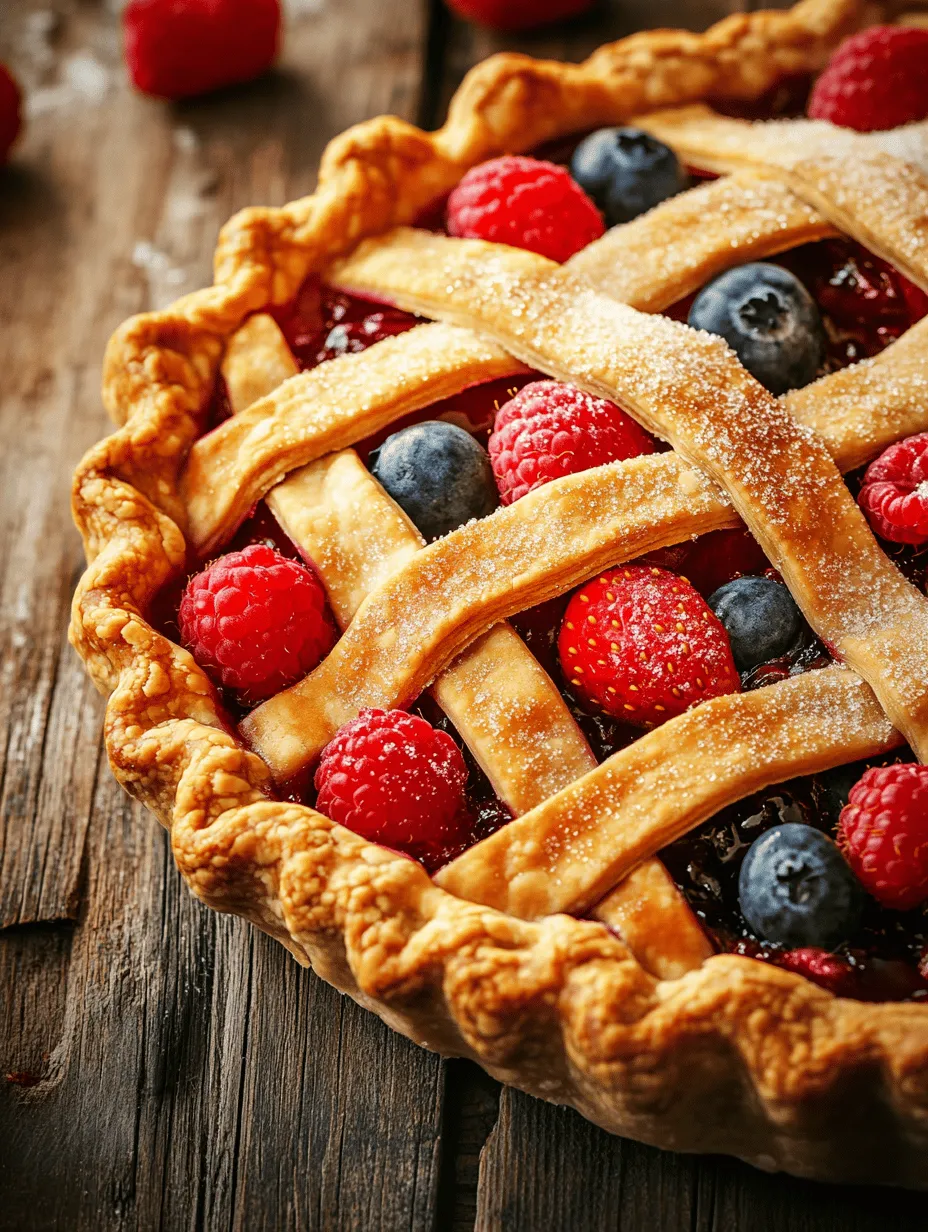
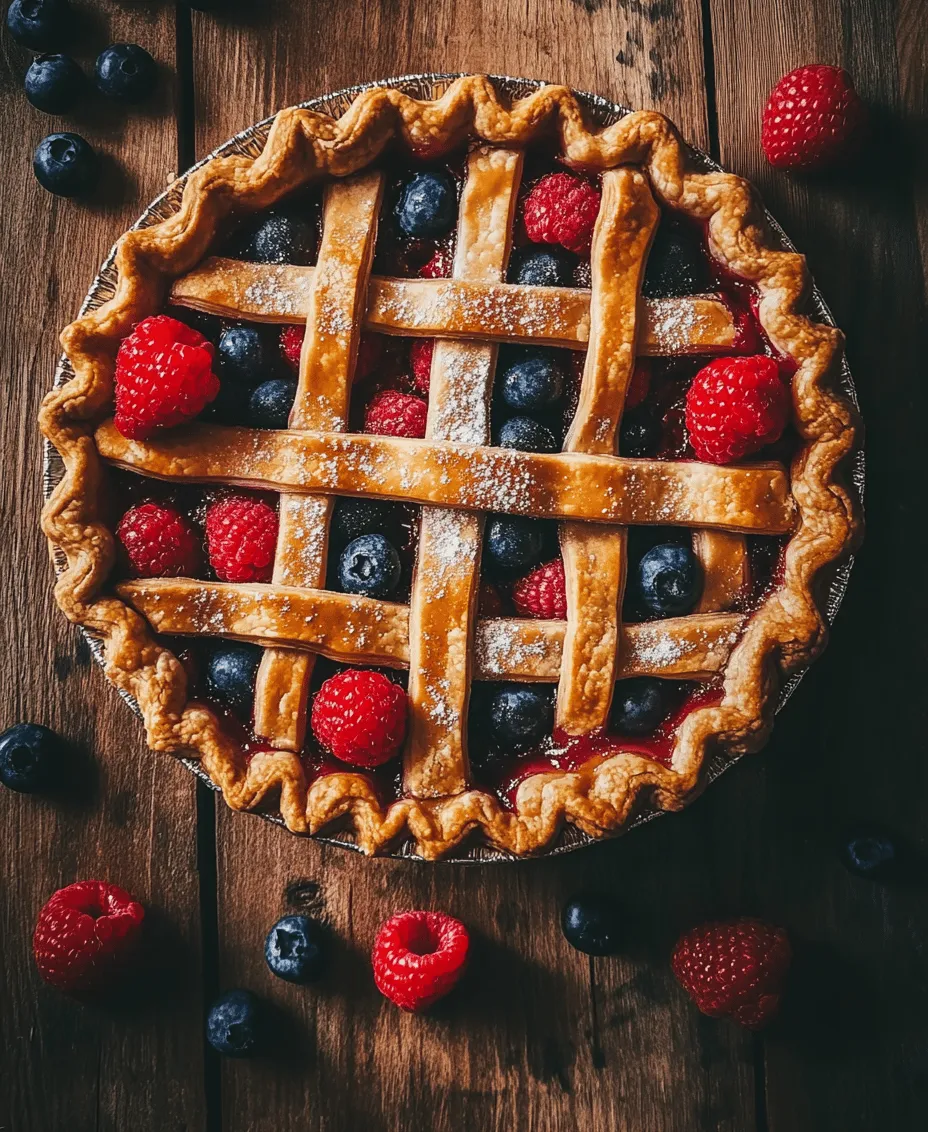
The berry filling is the star of the show, and for a lattice-topped berry pie, a harmonious blend of fruits is essential. Strawberries, blueberries, and raspberries each bring their unique flavor profiles to the mix. Strawberries offer a sweet, juicy base, while blueberries add a burst of sweetness and slight tang. Raspberries introduce a delightful tartness, balancing the sweetness of the other berries and enhancing the overall flavor complexity.
In addition to the berries themselves, other ingredients are typically added to the filling to enhance its flavor and texture. Sugar helps to sweeten the fruit, while cornstarch acts as a thickening agent, ensuring that the filling is not too runny. A splash of vanilla extract brings warmth and depth, and a touch of lemon juice brightens the flavors, making the berries pop. For those who enjoy a hint of spice, a sprinkle of cinnamon can add an additional layer of warmth.
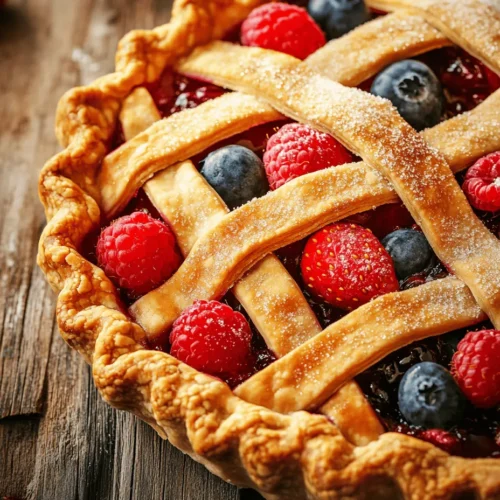
The Lattice Topping
The lattice topping is not only a beautiful decorative element but also serves a functional purpose. This crisscross pattern allows steam to escape during baking, preventing the filling from becoming overly watery. It also provides an opportunity for the crust to achieve a golden-brown color, enhancing both the visual appeal and flavor of the pie.
Creating the lattice topping may seem intimidating at first, but with practice, it becomes a straightforward task. The key is to roll out the dough to an even thickness and cut it into strips of uniform width. Arranging the strips in a crisscross pattern creates that classic lattice design, which can be adjusted to your preference, whether you prefer a more traditional look or a more modern, artistic approach.
The Art of Making the Perfect Pie Crust
Creating a perfect pie crust is an art form that requires precision and care. The process begins with selecting the right ingredients and follows through to the final assembly of the pie. Here’s a detailed guide to making a flaky, delicious pie crust that will serve as the perfect base for your lattice-topped berry pie.
Selecting Ingredients
1. Flour: Choose all-purpose flour for the ideal balance of strength and tenderness. You might also consider using a combination of all-purpose and pastry flour for a lighter texture.
2. Butter: Use unsalted butter for better control over the flavor. Ensure it is cold, as this is crucial for achieving flakiness.
3. Salt: A pinch of salt enhances the flavor of the crust without making it taste salty.
4. Water: Ice-cold water is essential for binding the dough without warming it up too much.
Step-by-Step Process for Making Pie Dough
1. Mixing Dry Ingredients: In a large mixing bowl, combine the flour and salt. Whisk together to ensure even distribution.
2. Incorporating Butter: Cut the cold butter into small cubes and add it to the flour mixture. Using a pastry cutter or your fingertips, work the butter into the flour until the mixture resembles coarse crumbs with pea-sized butter pieces. This step is vital for achieving the desired flaky texture.
3. Chilling the Dough: Once the butter is fully incorporated, slowly add ice-cold water, one tablespoon at a time, mixing gently with a fork until the dough begins to come together. Avoid overmixing, as this can lead to a tough crust. Once the dough holds together, divide it in half, shape each half into a disk, wrap in plastic wrap, and refrigerate for at least one hour. Chilling the dough allows the gluten to relax, leading to a more tender crust.
4. Rolling Out the Dough: After the dough has chilled, remove one disk from the refrigerator. On a lightly floured surface, roll out the dough into a circle, about 1/8 inch thick, ensuring an even thickness throughout. Keep the surface and your rolling pin floured to prevent sticking.
5. Fit the Dough into the Pie Pan: Carefully transfer the rolled-out dough into a 9-inch pie pan, gently pressing it into the corners. Trim any excess dough hanging over the edges, leaving about an inch for crimping.
Tips for Rolling Out the Dough Effectively
– Keep It Cold: If the dough becomes too warm while rolling, return it to the refrigerator for a few minutes to firm up.
– Use a Light Touch: Be gentle when rolling to avoid overworking the dough, which can result in a dense crust.
– Rotate the Dough: Frequently rotate the dough as you roll to maintain a round shape and prevent sticking.
Now that you have a perfectly prepared pie crust, it’s time to create the delicious berry filling that will elevate your lattice-topped berry pie to new heights.
Crafting the Berry Filling
The filling of your lattice-topped berry pie is where the magic truly happens. Using fresh, high-quality berries is essential for achieving the best flavor and texture. Here’s how to choose, prepare, and enhance your berry filling for the perfect pie.
Choosing and Preparing Fresh Berries
When selecting berries for your pie, freshness is key. Look for ripe, plump berries without any signs of spoilage. Strawberries should be bright red and fragrant, blueberries should be deep blue and firm, and raspberries should be vibrant and intact. If possible, try to source your berries from local farmers’ markets or pick-your-own farms for the freshest options.
Before using the berries, rinse them gently under cold water to remove any dirt or residue. For strawberries, remove the green tops and slice them into quarters or halves, depending on their size. Blueberries and raspberries can be used whole.
Enhancing the Filling
To create a delicious berry filling, you’ll need a few additional ingredients to enhance the natural flavors of the fruit:
1. Sugar: Depending on the sweetness of your berries, add sugar to taste. Generally, about ½ to ¾ cup of granulated sugar should suffice.
2. Cornstarch: This ingredient acts as a thickening agent, helping to bind the juices released by the berries and preventing the pie from becoming soggy. Use about 2-3 tablespoons of cornstarch.
3. Vanilla Extract: A teaspoon of pure vanilla extract adds depth and warmth to the filling.
4. Lemon Juice: A tablespoon of fresh lemon juice brightens the flavors and balances the sweetness of the berries.
5. Cinnamon (optional): For those who enjoy a hint of spice, a pinch of ground cinnamon can add an aromatic touch to the filling.
To prepare the filling, combine the cleaned and prepared berries in a mixing bowl. Gently toss them with the sugar, cornstarch, vanilla extract, lemon juice, and cinnamon (if using) until well combined. Allow the mixture to sit for about 10-15 minutes. This resting period enables the berries to release their juices and helps the cornstarch activate, ensuring a perfectly thickened filling.
With your homemade pie crust ready and your berry filling prepared, you are well on your way to creating a delectable lattice-topped berry pie that will impress everyone at the table. The next steps will involve assembling the pie, creating the lattice topping, and finally baking it to golden perfection. Stay tuned for the subsequent steps to complete this delightful dessert masterpiece.
The Science Behind Letting the Filling Sit
Before diving into the assembly of your lattice-topped berry pie, it’s important to discuss the science behind letting the berry filling sit. Allowing the berry mixture to rest for a bit before pouring it into the pie crust helps improve the overall texture and flavor of your pie. When berries sit with sugar, they release their juices, creating a syrupy consistency that enhances the flavor profile of the filling. This process not only allows the sugar to dissolve but also helps the flavors meld together, resulting in a more cohesive taste.
However, it’s crucial not to let the filling sit for too long, as excessive resting can lead to overly watery filling. Aim for about 20-30 minutes for optimal results. This time allows the juices to combine with the sugar and any thickening agents, ensuring your pie won’t be overly runny once baked.
Assembling the Pie: From Crust to Lattice
Now that your berry filling has had time to develop its flavor, it’s time to assemble your pie. Follow these detailed steps to create a beautiful and delicious lattice-topped berry pie.
Rolling Out the Crust and Preparing the Pie Dish
1. Prepare Your Work Surface: Dust your clean countertop with flour to prevent sticking.
2. Divide the Dough: If you’ve prepared your pie crust in advance, divide it into two equal parts: one for the bottom crust and one for the lattice topping.
3. Roll Out the Bottom Crust: Using a rolling pin, gently roll out the first half of the dough into a circle that is about 12 inches in diameter. Aim for an even thickness of about 1/8 inch.
4. Transfer to the Pie Dish: Carefully lift the rolled dough and place it into a 9-inch pie dish. Gently press it into the dish, ensuring that it fits snugly against the sides and bottom. Trim any excess dough hanging over the edges, leaving about 1 inch for folding over later.
Pouring and Spreading the Berry Filling
1. Add the Filling: Take your prepared berry filling and pour it into the crust, spreading it evenly with a spatula.
2. Distribute Evenly: Make sure to distribute the berries evenly across the bottom of the crust, ensuring that every slice will have a delicious berry mix.
Creating the Lattice Topping
1. Roll Out the Top Crust: Take the second half of the dough and roll it out into a similar circle, about 1/8 inch thick.
2. Cut the Strips: Use a sharp knife or pizza cutter to slice the rolled dough into strips, each approximately ¾ inch wide.
3. Weave the Lattice: Start by laying half of the strips parallel to one another over the filled pie. Place them about 1 inch apart.
– Weaving Technique: To create the lattice effect, lift every other strip and place a new strip perpendicular to the existing ones. Lower the lifted strips back down over the new strip. Repeat this process until the top is covered.
4. Trim and Fold Edges: Once your lattice is complete, trim any excess dough from the edges and fold the edges of the bottom crust over the lattice strips. Crimp the edges with your fingers or a fork for a decorative touch.
Baking the Lattice-Topped Berry Pie
Baking your pie is where the magic truly happens. The right temperature and technique ensure a perfectly baked pie.
1. Preheat the Oven: Start by preheating your oven to 425°F (220°C). This high temperature helps create a golden, flaky crust.
2. Prepare for Drips: Place a baking sheet on the rack below your pie to catch any drips during baking. This will save you from a messy oven clean-up later.
3. Bake the Pie: Bake your pie in the preheated oven for 15 minutes, then reduce the temperature to 350°F (175°C) and continue baking for an additional 30-40 minutes.
4. Watch for the Signs: The pie is done when the crust is golden brown, and the filling is bubbling. You can also use a thermometer to check that the filling has reached a temperature of about 200°F (93°C).
Cooling and Serving Your Berry Pie
Once baked, it’s crucial to let your pie cool down before slicing, as this allows the filling to set properly.
1. Cooling Time: Allow your pie to cool on a wire rack for at least 2 hours. This waiting period is essential for the filling to thicken and hold its shape when sliced.
2. Serving Suggestions: You can serve your berry pie warm or at room temperature. Consider pairing it with a scoop of vanilla ice cream or a dollop of freshly whipped cream for an extra indulgent experience.
3. Presentation Tips: For an appealing dessert display, consider serving slices of pie on elegant dessert plates. A sprinkle of powdered sugar on top adds a touch of sophistication. You might also add a few fresh berries or mint leaves for color and freshness.
Conclusion
Creating a homemade lattice-topped berry pie is not just about following a recipe; it’s about the joy of baking and sharing a delightful dessert with family and friends. The intricate weaving of the lattice crust serves as a beautiful testament to your effort, while the burst of berry flavors brings a smile to everyone’s face.
As you enjoy your pie, take a moment to reflect on the experience of baking. It’s a wonderful way to create memories in the kitchen, whether alone or surrounded by loved ones. Don’t hesitate to experiment with different berry combinations or personal touches in your next pie-making endeavor. Each attempt is an opportunity to refine your skills and unleash your creativity. So roll up your sleeves, gather your ingredients, and embark on your next pie-baking adventure!