Introduction
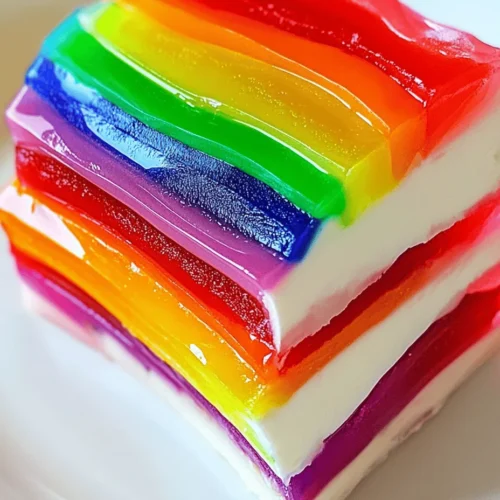
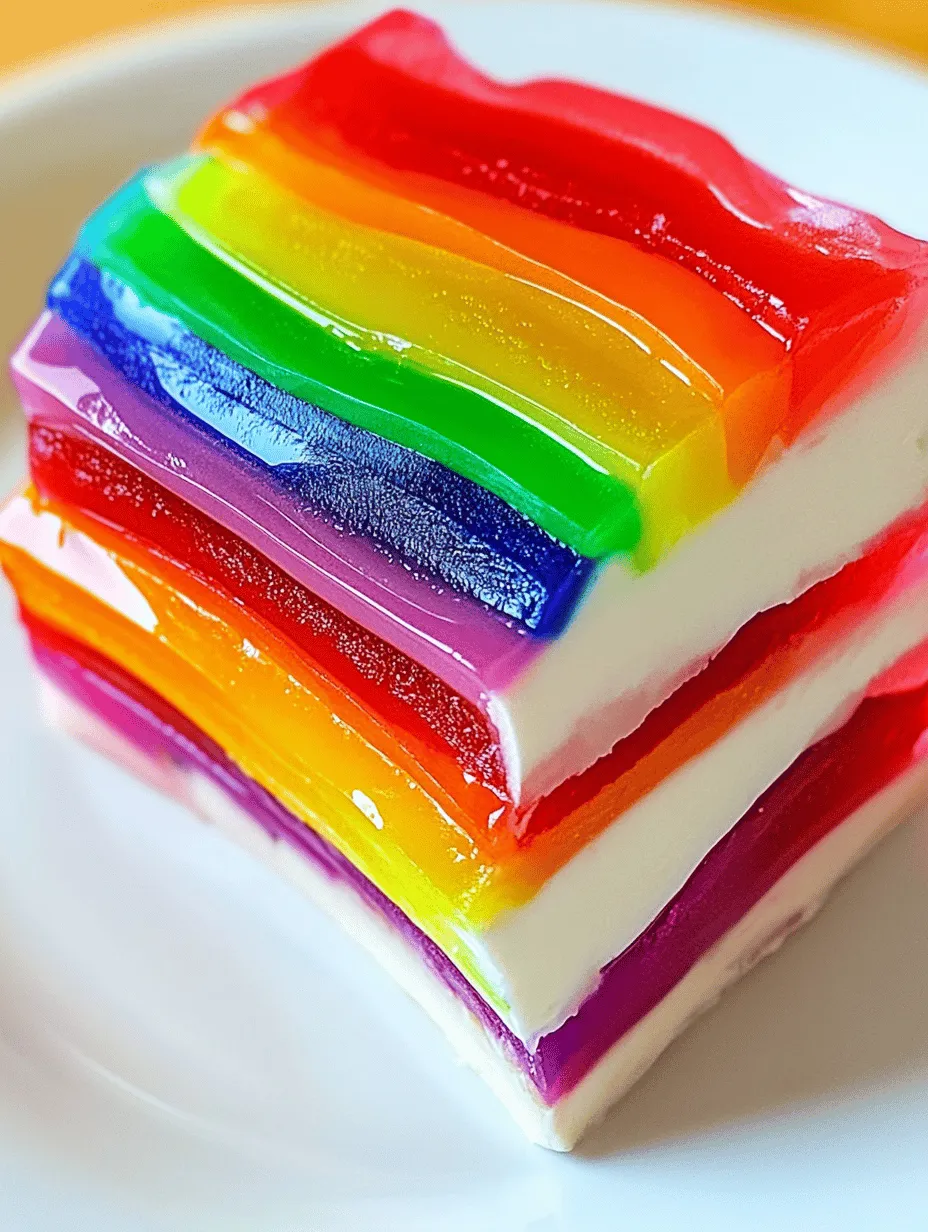
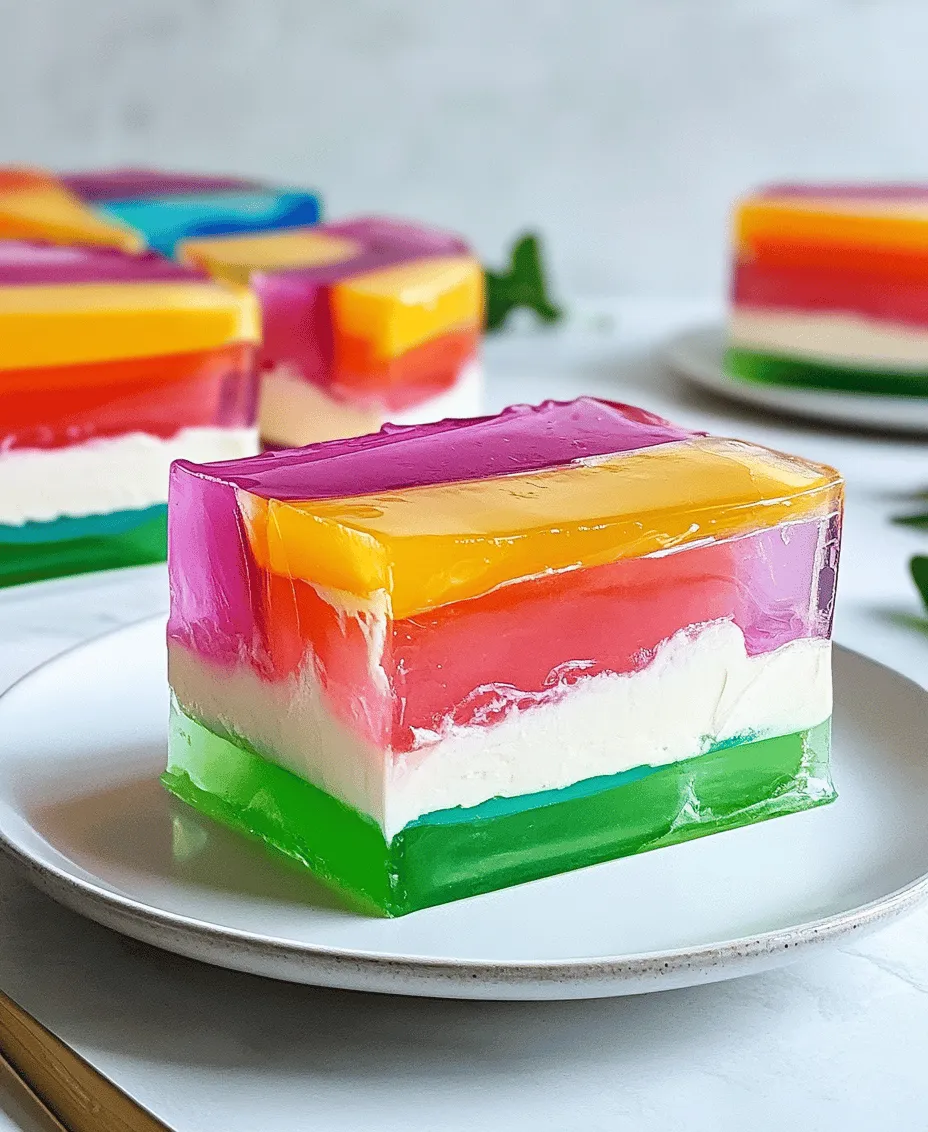
The Creamy Rainbow Jello Mold is a stunning dessert that brings a splash of color and a burst of flavor to any gathering. This delightful treat features multiple layers of vibrant jello, each with its unique flavor, beautifully contrasted by a rich and creamy cream cheese layer. The result is not only a feast for the taste buds but also a visual spectacle that captures the essence of joy and celebration.
This dessert is perfect for parties, birthdays, picnics, and festive occasions where you want to impress your guests. Its whimsical appearance often evokes nostalgia, reminding many of childhood parties and family gatherings filled with laughter and joy. With every slice, the Creamy Rainbow Jello Mold showcases an array of colors, making it an eye-catching centerpiece that can spark conversations and bring smiles to faces.
The Allure of Jello Desserts
Jello desserts have a long-standing tradition in many cultures, often gracing tables during celebrations, holidays, and family events. Their playful and whimsical nature captures the imagination, making them a favorite among both children and adults. The nostalgia associated with jello desserts is undeniable; they have been a staple in potlucks and birthday parties for decades, often evoking fond memories of simpler times filled with laughter and fun.
What makes jello desserts particularly appealing is their versatility. The possibilities are endless when it comes to flavors and colors. From fruity flavors like strawberry, raspberry, and lime to more adventurous combinations like tropical punch or blue raspberry, the choice is yours. This flexibility allows chefs and home cooks to customize their creations to suit their tastes or themes, making each dessert unique.
Moreover, the visually striking nature of jello desserts means they can elevate any occasion. The vibrant layers of color create an enticing presentation that draws people in, inviting them to indulge. In the world of cooking, where visual appeal is as important as taste, the Creamy Rainbow Jello Mold stands out as a showstopper, merging both aesthetics and flavors into one delightful package.
Ingredients Breakdown
To create the Creamy Rainbow Jello Mold, you’ll need a simple yet effective list of ingredients that work harmoniously together. Here’s a breakdown of each component and its role in this fabulous dessert:
– Flavored Gelatin: The heart of this jello mold, flavored gelatin comes in a variety of vibrant colors and tastes. You can choose from classic flavors such as strawberry, orange, lemon, lime, and grape, or opt for more unique flavors like peach or blue raspberry. The choice of flavors not only affects the taste but also contributes to the overall visual appeal. Each layer of gelatin will create a rainbow effect that is sure to impress.
– Cream Cheese: This ingredient plays a crucial role in creating the creamy layer that contrasts beautifully with the gelatin. Cream cheese adds a rich, tangy flavor that balances the sweetness of the gelatin, providing a luscious texture that is both smooth and satisfying. It’s essential to use softened cream cheese to ensure it blends seamlessly with the other ingredients.
– Powdered Sugar: To sweeten the cream cheese layer, powdered sugar is used. This fine sugar dissolves easily, creating a smooth and sweet mixture without the graininess that granulated sugar might impart. The amount of powdered sugar can be adjusted to taste, allowing you to achieve the perfect sweetness level for your cream layer.
– Whipped Cream: Light and airy, whipped cream is a key element in achieving the fluffiness of the cream layer. By folding whipped cream into the cream cheese and powdered sugar mixture, you create a light texture that contrasts nicely with the denser gelatin layers. The whipped cream also adds an additional layer of sweetness and richness, enhancing the overall experience.
– Cooking Spray: While it may seem like a minor detail, cooking spray plays an important role in ensuring that your jello mold comes out of the mold easily. A light coat of cooking spray will prevent the gelatin from sticking, allowing you to unmold it smoothly and present it beautifully to your guests.
Step-by-Step Instructions for the Creamy Rainbow Jello Mold
Now that you have all the ingredients ready, it’s time to dive into the preparation of your Creamy Rainbow Jello Mold. The process is straightforward and involves creating layers of gelatin followed by a luscious cream cheese layer. Let’s break it down step-by-step.
Preparing the Gelatin Layers
1. Choose Your Flavors: Begin by selecting the flavors of gelatin you want to use. Aim for a variety of colors to create a vibrant rainbow effect. You can use a single flavor for each layer or mix and match as you see fit.
2. Dissolve the Gelatin: For each layer, follow the instructions on the gelatin package. Generally, you will need to dissolve the gelatin powder in boiling water. To do this, measure out the required amount of boiling water (usually about 1 cup) and pour it into a mixing bowl. Gradually add the gelatin powder, stirring constantly until it is completely dissolved. This step is crucial; any undissolved granules will create a gritty texture in your finished mold.
3. Add Cold Water: Once the gelatin is fully dissolved, you will typically add cold water to the mixture, as instructed on the package. This helps to cool the mixture down and allows it to set more quickly.
4. Layering the Gelatin: Pour the first layer of gelatin into a mold that has been lightly coated with cooking spray. You can use a traditional bundt pan, a loaf pan, or a decorative mold. Place the mold in the refrigerator and allow the first layer to set completely. This usually takes about 1-2 hours, but check the package instructions for precise times.
5. Continue Layering: Once the first layer has set, repeat the process for each subsequent layer. Make sure to allow each layer to cool slightly before pouring it over the previous layer to prevent mixing. This careful layering technique will create distinct layers of color, resulting in the beautiful rainbow effect when sliced.
Making the Cream Cheese Layer
1. Prepare the Cream Cheese Mixture: While the gelatin layers are setting, you can prepare the cream cheese layer. In a mixing bowl, combine softened cream cheese and powdered sugar. Use an electric mixer on medium speed until the mixture is smooth and creamy without lumps.
2. Fold in Whipped Cream: Once your cream cheese mixture is ready, gently fold in the whipped cream. Be careful not to overmix; you want to maintain the light and airy texture of the whipped cream. This step is vital for achieving the desired fluffiness of the cream layer.
3. Add the Cream Cheese Layer: After the final layer of flavored gelatin has set, it’s time to add the cream cheese layer. Carefully pour the cream cheese mixture over the last gelatin layer, spreading it evenly to cover the entire surface. Smooth it out with a spatula if necessary.
4. Final Set: Return the mold to the refrigerator and allow it to chill for several hours or overnight. This time allows the cream cheese layer to set properly and ensures that the flavors meld beautifully.
Stay tuned for the next part, where we will explore tips for achieving the best results with your Creamy Rainbow Jello Mold and answer some common questions about this delightful dessert.
Important Techniques for Achieving a Smooth Cream Cheese Mixture
When preparing the cream cheese layer for your Creamy Rainbow Jello Mold, the key to a silky, lump-free mixture lies in proper techniques. Start by ensuring your cream cheese is at room temperature; this will make it much easier to blend smoothly. Using a hand mixer or stand mixer, beat the cream cheese until it’s completely smooth before adding any other ingredients. This process should take about 2-3 minutes.
If you find that the cream cheese still has lumps, you can use a spatula to scrape down the sides of the bowl frequently, ensuring that every bit is blended evenly. Additionally, adding a splash of milk, or a dairy-free alternative, while mixing can help achieve that luxurious texture. Always mix on a low to medium speed to avoid incorporating too much air, which can lead to a less dense and more unstable layer.
Tips for Folding in Whipped Cream to Maintain a Light Texture
Once your cream cheese mixture is smooth, it’s time to fold in the whipped cream. This step is crucial for achieving the light, airy texture that makes this dessert so delightful. To do this effectively, start by adding a small amount of the whipped cream to the cream cheese mixture. This initial addition lightens the cream cheese, making it easier to incorporate the rest without losing volume.
Use a rubber spatula to gently fold the whipped cream into the cream cheese mixture using a figure-eight motion. This technique ensures that you’re not overmixing, which can deflate the whipped cream’s air bubbles. Remember, the goal is to maintain that fluffy texture, so be gentle and patient as you combine the two mixtures.
Layering the Jello and Cream Cheese
Layering your Jello and cream cheese is both an art and a science. Proper layering is essential to prevent the mixtures from blending together, which can ruin the beautiful rainbow effect. Begin by preparing your Jello in small batches, allowing each layer to set before adding the next.
Best Practices for Layering to Prevent Mixing and Ensure Clean, Distinct Layers
1. Temperature Control: Ensure that the Jello is cool but not fully set before pouring over the cream cheese layer. A temperature that’s too warm can cause the layers to mix, while a layer that’s too cold may not adhere properly.
2. Pouring Technique: Use a ladle or a measuring cup to pour the Jello slowly over the back of a spoon. This technique diffuses the liquid and helps it land gently on the cream cheese layer, minimizing disruption.
3. Patience is Key: Allow each layer to set completely (about 30-60 minutes) in the refrigerator before adding the next. This patience ensures that your layers remain distinct and visually appealing.
Recommended Types of Molds for the Best Presentation
The type of mold you use for your Creamy Rainbow Jello Mold can significantly impact the final presentation. A clear mold, such as a bundt pan or a gelatin mold, allows the colorful layers to shine through, creating a stunning visual display. Silicone molds are also a great option, as they allow for easy unmolding and tend to release the Jello without sticking.
If you’re looking for a more unique shape, consider themed molds that fit the occasion, such as star or heart shapes for celebrations. Regardless of the mold, ensure it is well-greased with cooking spray to facilitate easy removal later.
Final Assembly and Setting
After layering your Jello and cream cheese mixtures, it’s time for the final assembly. Once all layers have been added, cover the mold with plastic wrap to prevent any odors from the refrigerator from penetrating your dessert. The chilling time typically ranges from 4 to 6 hours, but overnight is even better for optimal results.
Explanation of the Chilling Times and How They Affect the Texture and Stability of the Layers
Chilling times play a crucial role in the texture and stability of your Jello mold. If you rush this step, the layers may not set properly, leading to a soupy or unstable dessert. Each layer needs sufficient time to firm up, ensuring that when the mold is unmolded, the layers hold their shape and maintain their distinct colors.
Importance of Patience in the Layering Process for Optimal Results
Remember, good things come to those who wait! The layering process requires patience and attention to detail, so don’t be tempted to skip any steps. Allowing each layer to set fully will result in a stunning, multi-layered dessert that is as impressive as it is delicious.
Unmolding and Serving Your Jello Mold
After all your hard work, it’s time to unveil your Creamy Rainbow Jello Mold. Unmolding can be tricky, but there are techniques to ensure success without damaging its delicate structure.
Techniques for Successfully Unmolding the Jello Without Damaging Its Structure
1. Warm the Sides: Before unmolding, run warm water over the outside of the mold for about 10-15 seconds. This helps to loosen the Jello from the sides.
2. Loosen the Edges: Use a thin knife or a spatula to gently run along the edges of the mold, creating a space for the air to enter.
3. Invert with Care: Place a serving platter over the top of the mold, then quickly invert the mold. Give it a gentle shake or tap to encourage the Jello to release.
Suggestions for Presentation, Including Serving Platters and Garnishing Ideas
Serve your Jello mold on a large, decorative platter to showcase its vibrant colors. You can garnish the top with fresh fruit, such as berries or kiwi slices, or even add a dollop of whipped cream for an extra touch of indulgence. Edible flowers can also make a beautiful and elegant addition. If you’re feeling adventurous, drizzle a layer of melted chocolate or a fruit coulis around the edges of the platter for an artistic flair.
Nutritional Information and Dietary Considerations
Understanding the nutritional content of your Creamy Rainbow Jello Mold can help you manage dietary needs and preferences. A typical serving contains approximately 150 calories, 5 grams of fat, and 20 grams of carbohydrates, depending on the specific ingredients used.
Possible Substitutions for Dietary Restrictions
For those with dietary restrictions, there are several easy substitutions you can make:
– Sugar-Free Gelatin: Use sugar-free gelatin to reduce calorie content and cater to those watching their sugar intake.
– Dairy-Free Cream Cheese: Brands like Tofutti or Kite Hill offer delicious dairy-free cream cheese options that can easily replace the traditional cream cheese.
– Alternative Sweeteners: If you’re looking to cut out sugar entirely, consider using natural sweeteners like stevia or erythritol in your cream cheese mixture.
Creative Variations of the Rainbow Jello Mold
Once you’ve mastered the classic Creamy Rainbow Jello Mold, the possibilities for customization are endless.
Ideas for Customizing the Recipe
– Flavor Profiles: Experiment with different flavored gelatins, such as tropical fruit, berry, or even coffee-flavored gelatin, to create unique taste combinations.
– Incorporating Fruit: Layer in fresh fruit like sliced strawberries, blueberries, or diced peaches between the Jello layers for added flavor and nutrition.
Suggestions for Themed Jello Molds for Holidays or Events
For special occasions, consider creating themed Jello molds. For example, for a Fourth of July celebration, use red, white, and blue gelatin flavors, or for Halloween, incorporate orange and black layers with candy corn garnishes. Christmas can bring vibrant reds and greens, perhaps with peppermint-flavored layers. Themed molds can add a festive touch to any gathering.
Conclusion
Creating a Creamy Rainbow Jello Mold is not just about the dessert itself; it’s about the joyful experience of making something beautiful and delicious to share with friends and family. The vibrant layers, smooth cream cheese, and delightful flavors all come together to create a dish that’s sure to impress.
Embrace your creativity in the kitchen, experimenting with flavors and colors to make this dessert your own. Whether it’s for a holiday celebration or just a fun weekend project, your Creamy Rainbow Jello Mold will be a highlight at any gathering. So gather your loved ones, share the process, and most importantly, enjoy the delicious results of your efforts.