

Introduction
Exploring the luxurious world of desserts can lead you to extraordinary creations, and few are as indulgent as the Decadent Black Velvet Cake. This delightfully rich cake captivates with its deep cocoa flavor, moist texture, and luscious cream cheese frosting. It’s a fantastic option when you’re seeking something unique for a special occasion or a sweet treat to elevate an ordinary day. Whether you’re gathering with loved ones or celebrating a milestone, this cake serves as a splendid centerpiece that satisfies even the most discerning chocolate lovers.
The allure of the Black Velvet Cake lies not only in its decadent taste but also in its visual appeal. Its dark, velvety appearance is enhanced by cocoa powder and, if desired, black food coloring, creating an aesthetic that is truly eye-catching. As we progress through this article, you’ll gain a complete understanding of how to craft this exquisite dessert, ensuring that every step is crystal clear and simple to follow, allowing you to create a show-stopping cake effortlessly.
Recipe Overview
Understanding the primary elements of the recipe is crucial for achieving perfect results.
Description of the Cake
The Black Velvet Cake is celebrated for its deep, dark color and velvety crumb that melts in your mouth. The unsweetened cocoa powder combined with black food coloring, if used, sets the stage for a visually stunning dessert. But it’s not only a feast for the eyes—each bite delivers a rich chocolate flavor that is both velvety and decadent, making it a memorable treat for all who indulge.
Ideal Occasions for Serving
This cake is an excellent choice for special occasions such as birthdays, anniversaries, or any celebration where you want to impress your guests. Its luxurious character also lends itself well to intimate gatherings where a touch of elegance is desired. Regardless of the event, the Decadent Black Velvet Cake is certain to be a hit.
Special Features of the Recipe
One of the remarkable features of this cake is the combination of buttermilk and hot water, which plays a key role in ensuring the dessert remains moist and tender. The subtle tang from the buttermilk enhances the overall flavor profile, while the cream cheese frosting provides a delightful balance to the cake’s sweetness, giving it depth and richness that’s simply irresistible.
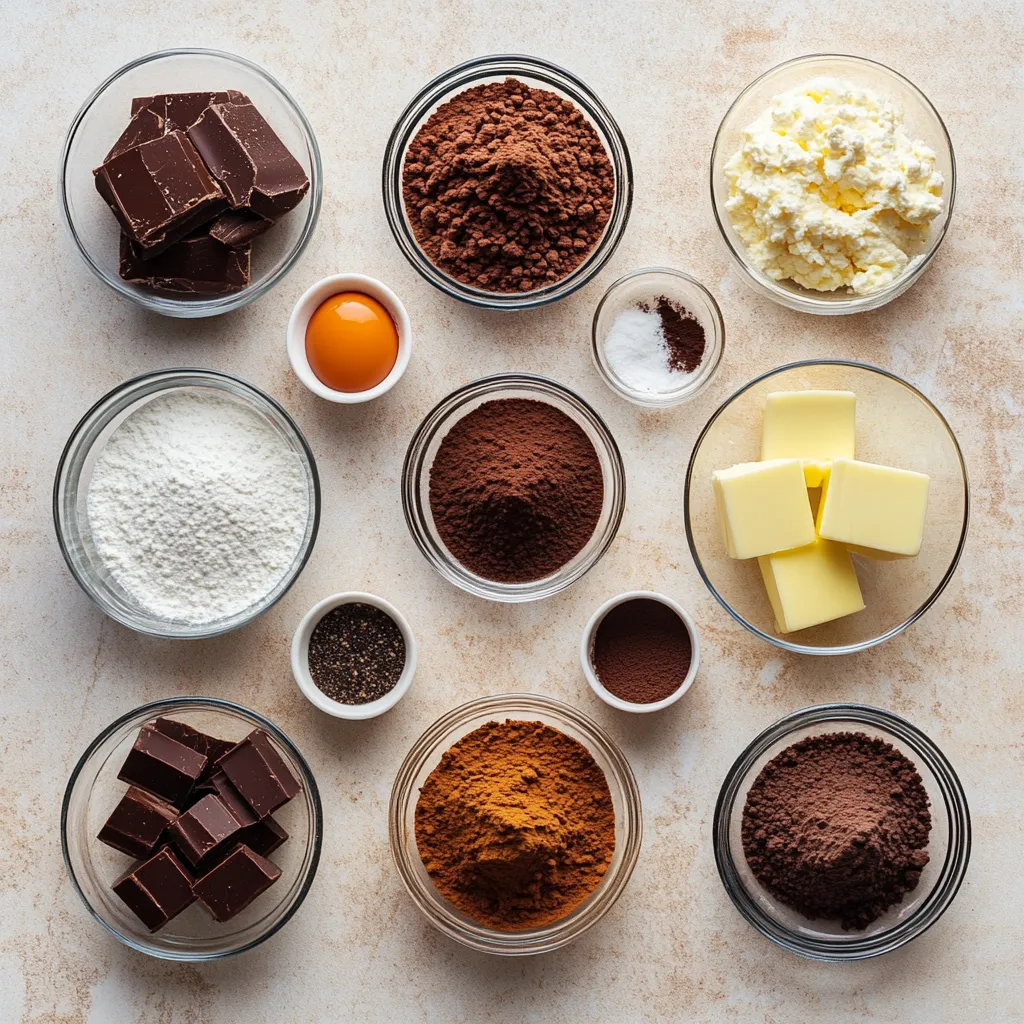
Ingredients
A detailed breakdown of the ingredients used in this decadent cake.
Cake Ingredients
– All-purpose flour: Provides structure and stability to the cake.
– Granulated sugar: Sweetens the cake and adds moisture.
– Unsweetened cocoa powder: Delivers a rich chocolate flavor.
– Baking soda and baking powder: Act as leavening agents.
– Salt: Enhances the overall flavor.
– Buttermilk: Contributes to the moistness and tangy flavor.
– Vegetable oil: Keeps the cake tender and adds moisture.
– Eggs: Provide essential binding and structure.
– Vanilla extract: Enriches the cake’s flavor profile.
– Hot water: Thin out the batter for a lighter texture.
– Black food coloring (optional): Intensifies the cake’s color.
Frosting Ingredients
Details of what goes into the creamy topping.
– Cream cheese: Forms the base of the frosting, providing a creamy texture and tang.
– Unsalted butter: Adds richness and smoothness.
– Powdered sugar: Sweetens the frosting and gives it body.
– Vanilla extract: Enhances flavor depth.
– Heavy cream (optional): Creates a fluffier frosting texture.
Instructions
Step-by-step guidance on baking the perfect black velvet cake.
1. Preheat the Oven: Start by preheating your oven to 350°F (175°C). Prepare two 9-inch round cake pans by greasing them with butter and dusting them with flour. Set aside to ensure they are ready to receive the batter.
2. Combine Dry Ingredients: In a large mixing bowl, sift together the all-purpose flour, granulated sugar, cocoa powder, baking soda, baking powder, and salt. Ensure the mixture is well combined and aerated, as this will aid in the cake’s leavening and overall texture.
3. Mix Wet Ingredients: In a separate bowl, whisk together the buttermilk, vegetable oil, eggs, and vanilla extract until the mixture is smooth and uniform. This step is crucial for achieving a consistent batter.
4. Combine Mixtures: Gradually pour the wet ingredients into the dry ingredients, stirring gently until just combined. It’s important to be cautious not to overmix the batter, as this can negatively affect the cake’s texture, making it denser than desired.
5. Incorporate Hot Water: Carefully stir in the hot water along with the optional black food coloring until the batter is smooth. Expect the batter to be quite thin; this is normal for this cake, and the additional moisture will contribute to the cake’s delectable crumb.
6. Bake the Cakes: Evenly distribute the batter between the prepared cake pans. Place them in the preheated oven and bake for 30-35 minutes, or until a toothpick inserted into the center of the cakes comes out clean, ensuring the cakes are perfectly baked.
7. Cool the Cakes: Once baked, remove the cakes from the oven and let them cool in their pans for about 10 minutes. Afterward, carefully transfer them to a wire rack to cool completely. This step is vital for preventing the cakes from becoming soggy.
8. Prepare the Frosting: In a large mixing bowl, beat the softened cream cheese and unsalted butter together until the mixture is creamy and smooth. Gradually add the powdered sugar, mixing until fully incorporated. Stir in the vanilla extract and heavy cream (if using) to achieve your desired frosting consistency.
9. Assemble the Cake: Once the cakes are completely cooled, place one layer on a serving plate. Generously spread cream cheese frosting over the top layer. Carefully place the second cake layer on top and frost the top and sides of the cake with the remaining cream cheese frosting.
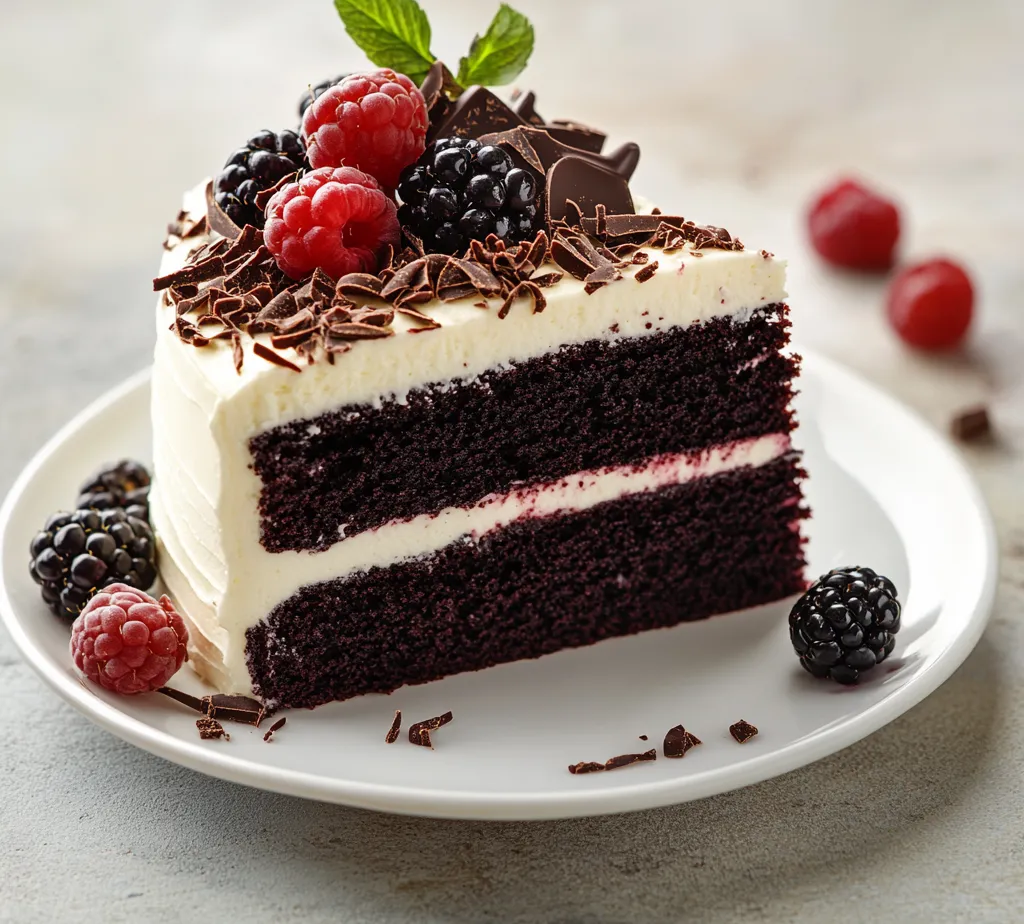
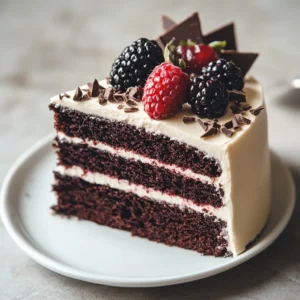
10. Decorate and Serve: For an elegant touch, consider decorating the cake with chocolate shavings or fresh berries. When ready to serve, slice the cake into pieces, revealing the delightful contrast of the rich chocolate against the creamy frosting.
Preparing the Cake
The process of creating a Decadent Black Velvet Cake starts with proper preparation, ensuring that every component comes together seamlessly to create a beautiful, indulgent dessert.
Preheating the Oven
Understanding the importance of preheating is fundamental to baking. When you preheat your oven to 350°F (175°C), you ensure that it reaches the ideal temperature for even baking. This step is essential, as it helps the cake rise properly, creating that light and fluffy texture we desire. Preparing your pans by greasing and dusting them is equally vital; it prevents the cakes from sticking, allowing for easy removal after baking for a perfect presentation.
Mixing Dry Ingredients
Sifting together your dry ingredients—such as flour, cocoa powder, and leavening agents—is a critical step that not only ensures there are no lumps in your mixture but also aerates it. This aeration is essential for creating a light texture. When you combine the dry ingredients thoroughly in a bowl, you lay the foundation for your cake’s structure, which will ultimately contribute to its delightful texture and taste.
Mixing Wet Ingredients
In a separate bowl, mixing the wet ingredients carefully is equally crucial. Whisking buttermilk, eggs, vegetable oil, and vanilla extract together until smooth helps to unite these components, ensuring each slice of cake is consistently flavorful and moist. Achieving a homogenous mixture means that every bite will offer the ideal balance of flavor and texture, enhancing the overall dessert experience.
Combining Mixtures
Combining the wet and dry ingredients requires a delicate touch. Gradually pouring the wet mixture into the dry while stirring gently is the key to avoiding overmixing. Overmixing can result in a tough cake, while gently folding the batter keeps it airy and light. This technique emphasizes how important the mixing method is to baking; it can make or break the final texture of the cake.
Adding Hot Water
The addition of hot water plays a pivotal role in the Decadent Black Velvet Cake recipe, as it produces a thinner batter that bakes into a moist and tender crumb. The heat from the water activates the cocoa and the leavening agents, enhancing the flavors and ensuring proper rise. Understanding this step will elevate your baking game, making the transition from an ordinary cake to an extraordinary one.
Baking Process
Finally, the baking process is where all your preparation culminates. Properly distributing the batter and timing the bake is crucial. Keeping an eye on your cakes in the oven will ensure they do not overbake, preserving their moist texture. Following these steps carefully will lead you to a beautifully baked Decadent Black Velvet Cake that you will be proud to serve. The combination of rich chocolate flavor and velvety frosting results in a truly indulgent dessert that leaves a lasting impression.
Cooling the Cakes
Proper cooling is essential in ensuring that your black velvet cakes maintain their integrity and flavor as well as provide a smooth foundation for frosting.
Initial Cooling in the Pan
After removing the cakes from the oven, it’s crucial to allow them to cool in their pans for approximately 10 minutes. This step helps the cakes settle and reduces the risk of them collapsing or breaking apart when transferred. Cooling in the pans also allows for the residual heat to continue gently cooking the cakes, helping to prevent a dense or gummy texture.
Transferring to a Wire Rack
Once the initial cooling period is complete, it’s time to transfer the cakes to a wire rack to cool completely. To do this safely, gently run a thin knife or an offset spatula around the edges of the pans to loosen the cakes. Place a wire rack over the top of each cake pan and flip the pan upside down, allowing the cake to gently release onto the rack. If the cakes don’t fall out easily, a few gentle taps on the counter can help. This method minimizes the risk of breaking the cake and ensures it remains level and uniform.
Cream Cheese Frosting Preparation
Creating the creamy frosting is key to making your black velvet cake truly decadent.
Beating the Cream Cheese and Butter
Start by placing softened cream cheese and unsalted butter in a large mixing bowl. Beat the two together on medium speed until the mixture transforms into a smooth, creamy consistency. This process is crucial for incorporating enough air, leading to a light and fluffy frosting. It’s recommended to scrape down the sides of the bowl periodically to ensure all the ingredients are blended evenly.
Incorporating Powdered Sugar
Once the cream cheese and butter are well combined, gradually add in the powdered sugar. To prevent a sweet cloud of sugar from enveloping your kitchen, add it in batches and mix on a low speed until incorporated. After each addition, increase the speed to medium-high until the sugar is fully mixed in. This method avoids mess and ensures that your frosting achieves the desired even texture.
Achieving the Right Consistency
To adjust the thickness of your frosting, consider using heavy cream. If the frosting is too thick, mixing in a tablespoon or two of heavy cream can add moisture and lightness. Conversely, if your frosting is too thin, you can simply add a little more powdered sugar until the desired consistency is achieved. The perfect frosting should be spreadable but also hold its shape well enough to create a beautiful finish on your cake.
Assembling the Cake
Careful assembly helps create an impressive black velvet cake that not only tastes good but also looks stunning.
Layering the Cake
When layering the cakes, ensure that both layers are completely cooled to avoid melting the frosting. Gently place the first layer on a serving plate or a turntable, ensuring it is centered. It’s helpful to use a serrated knife to even out the tops of both layers if they have domed as they baked. This ensures a flat surface, which creates a stable base for the layers.
Frosting Between Layers
Spread an even layer of cream cheese frosting over the top of the first cake layer. Use an offset spatula to distribute the frosting uniformly, reaching the edges for a well-done appearance. Consider applying a slightly thicker layer of frosting between the layers to prevent the cake from becoming dry, providing a delightful creaminess in every bite.
Frosting the Outside
Using the same frosting, spread a generous amount over the top and sides of the cake. Start by applying a “crumb coat,” which is a thin layer of frosting that seals in any crumbs. Refrigerate for about 15 minutes to set this first coat. Then, return to add a thicker second layer, smoothing it out with a spatula or a bench scraper for a polished finish. Creating sharp edges and a smooth surface gives the cake a professional look.
Decorative Touches
A well-decorated cake not only enhances visual appeal but also invites guests to indulge.
Chocolate Shavings
Creating chocolate shavings can be done easily with a vegetable peeler on a block of chocolate. If using a dark chocolate bar, gently shave off thin pieces. Sprinkle these shavings over the top or along the sides of the completed cake for a touch of elegance.
Using Fresh Berries
Fresh berries, such as raspberries or strawberries, can add a vibrant burst of color contrasting beautifully with the dark cake. Rinse and pat dry your berries before placing them artistically on the top of the cake or strategically along the sides. This not only enhances presentation but also adds a fresh flavor complementing the richness of the cake.
Optional Chocolate Ganache Drizzle
To create a luscious chocolate ganache, heat equal parts heavy cream and chocolate chips, stirring until smooth. Allow it to cool slightly before drizzling it over the top of the frosted cake, letting it run down the sides. This adds a layer of richness that elevates the overall appearance and taste.
Serving Suggestions
Presenting your black velvet cake beautifully can enhance the dining experience.
Slicing Techniques
To ensure even slices that maintain the cake’s structure, use a sharp serrated knife. It’s advisable to clean the knife between cuts to prevent crumbling and maintain a tidy appearance. For best results, consider warming the knife in hot water before slicing, ensuring smoother cuts.
Pairing with Beverages
This decadent cake pairs well with a variety of beverages. Coffee, with its bitter notes, competently balances the sweetness of the cake. Alternatively, sparkling wines or dessert wines like port or dessert-style rosé can accentuate the chocolate flavor, making the experience even more delightful.
Serving Temperature
For optimal flavor, serve the black velvet cake at room temperature. Allow it to sit out for about 30 minutes before serving. This ensures that the cream cheese frosting softens slightly and the flavors meld beautifully, enhancing the tasting experience.
Storing Leftovers
To keep the leftover cake fresh and enjoyable for days to come, proper storage is vital.
Refrigeration Tips
Store the cake in an airtight container in the refrigerator, ensuring it retains moisture while avoiding unpleasant odors from other food. If the cake is unfrosted, consider wrapping it tightly in plastic wrap to maintain softness and avoid drying out.
Freezing
If you want to freeze leftover black velvet cake, wrap the unfrosted layers individually in plastic wrap, then place them in a freezer-safe container or bag. For frosted cake, it’s best to freeze it uncovered for about 30 minutes until the frosting is firm, then wrap it tightly. Thaw in the refrigerator before serving for the best texture.
In conclusion, the black velvet cake features a rich flavor and soft texture that is sure to please. With attention to detail during assembly and presentation, you can create a stunning dessert that highlights its luxurious attributes. The preparation and storage tips ensure that this cake can be enjoyed on various occasions, maintaining its deliciousness.
Decadent Black Velvet Cake Recipe for Special Occasions
Ingredients
- 2 cups all-purpose flour
- 1 ½ cups granulated sugar
- ¾ cup unsweetened cocoa powder
- 1 teaspoon baking soda
- ½ teaspoon baking powder
- ½ teaspoon salt
- 1 cup buttermilk
- ½ cup vegetable oil
- 2 large eggs
- 2 teaspoons vanilla extract
- 1 cup hot water
- 1 tablespoon black food coloring
- 8 oz cream cheese
- ½ cup unsalted butter
- 4 cups powdered sugar
- 2 teaspoons vanilla extract
- 2 tablespoons heavy cream
Instructions
- Preheat your oven to 350°F (175°C) and prepare two 9-inch round cake pans.
- Sift together the flour, sugar, cocoa powder, baking soda, baking powder, and salt in a large bowl.
- In a separate bowl, whisk the buttermilk, vegetable oil, eggs, and vanilla extract until smooth.
- Gradually mix the wet ingredients into the dry ingredients until just combined.
- Stir in the hot water and optional black food coloring until the batter is smooth.
- Distribute the batter evenly between the prepared pans and bake for 30-35 minutes.
- Cool the cakes in their pans for 10 minutes, then transfer to a wire rack to cool completely.
- Beat the cream cheese and butter until creamy, then add powdered sugar and mix until smooth.
- Frost the cooled cakes with cream cheese frosting, layering and covering the top and sides.
- Decorate as desired and serve.